Post JSON to FlowForce Web Service
This example shows you how to create a FlowForce Web service that accepts POST requests carrying JSON data in the HTTP request body. Secondly, it illustrates how to call the Web service from a client like MapForce.
In this example, the Web service will be configured to accept JSON data. You could also post XML or other content to a service created with FlowForce Server in a similar way as shown below. The Web service is intended to be very simple so it will merely accept JSON data and save it locally without any further processing. It is possible to further extend the job to validate the JSON data with RaptorXML Server, or process it, although this will not be done in this example.
This example specifically illustrates the case when data is posted in the body of the HTTP request, not as a parameter. For an example that invokes a Web service with parameters, see Expose a Job as a Web Service.
Prerequisites
•Required licenses: FlowForce Server, MapForce Enterprise Edition.
Remarks FlowForce Server provides a quick way to create the Web service. MapForce Enterprise Edition acts as a client that calls the Web service created with FlowForce Server. You may also use a different client and achieve the same result. |
•The FlowForce Web Server and FlowForce Server services must be listening at the configured network address and port
•You have a FlowForce Server user account with permissions to one of the containers (by default, the /public container is accessible to any authenticated user)
•This job saves input data received by the Web service to a local working directory, C:\FlowForceExamples\PostJson. This directory (or a similar one) must exist on the machine where FlowForce Server runs, and your operating system user account must have rights to write to this directory.
Creating the FlowForce job
Log in to the FlowForce Server Web administration interface, open the /public/Examples container, and then click Create Job. Next, enter a name and, optionally, a description for the Web service you are creating.
Note: The public/Examples container should already exist if you followed the previous examples; otherwise, create it using the Create | Create Container command.

In order for the job to treat the POST data as arbitrary content, it must have exactly one parameter of type stream. To create the parameter, click Add parameter  , enter a parameter name (in this example, "data"), and select stream as data type.

Next, add a new execution step and configure it as follows:
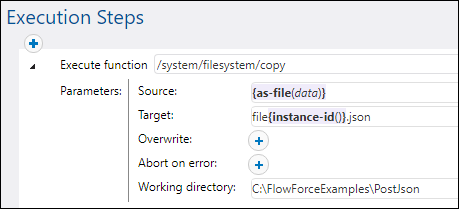
The execution step above calls the FlowForce built-in copy function. The expression shown in the "Source" text box converts the input received by the Web service to a file by using the as-file expression function (recall that the input parameter was named data in a previous step). To obtain this expression automatically, click the  button next to the "Source" text box and then select data.
The "Target" text box contains an expression that produces a unique file name each time when the job is invoked. To obtain the unique file name, the FlowForce instance-id expression function is called; therefore, the JSON file name will look something like "file35.json", and the number will be different with each job call (corresponding to the ID of that FlowForce job instance). You could also enter a full path, but it is not necessary if the "Working directory" path is set, as it was done in this example. When you set the working directory path, any relative file name will be resolved relative to the working directory path.
The directory C:\FlowForceExamples\PostJSON (or a similar one if you changed the path) must exist and your operating system user account must have rights to write to it. |
Under "Service", select the Make this job available via HTTP check box, and enter "PostJsonService" or a similar name for the new Web service. Take notice of the service name; you will need it to call the Web service.

Under "Credentials", select an existing credential record or specify a local credential (see also Credentials). These must be the credentials of the user account on the operating system where FlowForce Server runs.
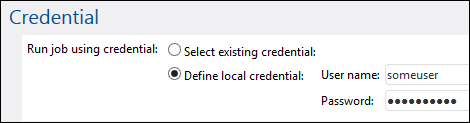
Note: Do not confuse these credentials with the ones used to access the FlowForce Server Web administration interface.
Click Save. You are now ready to call the new Web service from a client.
Calling the Web service from a browser
You can call the Web service from a browser in any of the following ways:
•Go to the Home page and click Show all active triggers and services. Next, click the job's URL displayed in the Info column.
•Enter http://127.0.0.1:4646/service/PostJsonService in the browser's address bar. Note that this URL works only if the FlowForce Server service listens at the default host address and port name. If you have defined other host and port settings on the Setup page, change the address accordingly.
•If you set the optional Host name field of FlowForce Server on the Setup page, you can execute the web service call directly from the job configuration page, by clicking the  button adjacent to the Make this job available via HTTP check box. The button is not displayed otherwise.
If you are asked for credentials when you access the Web service, supply the same credentials you use to log on to FlowForce Server.
Important Supplying your FlowForce Server user credentials for HTTP authentication is only for testing purposes. For production, it is recommended to create a new FlowForce user, grant the Service - Use permission to this user on the container where the job is, and then access the Web service with the corresponding user account. To disable HTTP authentication and make the Web service public, grant the Service - Use permission to the user Anonymous. For details, see How Permissions Work. |
Because the job was configured to expect a stream as parameter, you are now prompted to enter the parameter value in the browser. Click Browse and select the JSON file to be submitted in the POST request.
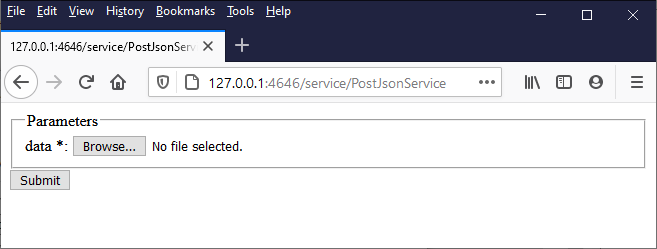
When you click Submit, FlowForce Server processes the job and outputs the response to the browser.
If the job executes successfully, the browser displays "true" and the JSON file is saved to the working directory C:\FlowForceExamples\PostJson. Otherwise, if you see an execution error, refer to the job log for more details, see Viewing the Job Log.
Calling the Web service from MapForce
You can also call the Web service from a client other than the Web browser, for example, from MapForce Enterprise Edition.
1.On the File menu, click New to create a new mapping.
2.On the Output menu, click Built-in Execution Engine.
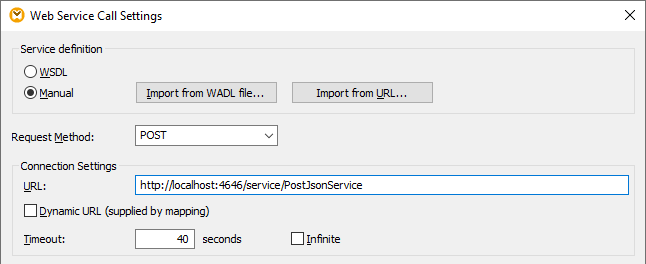
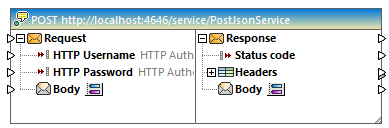
3.On the Insert menu, click Web Service Function. The Web Service Call Settings dialog box opens.
4.Click Manual, choose POST as request method, and enter the URL of the web service in the URL box. This is the same URL that was used to test the Web service from the browser.
5.Click the Edit button next to "HTTP Security Settings", and select the Dynamic authentication check box. This makes it possible to supply the credentials interactively as input parameters to the mapping when the mapping runs. For information about the Use credential option, see Credentials in Mapping Functions. Entering the username and password directly in this dialog box is supported only for backward compatibility and is not recommended.

6.Click OK to close the dialog box. The mapping now looks as follows:
7.Add to the mapping three input parameters, by selecting the Insert | Insert Input menu command. The first two will supply the username and password, respectively. The third will supply the JSON data.
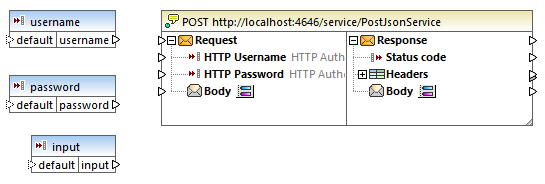
8.Double-click each of the input components above, and enter a design-time execution value to be used for previewing the mapping. For the first two parameters, enter the username and password required to access the Web service—these are necessary to run the mapping, and, for security reasons, it's not recommended to save them in the mapping file. For the parameter that will supply JSON data, enter some sample JSON data to be used for executing this mapping at design time, like the one shown below:
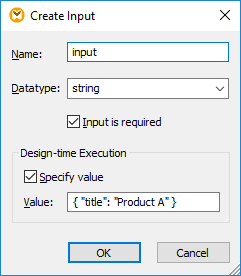
Note: The sample JSON data shown here is very short, for demo purposes. When MapForce Server runs the mapping, you can supply the JSON data as input parameter to the mapping from an actual JSON file.
9.Add the output of the mapping, by selecting the Insert | Insert Output menu command.
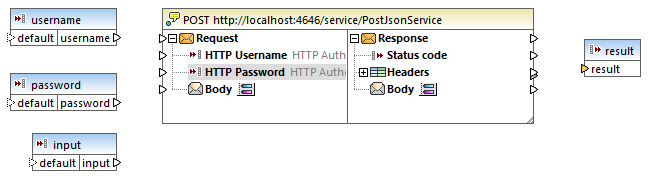
10.Drag the charset-encode and mime-entity functions from the Libraries window and make all the connections as shown below. You will also need to add two constants, by selecting the Insert | Constant menu command.
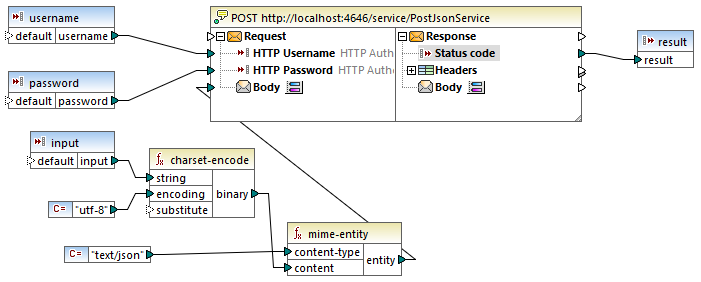
In the mapping above, the JSON input is provided to the mapping by means of a simple input component. The charset-encode and mime-entity functions are MapForce built-in functions that prepare the body of the HTTP request. The status code returned by the Web service is mapped to the result returned by the mapping.
Preparing the body of the HTTP request in an unstructured manner as shown above is just one of the ways to send data in the POST request. For JSON and XML structures, you can enter the JSON or XML schema of the request in the "Web Service Call Settings" dialog box instead. In this case, the body of the Web service component provides mapping inputs (connectors) based on the JSON/XML structure of the request. |
You can now execute the mapping with MapForce, by clicking the Output tab. If an error occurs, it is displayed in the Messages window. To debug, you may need to check the FlowForce Server log as well (assuming that the POST request reached the server). Otherwise, if execution is successful, the following happens:
1.The HTTP status code "200" is displayed in the Output pane.
2.On the server side, the submitted JSON data is written to a file and saved to the C:\FlowForceExamples\PostJson directory.
The exact behavior of the mapping in case of an error can be further configured from MapForce. Also, the mapping can be run with MapForce Server, or be deployed to FlowForce Server, and turned into a job or even another Web service. For further information, refer to MapForce documentation https://www.altova.com/documentation.