Customizing Class Diagrams
Expanding / hiding class compartments in a UML diagram
There are several methods of expanding the various compartments of class diagrams.
•Click on the + or - buttons of the currently active class to expand/collapse the specific compartment.
•Use the marquee (drag on the diagram background) to mark multiple classes, then click the expand/hide button. You can also use Ctrl+Click to select multiple classes.
•Press Ctrl+A to select all classes, then click the expand/collapse button, on one of the classes, to expand/collapse the respective compartments.
Expanding / collapsing class compartments in the Model Tree
In the Model Tree classes are subelements of packages and you can affect either the packages or the classes.
•Click the package / class you want to expand and:
▪Press the * key to expand the current package/class and all sub-elements
▪Press the + key to open the current package/class.
To collapse the packages/classes, press the - keyboard key.
Note that you can use the standard keyboard keys, or the numeric keypad keys to achieve this.
Changing the visibility type icons
Clicking the visibility icon to the left of an operation ![]() , or property
, or property ![]() , opens a drop-down list enabling you to change the visibility status. You can also change the type of visibility symbols that you want to see.
, opens a drop-down list enabling you to change the visibility status. You can also change the type of visibility symbols that you want to see.
•Click a class in the diagram window, click the Styles tab and scroll down the list until you find the Show Visibility entry.
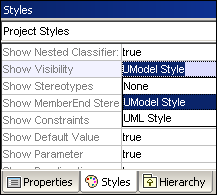
You can choose between the UModel type shown above, or the UML conformant symbols shown below.
Showing or hiding node content (class attributes, operations, slots)
In class diagrams, you can show or hide specific members of a class, such as attributes or operations. You can show or hide not only individual members but also multiple members of the same type according to their visibility. For example, you can hide only those class attributes that have private visibility. Showing or hiding is also supported for object slots (InstanceSpecifications) in Object diagrams.
To show or hide class members or object slots:
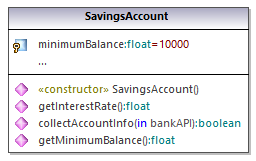
1.Right-click a class (for example, SavingsAccount from the example Bank_MultiLanguage.ump project) and select Show/Hide Node content from the context menu.
2.Select or clear the check box next to the members you want to show or hide, respectively.
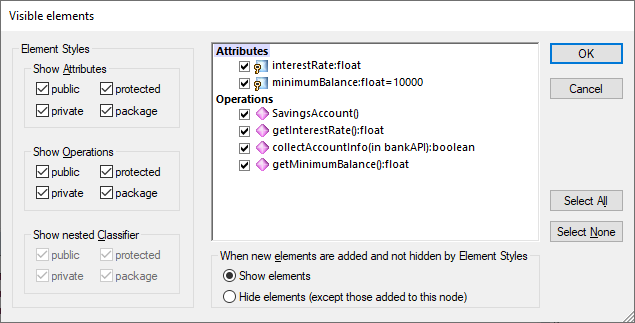
To show or hide multiple members based on their visibility, use the check boxes in the Element Styles group. For example, clearing the protected check box in the Show Attributes group hides all protected attributes of the class.
Note: Tagged values of hidden elements are also hidden when you select the hide option.
After you confirm your preferences with OK and close the dialog box, any hidden members on the diagram are replaced by the ellipsis ... symbol. To open the dialog box again, double-click the ellipsis.
The When new elements are added and not hidden by Element Styles option allows you to define what will be made visible when new elements are added to the class. This applies not only to elements added manually in the diagram or in the Model Tree, but also to those added automatically during the code engineering process. The valid values for this option are as follows:
Show elements | When a new member is added to the class, show it on the diagram. Nevertheless, if any of the options set under "Element styles" dictate that the element must be hidden, hide it. |
Hide elements (except those added to this node) | Here, the term "node" refers to the current instance of the class on the diagram. (Recall that the same class can be added multiple times on the same diagram, see Renaming, Moving, and Copying Elements.)
When two or more instances of the same class exist on the diagram, and when a new member is added to this instance of the class, then hide the member in all instances of the class but show it for the current instance. |
For an example of how the options above are useful, open the Bank_MultiLanguage.ump example project, and find the "Hierarchy of Account" class diagram.
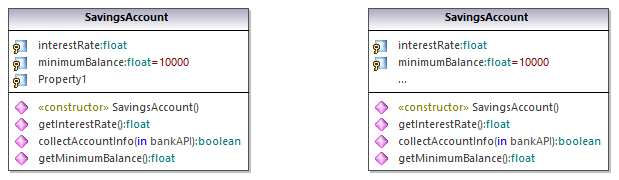
Next, create a new instance of the SavingsAccount class, as follows:
1.Right-click the SavingsAccount class in the diagram and select Copy.
2.Right-click an empty area in the same diagram and select Paste in this diagram only from the context menu.
There are now two instances of the SavingsAccount class on the diagram.

Next, set different visibility options in each of the instances:
1.Right-click the left instance of the class, select Show/Hide Node content, and then select the Show elements option.
2.Right-click the right instance of the class, select Show/Hide Node content, and then select the Hide elements (except those added to this node) option.
Next, add a new property to the left instance (select the class and press F7). As illustrated below, the new property (Property1) is visible in the left instance but not visible in the right instance. This happens because the right-side instance of the class has the the Hide elements (except those added to this node) option enabled.
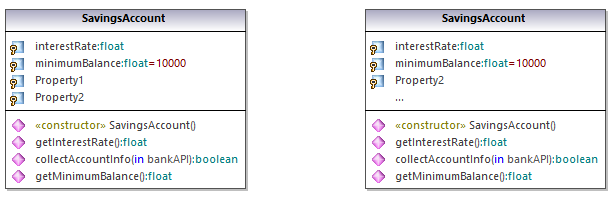
Finally, add a new property to the right-side instance of the class. As illustrated below, the new property (Property2) is visible in both instances. This happens because the left-side instance is configured to show new elements, while the right-side instance is the current instance where the property is added, so the new property is shown unconditionally.
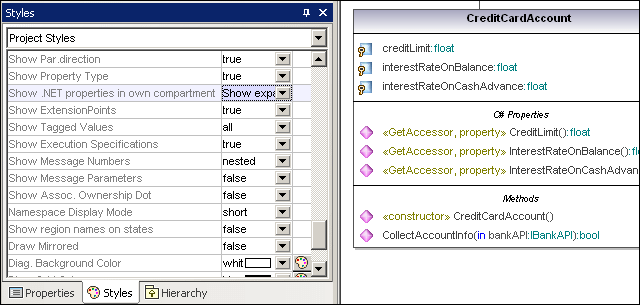
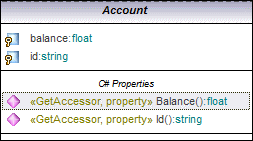
Showing or hiding .NET compartments
To display .NET properties in their own compartment, select the "Show .NET properties in own compartment" option in the Styles tab.
Showing .NET properties as associations
To display .NET properties as associations, right-click a C# property as shown below, and select Show | All .NET Properties as Associations from the context menu.
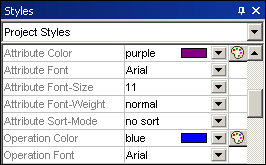
Changing the syntax coloring of operations/properties
UModel automatically enables syntax coloring, but lets you customize it to suit your needs. The default settings are shown below.
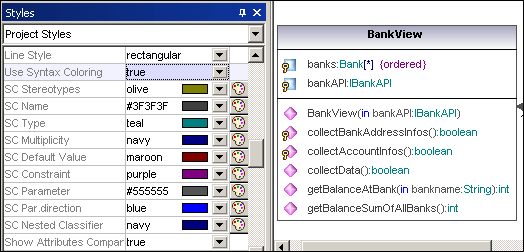
To change the default syntax coloring options (shown below):
1.Switch to the Styles tab and scroll the SC prefixed entries.
2.Change one of the "SC color" entries e.g. "SC Type" to "red".
To disable syntax coloring:
1.Switch to the Styles tab and change the Use Syntax Coloring entry to false.
2.Use the Attribute Color, or Operation Color entries in the Styles tab to customize these items in the class.