Example: Generate C# Code
This example shows you how to generate C# code with UModel. You will first create a sample C# namespace that contains a couple of classes, configure the project for code generation, and then generate the actual code.
In this example, the target platform is .NET Standard 2.0 for C# 7.1. This is possible thanks to a profile built into UModel that defines all the types of .NET Standard 2.0 for C# 7.1. UModel also includes built-in profiles for specific .NET Framework versions. For details, see Including Subprojects.
Create a new project and its structure
The first step is to create an empty project that has two default packages (Root and Component View): Click New in the File menu or in the toolbar. Next, right-click the Root package and create a few more packages, as illustrated below. If you are new to the UModel graphical user interface, see the UModel Tutorial and How to Model sections to get started.
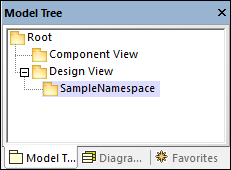
In this example, the Design View package acts as a container for the design part of your model (e.g., classes and class diagrams), while the SampleNamespace package acts as a namespace for all classes that are to be created. In general, you can organize your packages differently.
Code engineering
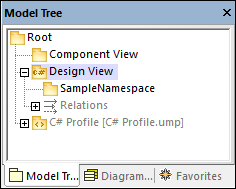
The next step is to set C# for our package. Right-click the Design View package and select Code Engineering | Set as C# Namespace Root from the context menu. UModel will inform you that the C# profile will be applied to the package. Click OK. The C# profile built into UModel has just been included in the project (see screenshot below).
Set SampleNamespace as namespace
Next, click the SampleNamespace package and select the <<namespace>> check box in the Properties window. This applies the namespace stereotype to the package, and its icon changes to  . You can now create classes under this namespace.
Include a subproject
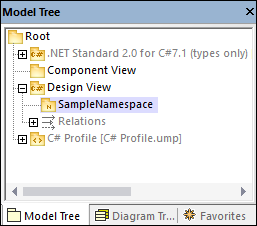
So far, the model includes the C# profile, which contains the data types applicable to C#. However, the model does not yet include the types specific to .NET Standard 2.0 (these are available in a separate UModel profile). To add this profile to the project, do the following:
1.Go to the Project menu and select Include Subproject.
2.Switch to the C# tab and select .NET Standard 2.0 for C# 7.1 (types only).
3.Select Include by reference in the Include Subproject dialog and click OK.
The additional profile has been added to the project (see below).
Create C# classes
The next step is to create classes, which you can do directly in the Model Tree pane or from a class diagram. For this example, we have chosen the second option. Follow the steps below:
1.Open the Diagram Tree pane.
2.Right-click Class Diagrams and select New Diagram | Class Diagram.
This example assumes that all your classes must be generated under the SampleNamespace namespace. Therefore, when prompted to select an owner for the diagram, select the SampleNamespace package. If you choose a different package, any elements that you add to the diagram will belong to the same package as the diagram (which may or may not be the intended goal).
Create classes and their structure
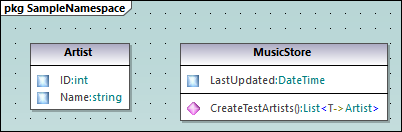
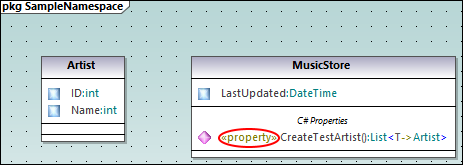
Next, create classes, types, and other elements required in your model. For our example, you can create a simple diagram that contains an Artist class and a MusicStore class (see screenshot below). Follow the instructions below:
1.Right-click inside the pkg SampleNamespace window and select New | Class.
2.Name this class Artist.
3.Right-click inside the Artist box and create two properties: ID of type int and Name of type string.
4.Create the second class called MusicStore.
5.Create a property called LastUpdated of type DateTime.
6.Create an operation and type its name and definition as shown below.
For more information about designing classes and their members, see the Class Diagrams and How to Model sections.
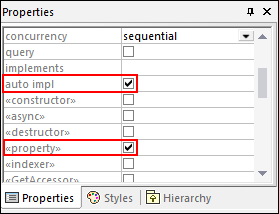
About auto-implemented C# properties
In UModel, you can see whether C# properties have been auto-implemented. The auto-implementation option becomes available after the property check box has been selected (for CreateTestArtist() in our example) in the Properties window (see screenshots below).
Add documentation (optional)
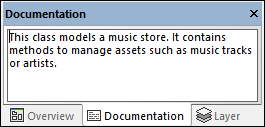
Optionally, click the MusicStore class in the diagram and add some documentation by typing the text in the Documentation window (see screenshot below). This lets you generate code comments for this class.
Configure the project for code engineering
In the next step, we need to define code engineering settings. Take the steps below:
1.Save the project to a directory.
2.Then right-click the Component View package in the Model Tree pane and add a new Component ![]() (that is, a software component) to it.
(that is, a software component) to it.
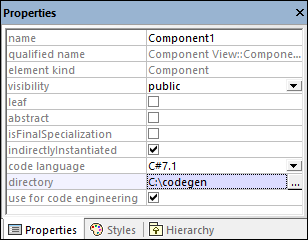
3.Click the new software component and set the following properties in the Properties window (see screenshot below):
•Set the code language of the component to C# 7.1, for example.
•Select the code generation directory (C:\codegen in our example).
•Select the use for code engineering check box.
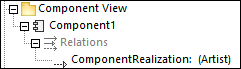
Create a ComponentRealization relationship
Next, create a ComponentRealization  relationship between the classes from which C# code must be generated. This can be done as follows: In the Model Tree pane, click the class to be realized by the component (Artist in this example), then drag and drop it into the code engineering component (Component1) (see screenshot below). Take the same step for the MusicStore class.
Note: In case you forget to create a ComponentRealization relationship for a class, UModel still generates the corresponding code file, even though warnings will be issued in the Messages window. This setting is configurable from Tools | Options | Code Engineering tab (the Generate missing ComponentRealizations check box).
Generate C# code
The final step is to generate the actual C# code. Take the steps below:
1.Go to the Project menu and click Merge Program Code from UModel Project. A dialog box appears where you can adjust whether changes in code should be merged with those in the code or overwrite them (if applicable). For the scope of this example, you can select Overwrite since a new project is getting generated.
2.To include the class documentation as comments in the generated code, click Project | Project Settings and select the Write Documentation as DocComments check box. For more information, see Code Generation Options.
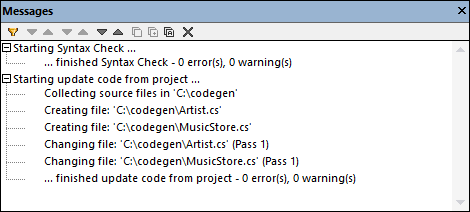
3.Click OK. The Messages window displays the code engineering result (see below).
If you have added any documentation to the MusicStore class, notice that it appears as code comments in the generated code:
using System; |