Inserting Interaction Overview elements
Using the toolbar icons
1.Click the specific icon in the Interaction Overview Diagram toolbar.

2.Click in the diagram to insert the element. To insert multiple elements of the selected type, hold down the Ctrl key and click in the diagram window.
Dragging existing elements into the Interaction Overview Diagram
Elements occurring in other diagrams, e.g. Sequence, Activity, Communication, or Timing diagrams can be inserted into a Interaction Overview diagram.
1.Locate the element you want to insert in the Model Tree tab (you can use the search function text box, or press Ctrl+F, to search for any element).
2.Drag the element(s) into the diagram.
Inserting an Interaction element
1.Click the CallBehaviorAction (Interaction) icon ![]() in the icon bar, and click in the Interaction Overview diagram to insert it.
in the icon bar, and click in the Interaction Overview diagram to insert it.
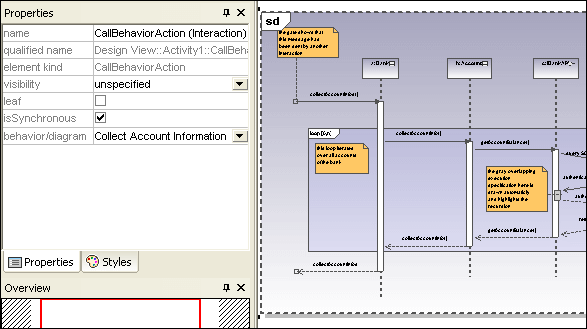
The Collect Account Information sequence diagram is automatically inserted if you are using the Bank_Multilanguage.ump example file from the ...\UModelExamples folder. The first sequence diagram, found in the model tree, is selected by default.
2.To change the default interaction element: Click the behavior/diagram combo box in the Properties tab. A list of all the possible elements that can be inserted is presented.
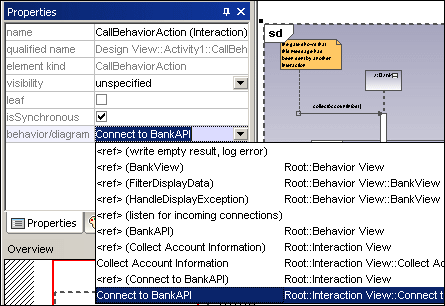
3.Click the element you want to insert to e.g. Connect to BankAPI.
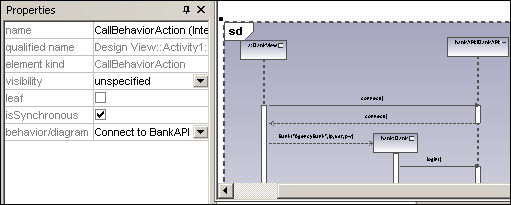
As this is also a sequence diagram, the Interaction element appears as an iconized version of the sequence diagram.
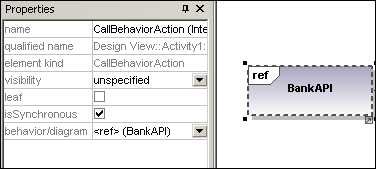
If you select <ref> BankAPI, then the Interaction element occurrence is displayed.
Inserting an Interaction element occurrence
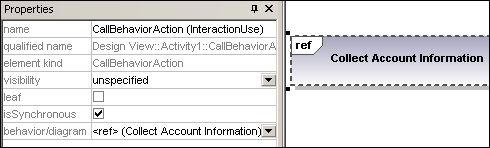
1.Click the CallBehaviorAction (InteractionUse) icon ![]() in the icon bar, and click in the Interaction Overview diagram to insert it.
in the icon bar, and click in the Interaction Overview diagram to insert it.
Collect Account Information is automatically inserted as a Interaction occurrence element, if you are using the Bank_Multilanguage.ump example file from the ...\UModelExamples folder. The first existing sequence diagram is selected per default.
2.To change the Interaction element, double-click the behavior combo box in the Properties tab. A list of all the possible elements that can be inserted is presented.
3.Select the occurrence you want to insert.
Note: All elements inserted using this method appear in the form shown in the screenshot above i.e. with "ref" in the frame's title space.
Inserts a Decision Node which has a single incoming transition and multiple outgoing guarded transitions. Please see "Creating a branch" for more information.
Inserts a Merge Node which merges multiple alternate transitions defined by the Decision Node. The Merge Node does not synchronize concurrent processes, but selects one of the processes.
 InitialNode
The beginning of the activity process. An interaction can have more than one initial node.
 ActivityFinalNode
The end of the interaction process. An interaction can have more that one final node, all flows stop when the "first" final node is encountered.
 ForkNode
Inserts a vertical Fork node. Used to divide flows into multiple concurrent flows.
 ForkNode (Horizontal)
Inserts a horizontal Fork node. Used to divide flows into multiple concurrent flows.
 JoinNode
Inserts a vertical Fork node. A Join node synchronizes multiple flows defined by the Fork node.
 Join Node (horizontal)
Inserts a horizontal Fork node. A Join node synchronizes multiple flows defined by the Fork node.
A Duration defines a ValueSpecification that denotes a duration in time between a start and endpoint. A duration is often an expression representing the number of clock ticks, which may elapse during this duration.
A Control Flow is an edge, i.e. an arrowed line, that connects two behaviours, and starts an interaction after the previous one has been completed.