Forward Engineering (from Model to Code)
This example illustrates how to create a new UModel project and generate program code from it (a process known as "forward engineering"). For the sake of simplicity, the project will be very simple, consisting of only one class. You will also learn how to prepare the project for code generation and check that the project uses the correct syntax. After generating program code, you will modify it outside UModel, by adding a new method to the class. Finally, you will learn how to merge the code changes back into the original UModel project (a process known as "reverse engineering").
The code generation language used in this tutorial is Java; however, similar instructions are applicable for other code generation languages.
Creating a new UModel project
You can create a new UModel project as follows:
•On the File menu, click New. (Alternatively, press Ctrl+N, or click the New  toolbar button.)
At this stage, the project contains only the default "Root" and "Component View" packages. These two packages cannot be deleted or renamed. "Root" is the top grouping level for all other packages and elements in the project. "Component View" is required for code engineering; it typically stores one or more UML components that will be realized by the classes or interfaces of your project; however, we didn't create any classes yet. Therefore, let's first design the structure of our program, as follows:
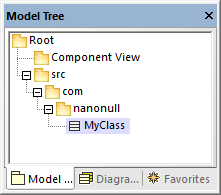
1.Right-click the "Root" package in the Model Tree window and select New Element | Package from the context menu. Rename the new package to "src".
2.Right-click "src" and select New Element | Package from the context menu. Rename the new package to "com"
3.Right-click "com" and select New Element | Package from the context menu. Rename the new package to "nanonull".
4.Right-click "nanonull" and select New Element | Class from the context menu. Rename the new class to "MyClass".
Preparing the project for code generation
To generate code from a UModel model, the following requirements must be met:
•A Java, C#, or VB.NET namespace root package must be defined.
•A component must exist which is realized by all classes or interfaces for which code must be generated.
•The component must have a physical location (directory) assigned to it. Code will be generated in this directory.
•The component must have the property use for code engineering enabled.
All of these requirements are explained in more detail below. Note that you can always check if the project meets all code generation requirements, by validating it:
•On the Project menu, click Check Project Syntax. (Alternatively, press F11.)
If you validate the project at this stage, the Messages window displays a validation error ("No Namespace Root found! Please use the context menu in the Model Tree to define a Package as Namespace Root"). To resolve this, let's assign the package "src" to be the namespace root:
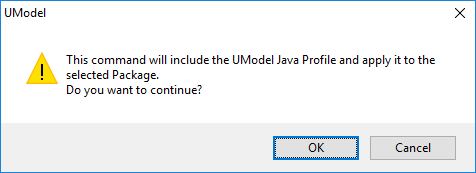
•Right-click the "src" package and select Code Engineering | Set As Java Namespace Root from the context menu.
•When prompted that the UModel Java Profile will be included, click OK.
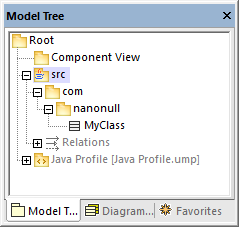
Notice the package icon has now changed to  , which signifies that this package is a Java namespace root. Additionally, a Java Profile has been added to the project.
The actual namespace can be defined as follows:
1.Select the package "com" in the Model Tree window.
2.In the Properties window, enable the <<namespace>> property.
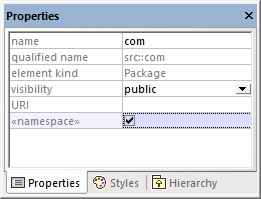
3.Repeat the step above for the "nanonull" package.
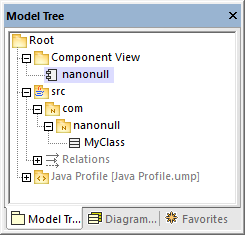
Notice that the icon of both "com" and "nanonull" packages has now changed to  , which indicates these are now namespaces.
Another requirement for code generation is that a component must be realized by at least a class or an interface. In UML, a component is a piece of the system. In UModel, the component lets you specify the code generation directory and other settings; otherwise, code generation would not be possible. If you validate the project at this stage, a warning message is displayed in the Messages window: "MyClass has no ComponentRealization to a Component - no code will be generated". To solve this, a component must be added to the project, as follows:
1.Right-click "Component View" in the Model Tree window, and select New Element | Component from the context menu.
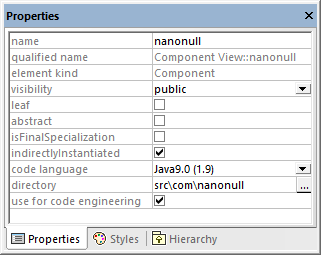
2.Rename the new Component to "nanonull".
3.In the Properties window, change the directory property to a directory where code should be generated (in this example, "src\com\nanonull"). Notice that the property use for code engineering is enabled, which is another prerequisite for code generation.
4.Save the UModel project to a directory and give it a descriptive name (in this example, C:\UModelDemo\Tutorial.ump).
Note: The code generation path can be absolute or relative to the .ump project. If it is relative as in this example, a path such as src\com\nanonull would create all the directories in the same directory where the UModel project was saved.
We have deliberately chosen to generate code to a path which includes the namespace name; otherwise, warnings would occur. By default, UModel displays project validation warnings if the component is configured to generate Java code to a directory which does not have the same name as the namespace name. In this example, the component "nanonull" has the path "C:\UModelDemo\src\com\nanonull", so no validation warnings will occur. If you want to enforce a similar check for C# or VB.NET, or if you want to disable the namespace validation check for Java, do the following:
1.On the Tools menu, click Options.
2.Click the Code Engineering tab.
3.Select the relevant check box under Use namespace for code file path.
The component realization relationship can be created as follows:
•In the Model Tree window, drag from the MyClass created previously and drop onto component nanonull.
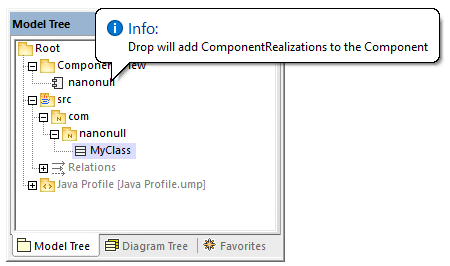
The component is now realized by the project's only class MyClass. Note that the approach above is just one of the ways to create the component realization. Another way is to create it from a component diagram, as illustrated in the tutorial section Component Diagrams.
Next, it is recommended that the classes or interfaces which take part in code generation have a file name. Otherwise, UModel will generate the corresponding file with a default file name and the Messages window will display a warning ("code file name not set - a default name will be generated"). To remove this warning:
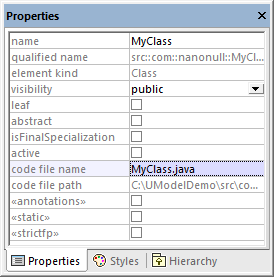
1.Select the class MyClass in the Model Tree window.
2.In the Properties window, change the property code file name to the desired file name (in this example, MyClass.java).
Including the JDK types
Although this step is optional, it is recommended that you include the Java Development Kit (JDK) language types, as a subproject of your current UModel project. Otherwise, the JDK types will not be available when you create the classes or interfaces. This can be done as follows (the instructions are similar for C# and VB.NET):
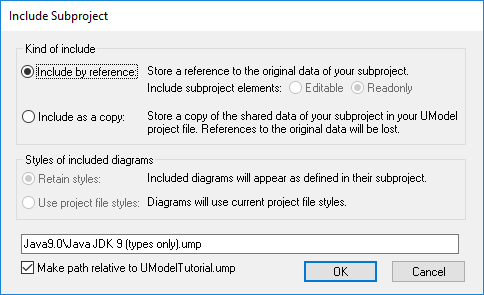
1.On the Project menu, click Include Subproject.
2.Click the Java tab and select the Java JDK 9 (types only) project.
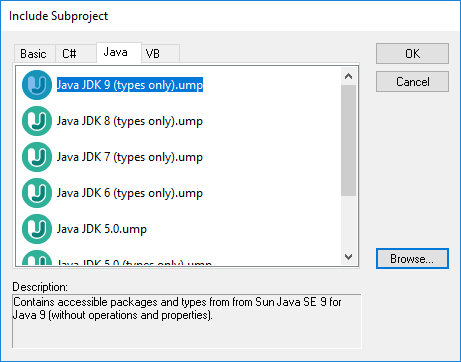
3.When prompted to include by reference or as a copy, select Include by reference.
Generating code
Now that all prerequisites have been met, code can be generated as follows:
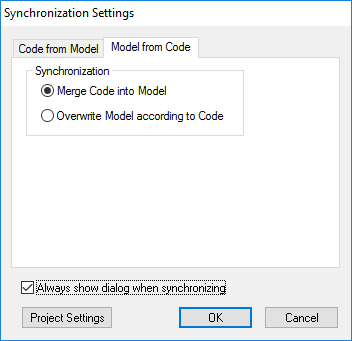
1.On the Project menu, click Merge Program Code from UModel Project. (Alternatively, press F12.) Note that this command will be called Overwrite Program Code from UModel Project if the Overwrite Code according to Model option was selected previously on the "Synchronization Settings" dialog box illustrated below.
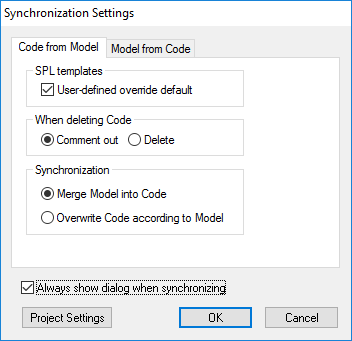
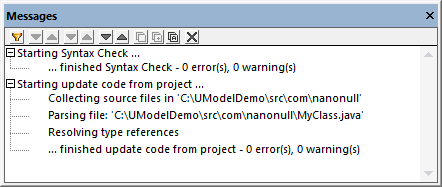
2.Leave the default synchronization settings as is, and click OK. A project syntax check takes place automatically, and the Messages window informs you of the result:
Modifying code outside of UModel
Generating program code is just the first step to developing your software application or system. In a real life scenario, the code would go through many modifications before it becomes a full-featured program. For the scope of this example, open the generated file MyClass.java in a text editor and add a new method to the class, as shown below. The MyClass.java file should look as follows:
package com.nanonull; |
MyClass.java
Merging code changes back into the model
You can now merge the code changes back into the model, as follows:
1.On the Project menu, click Merge UModel Project from Program Code (Alternatively, press Ctrl + F12).
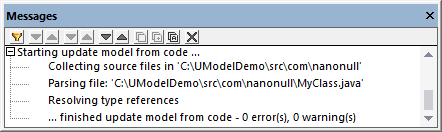
2.Leave the default synchronization settings as is, and click OK. A code syntax check takes place automatically, and the Messages window informs you of the result:
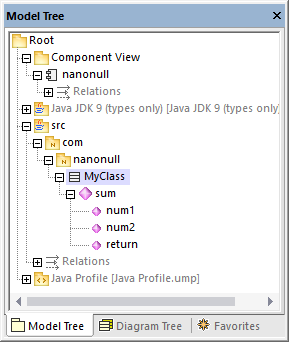
The operation sum (which has been reverse engineered from code) is now visible in the Model Tree window.