License Pool
The License Pool tab (screenshot below) provides the following functionality:
•Upload the licenses in a license file to LicenseServer's license pool (which is a database in which licenses are stored); see Upload and Activate Product Licenses for details.
•Display information about the licenses that are currently in the license pool (see screenshot below). Trial licenses are indicated with a T icon in the Expires in days column.
•Activate, deactivate, and delete licenses that are in the license pool (see below for details)
•Set restrictions on a license as to which registered clients may be assigned this license

When a license file is uploaded to LicenseServer with the Upload button on this page, all the licenses contained in that license file are uploaded to the license pool on LicenseServer. The License Pool tab provides an overview of all licenses that are currently available on LicenseServer, together with the details of each. When a license has been activated, it can be assigned to a product that has been registered with LicenseServer.
This topic (i) explains the meaning of the license information that is displayed in the License Pool tab, and (ii) describes how to activate, deactivate, and delete licenses.
License information
The following license information is displayed:
•Status: Can be one of the following values: Activating | Failed Verification | Active | Inactive | Blocked. See License Status for details.
•Name, Company: The name and company of the licensee. This information was submitted by you at the time of purchase.
•Product, Edition, Version: The version and edition of the licensed products. At the top of each column is a combo box to filter licenses by category.
•Key Code, Bundle ID: The license key to unlock the product. All products in a single Altova MissionKit bundle have the same Bundle ID. Non-MissionKit products have no Bundle ID.
•Start Date, End Date: Together they give the validity period of the license. Permanent licenses have no end date.
•Expires in days, SMP (days left): The number of days left before the license expires. Trial licenses are indicated with a T icon. Each licensed purchase comes with a Support & Maintenance Package, which is valid for a certain number of days. The SMP column notes how many SMP days are still left.
•#, License Type: The allowed number of users or CPU cores is listed in the # column. Whether it is users or cores that the license regulates is given in the License Type column (see Types of Altova Licenses for more information). In the case of Altova desktop products, licenses are assigned on the basis of users (machine-users in the case of Installed User and Concurrent User licenses, named-users in the case of Named User licenses). In the case of Altova server products, licenses are assigned on the basis of CPU cores (see Processor Cores and Licenses).
•Client Restriction: If a client restriction has been set for a license, then the name of the restriction is displayed along with an indication of whether clients matching the restriction pattern are to be allowed (green check mark; see screenshot above) or denied (red cross mark). Click Show Client Restrictions to go to the definitions of client restrictions. To set one of the defined client restrictions on a license, select the license and, at the bottom of the page, click Set Restriction (description below).
•Clients: Information in this column is different according to whether the product is a desktop product or a server product, and is explained below. In the case of desktop products, a user count and machine count are given. In the case of server products, the following is indicated: (i) an assigned license is indicated by the word assigned, (ii) if the license is currently being used by a running server product, then the word running is displayed. The actions that are carried out when you click the icons in this column are described below. If there have been client requests for a license that exceed the capacity of that license, then an Unmet Requests button appears for that license in the Clients column. Clicking the button takes you to the Unmet License Requests tab, where you can see statistics about the unmet requests.
Client information for desktop products
•A user count and a machine count is given for desktop products.
•The machine count indicates the number of assigned licenses. For example, 7/10 machines means that the license allows the software to be installed on 10 clients (machine-user or named-user), and that the license has been assigned to 7 clients.
•The user count indicates the number of clients (machine-user or named-user) that are currently running. For example, 3/10 users means that the license is currently being used by 3 users out of a total of 10 allowed users.
•The user count and machine count together tell you the current licensing capacity and usage of a given license. For example, if the machine count is 7/10 and if the user count is 3/10, then we know the following: (i) The software is allowed to be licensed on 10 machines (in the case of installed user licenses) or for 10 users (named user licenses); (ii) The software has been licensed on 7 machines (or for 7 users); (iii) 3 of the 7 licensed software installations are currently running. See Types of Altova Licenses for information about the various license types.
•For information about the icons that appear in this column, see below.
Client information for server products
•Indicates whether the license has been assigned. If assigned, then assigned is displayed; otherwise the field is empty.
•If a license has been assigned to a product installation, and that installation is currently running, then running is displayed (in addition to assigned); otherwise the field will contain only assigned.
•For information about the icons that appear in this column, see below.
Icons in the License Pool tab
Altova MissionKit logo. Appears next to individual Altova desktop product names when the desktop product license is part of a MissionKit license. Note that if a product license that is part of a MissionKit License is assigned to a given user, then all the other product licenses in that MissionKit bundle are assigned to the same user. | |
 | Show Assigned Client. Appears in the Clients column of a license that has been assigned. Clicking it takes you to the Client Management tab, in which the licenses of a client's registered products can be managed. If licenses have been assigned to more than one client, then you will be prompted in a pop-up to select the client you want. Show Client Restrictions. Appears in the Client Restriction column of a license that has been restricted. Clicking it takes you to the Define Restrictions tab, in which you can define patterns to match the names of registered clients. |
Show Running Client. Appears in the Clients column of a license that has been assigned to software that is currently running. Clicking it takes you to the Client Monitoring tab and highlights the clients running that software. In this tab, information about the selected client and its registered software is displayed. If licenses have been assigned to more than one client, then you will be prompted in a pop-up to select the client you want. | |
Show Info. Appears in the Clients column of a license that has not been assigned. Clicking it displays information about the license, such as the user count and whether the license is part of a license bundle. |
Activate, deactivate, or delete a license
To activate, deactivate, or delete a license, select the license so that its check box at extreme left is checked. Then click Activate, Deactivate, or Delete as required.
Note the following points:
•You can activate an inactive license, and deactivate an active license.
•Only inactive licenses can be deleted. This means that an active license must be deactivated before it can be deleted.
•When a license is deleted it is removed from the license pool.
•A deleted license can be added again to the license pool by uploading the license file containing it. If a license file is re-uploaded, only licenses that are not already in the license pool will be added to the license pool; licenses that are already in the pool will not be re-added.
Set restriction
If one or more desktop licenses are available in the license pool, or if a floating license is available, then clients that are registered with that LicenseServer are automatically assigned a license. You can control to which clients a license may be assigned by setting an inclusive or exclusive restriction on that license. Restrictions are defined in the Define Restrictions tab on the basis of client names (the user name or host name that was used for registration).
To set a client restriction on one or more licenses, select the license(s) and click Set restriction (located at the bottom of the License Pool tab). In the dialog that appears (screenshot below), select the restriction you want to use, then select whether you want to include or exclude clients that match that restriction. Click Set to finish. In the Client Restriction column of that license (see screenshot at top of topic), the name of the selected restriction will be displayed.
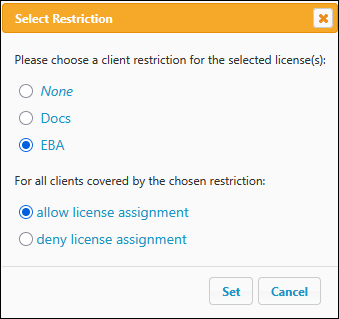
To remove a client restriction from a license, select the None option (see screenshot above) and click Set.