Page Layout Properties
Page properties are assigned individually for each document section of a document design, in the Page Layout group of properties of that document section. If a design has only one document section, then the page properties of that document section are the page properties of the entire document.
Note: Due to a limitation of FOP, Page Layout properties are available only for the Initial Document Section when FOP is used to generate output.
Accessing the page properties of a document section
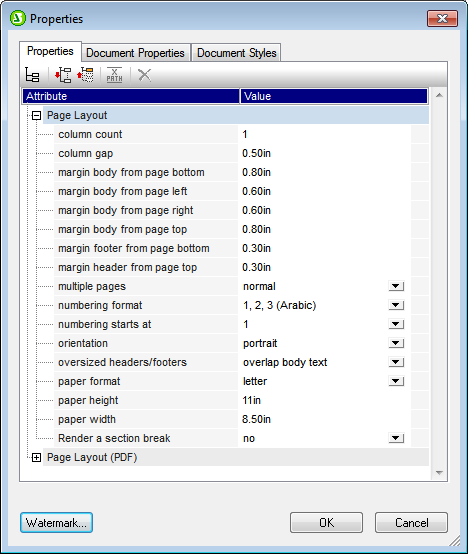
To access the page properties of a document section, click the Edit Properties link of the Initial Document Section or Document Section item in the design (see screenshot below).

This pops up the Properties window, with the Page Layout properties active within it (screenshot below).
Alternatively, clicking the Document Section title bar makes the Page Layout group of properties of that document section active in the Properties window.
Page size
Three properties determine the size of pages of a document section: (i) page height, (ii) page width, and (iii) size. Page size can be set in one of two ways:
•You can select a predefined page size from the combo box in the Paper Format property field. In this case, values for the Page height and Page width fields are automatically filled in depending on what value has been selected in the combo box.
•You can specify your own values for the Page height and Page width properties. In this case, the Paper Format field will contain the value custom size.
Valid length dimensions (for the Page height and Page width properties) are inches (in), centimeters (cm), millimeters (mm), picas (pc), points (pt), pixels (px), and ems (em). Note that (i) a unit is mandatory; (ii) there must be no space between the number and the unit; (iii) there is no default unit. Entering an invalid unit or no unit causes the property value to be displayed in red.
Page margins
The top, bottom, left and right margins of a page can be defined with the four margin properties, Margin body from page top, Margin body from page bottom, Margin body from page left, and Margin body from page right, respectively. To specify a margin, enter the required number in the relevant margin property field followed by any of the valid length units: inches (in), centimeters (cm), millimeters (mm), picas (pc), points (pt), pixels (px), and ems (em). Note that (i) a unit is mandatory; (ii) there must not be a space between the number and the unit; (iii) there is no default unit. Entering an invalid unit or no unit causes the property value to be displayed in red.
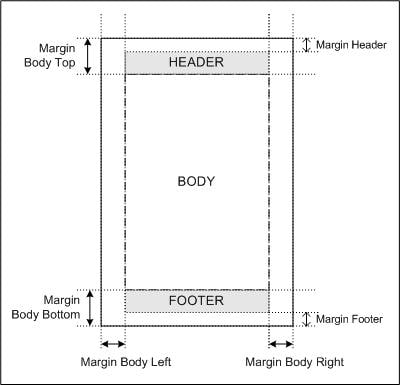
The body area is defined by the page margins you set (see screenshot below).
Header and footer margins
The Margin header from page top and Margin footer from page bottom properties specify the distance from the top of the page to the top of the header and from the bottom of the page to the bottom of the footer, respectively (see screenshot below).
The vertical extents of headers and footers are determined by the actual content of the headers and footers. You should ensure that the vertical extent of a header plus the header margin does not exceed the Margin body from page top. Otherwise, the header will be too large to be contained in the space defined for it. Similarly, ensure that the sum of the vertical extent of the footer and footer margin does not exceed the value of the Margin body from page bottom.
If the actual header or footer is too large for the space assigned for it, then the value of the Oversized Headers/Footers property comes into play and can modify the treatment of headers and footers in RTF output. If the Oversized Headers/Footers property has been set to Overlap Body Text, then the oversized header or footer will superimpose, or be superimposed by, body text. If the option Reduce Body Height has been set, then the vertical extent of the body text is reduced so as to accommodate the oversized header or footer.
The Multiple Pages setting
The Multiple Pages setting has two options:
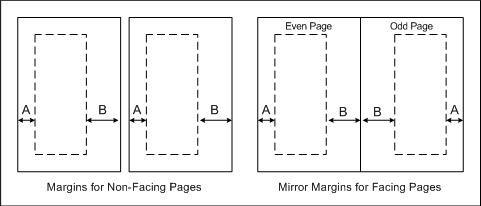
•If you set Multiple Pages to Normal, then all pages in the output will have the same value for all left margins and the same value for all right margins (see screenshot below).
•If, on the other hand, you set Multiple Pages to Mirror Margins, then the document pages are treated as facing pages (see screenshot below). This means that for even-numbered pages (left-hand-side pages), the left margin (Margin body left property) is the outer margin while the right margin (Margin body right property) is the inner margin. For odd-numbered pages (right-hand-side pages), the left margin (Margin body left property) is the inner margin while the right margin (Margin body right property) is the outer margin.
The settings made for the Margin body left and Margin body right properties are applied by StyleVision to the odd-numbered pages; these margins will be reversed for even-numbered pages; the inner-margin value of odd-numbered pages becomes the outer-margin value of the even-numbered pages.
Note: If an SPS design has multiple document sections, then the value of the mirror margins setting is taken from the initial document section. The left and right margin values are also taken from the initial document section. The values of these properties in subsequent document sections will be ignored.
Page orientation
Page orientation can be set to portrait or landscape.
Columns
Columns and their widths are specified with two properties: Column count and Column gap, which specify, respectively, the number of columns and the space between two columns. The width of a column is thus the width of the page body minus the sum of the column gaps, divided by the number of columns.
Text will fill the columns on a page one by one. Only after all the columns have been filled will a new page be started. A column break can be forced by inserting a new column at the desired point in the design. To do this, right-click at the location where the column break is required and select the context menu command Insert Page / Column/ Document Section | New Column.
Page numbering
There are two relevant properties: Numbering format and Numbering starts at. These work as follows:
•The required page number format is set by selecting one of the pre-defined options from the drop-down menu for Numbering format. (The Numbering format selection also applies to the page total, if this is inserted.)
•The page numbering for a document section can be set to start with any positive integer. This integer is specified in the Numbering starts at property. If the numbering is to continue from the previous document section, then this field should be left blank or set to auto.
Note: Page numbers can be inserted in a document by inserting a page number placeholder (with the command Insert Page / Column / Document Section | Page Number). The total number of pages in the output document is inserted with the command Insert Page / Column / Document Section | Page Total.
Note: MS Word does not always update page numbers automatically. To manually update page numbers in MS Word, press Ctrl+A and F9.
Page numbering in the RTF output
In order to display page numbering in the RTF output in MS Word, you must select, in MS Word, the entire contents of the document (with Edit | Select All or Ctrl+A), and then press F9. This will cause the page numbering to be displayed—if you have inserted page numbering.
Page totals
To output the total number of pages at various locations in your document, use the page total feature.
Page starts for document sections
For each document section that is not the Initial Document Section, the Section Starts On property specifies whether the document section should start on the next page (irrespective of whether it is odd-numbered or even-numbered), or whether it should specifically start on an odd-numbered or even-numbered page. For example, if the previous document section ends on an odd-numbered page and the current document section is specified to start on an odd-numbered page, then the even.numbered page that occurs directly after the end of the previous document section will be left blank. Note that it is the underlying document page-numbering that determines whether a page is odd-numbered or even-numbered. The page numbering that the user specifies is irrelevant for determining the document section start-page.
Page break after the Initial Document Section
If you wish to start the section immediately after the Initial Document Section on a new page, give the Render a Section Break property (of the Initial Document Section's page layout properties) a value of Yes. This starts the second document section (that is the first section after the Initial Document Section) on a new page. Note that this property is available only for the Initial Document Section, not for any other section.
Note the converse effect also, that is, when the property has a value of No. In this case, the first non-Initial-Document-Section starts directly after the Initial Document Section—without rendering a page break. This is useful if the Initial Document Setting is blank—for example, if it contains a set of templates that produces no output. A property value of No (for Render a Section Break) ensures that the first page of the print output document will not be blank (which would have been the case if a page break were to be rendered after an Initial Document Section that produced no output).