Node-Template Operations
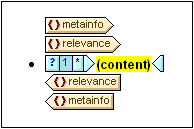
A node-template is a template in the design that specifies the processing for a node. In the design, node-templates are displayed with beige start and end tags (screenshot below). The type of node is indicated by a symbol inside the tags (For example: angular brackets for element nodes and equal-to signs for attribute nodes). The screenshot below contains two node-templates, both for elements: metainfo and relevance. Also see, Nodes in the XML document.
The operations that can be carried out on a node-template are accessible via the context menu of that node-template (accessed by right-clicking either the start or end tag of a node-template, see screenshot below).
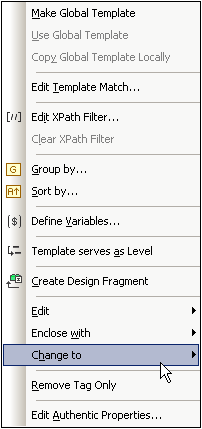
The commands in this context menu are described below:
•Group by, Sort by, Define variables, Template serves as level
•Edit, Enclose with, Change to
These menu commands are described below. Note that for a given node-template, some commands might not be available; these are grayed out in the context menu.
Global templates: make, use, copy locally
A node-template in the main template can be changed to or associated with a global template via the following commands:
•Make global template: This option is available if the node-template represents an element that is defined as a global element in the schema. A global template will be created from the node-template. The node-template in the main template will use this global template and its tags will then be displayed in gray (indicating its use of the global template).
•Use global template: If a global template of the same qualified name as the node-template has been defined, the node-template will use the processing of the global template. The tags of the node-template will become gray.
•Copy global template locally: The processing instructions of a global template of the same qualified name as the node-template are copied physically to the node-template. The node-template is independent of the global template. Subsequently, both it and the global template can be modified independently of each other. Since the node-template does not reference a global template, it retains its beige color.
For more information, see the section Global Templates.
Editing the template match
The node for which a template has been created can be changed by using this command. The Edit Template Match command pops up the Edit XPath Expression dialog, in which you can enter an XPath expression that selects another node in the schema. You can also enter any XPath expression to change the template to a User-Defined Template.
Edit/Clear XPath Filter
An XPath filter enables you to filter the nodeset on which a node-template is applied. XPath filters can also be applied to global templates.
By default, a node-template will be applied to nodes (elements or attributes) corresponding to the node for which the node-template was created (having the same name and occurring at that point in the schema hierarchy). For example, a node-template for the /Personnel/Office node will select all the /Personnel/Office elements. If an XPath filter with the expression 1 is now created on the Office element (by right-clicking the Office element and editing its XPath Filter), this has the effect of adding a predicate expression to the Office element, so that the entire XPath expression would be: /Personnel/Office[1]. This XPath expression selects the first Office child of the Personnel element, effectively filtering out the other Office elements.
A filter can be added to any node-template and to multiple node-templates in the design. This enables you to have selections corresponding to such XPath expressions as: /Personnel/Office[@country='US']/Person[Title='Manager'] to select all managers in the US offices of the company. In this example, a filter each has been created on the Office and on the Person node-templates, respectively.
Wherever a global template is used—that is, called—an XPath filter can be applied to it. So, for every instance of a global template that is used, an XPath filter can be applied to the global template in order to restrict the targeted nodeset.
To add an XPath Filter to a node-template, right-click the node-template and select Edit XPath Filter. Enter the XPath filter expression without quotes, square brackets, or delimiters of any kind. Any valid XPath expression can be entered. For example:
•1
•@country='US'
•Title='Manager'
After an XPath Filter has been created for a node-template, this is indicated by a filter symbol in the start tag of the node-template. In the screenshot below, the synopsis node-template has a filter.
Note: Each node-template supports one XPath Filter.
Group by, Sort by, Define variables, Template Serves as Level
The mechanisms behind these commands are described in detail in their respective sections:
•The Group by command enables instances of the node represented by the selected node-template to be grouped. The grouping mechanism is described in the section, Grouping.
•The Sort by command enables instances of the node represented by the selected node-template to be sorted. The sorting mechanism is described in the section, Sorting.
•The Define Variables command enables you to define variables that are on scope on the selected node-template. How to work with variables is described in the section, Variables.
•The Template Serves as Level command is a toggle command that creates/removes a level on the node-template. Levels can be specified at various levels in order to structure the document into a hierarchy. This structure can then be used to generate a table of contents (TOC), automatic numbering, and text references. These features are described in detail in the section, Table of Contents (TOC) and Referencing.
Create Design Fragment
Creates a Design Fragment template from the selected template. The resulting Design Fragment template is added to the Design Fragment templates at the bottom of the design, and added to the Design Tree and Schema Tree. The Design Fragment is also applied at that point in the design where it was created.
Remove (Template or Formatting) Tag Only
This command removes the selected template or formatting tag only. It does not remove any descendant nodes or formatting tags. This command is useful for removing a formatting tag or a parent element tag without removing all that is contained within the tag (which is what would happen if the Delete operation is carried out with a tag selected). Note, however, that removing a parent element might render descendant nodes of the deleted element invalid. In such cases, the invalid nodes are indicated with a red strike-through.
Edit, Enclose with, Change to
These commands are described below:
•Edit: Pops out a submenu with the familiar Windows commands: cut, copy, paste, and delete.
•Enclose with: The node-template can be enclosed within the following design components, each of which is described in a separate section of this documentation: paragraph, special paragraph, Bullets and Numbering, Hyperlink, Condition, TOC Bookmark and Level.
•Change to: The Change-To feature enables you to change: (i) the node for which that template applies, or (ii) how the node is created in the design. It is described in detail in the section, The Change-To Feature.
Edit Authentic Properties
Selecting this command pops up the Properties sidebar, in which certain properties (Authentic Properties) of the instantiated node in Authentic View can be defined. Authentic Properties are described in detail in the section, Authentic Node Properties.