Auto-Numbering in the Document Body
Repeating instances of a node can be numbered automatically in the main body of the document using the Auto-Numbering feature. For example, in a Book element that contains multiple Chapter elements, each Chapter element can be numbered automatically using the Auto-Numbering feature. This is an easy way to insert numbering based on the structure of the XML document.
Note: The Auto-Numbering feature refers to numbering within the main body of the document. It does not refer to numbering within tables of contents (TOCs), where numbering is considered to be a property of the TOC item.
Auto-Numbering can be either sequential (flat) or hierarchical. Sequential numbering provides ordinary numbering on a single level. Hierarchical numbering is based on the TOC-level hierarchy created in the document and creates numbering according to the element's position in the TOC-level hierarchy.
A wide variety of formatting is available for the numbers. In the case of hierarchical numbers, individual number tokens can be formatted separately. For example, a three-token number could be given the format: A.1.i., where each of the three tokens has a different number format. Number formatting is assigned differently for sequential and hierarchical numbering, and therefore have separate descriptions, each in their respective sections below.
Sequential numbering (num-seq)
Sequential (or flat) numbering can be inserted within a TOC Bookmark in the document design (see screenshot below). Create sequential numbering as follows:
1.Place the cursor within the node that has to be numbered and create the TOC bookmark (right-click, and select Insert Table of Contents | TOC Bookmark). The TOC bookmark will be created. In the screenshot below, we wish to number the topic element, so the TOC bookmark has been created within the topic element. The exact location within the topic element depends on where in the layout you want the numbering. (In the screenshot below, the numbering is placed immediately to the left of the chapter header (title).)
2.Place the cursor within the tags of the TOC bookmark, right-click, and select Insert Table of Contents | Sequential Numbering. This inserts the Auto-Numbering placeholder for sequential numbering, (num-seq) (highlighted within the TOC bookmark 'TopicHeader' in the screenshot below).
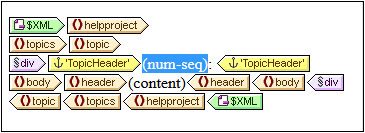
3.If the TOC bookmark is going to be referenced from within a TOC template, then you can enter TOC bookmark properties as required. However, if the TOC bookmark is going to be used only for sequential numbering, there is no need to name it. If you wish to name it, right-click it and select the Edit Group command.
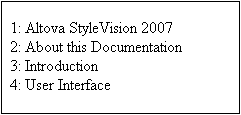
In the example shown in the screenshot above, sequential numbering has been set on the topic node. The result is that each topic element receives a sequential number, as shown in the screenshot below. Note that the numbering is essentially the position of each topic element within the sequence of all sibling topic elements at that level of the XML document hierarchy.
Note: If sequential numbering must be continued on another set of nodes, then use a TOC bookmark with the same name on both nodesets.
To format the sequential numbering, right-click the num-seq placeholder and select the Edit Format command. This pops up the Format Sequential Auto-Number dialog (screenshot below).

Select the format you want from the dropdown box of the Available numbering styles combo box (see screenshot above) and click OK to apply the selected format.
Hierarchical numbering (num-lvl)
Hierarchical numbering can be inserted within a TOC level in the design. To create hierarchical numbering in a document, you must therefore first structure the document in TOC levels. Do this as described in the section Structuring the Design in Levels. The following points should be borne in mind:
•Levels must be created either on the node to be numbered or within it.
•Levels must be nested according to the hierarchy of the numbering required (see screenshot below).
•The hierarchical numbering placeholder must be inserted within the corresponding level in the design (see screenshot below).
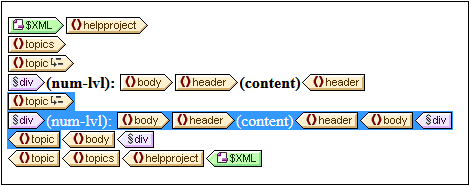
In the screenshot above, there are two levels. The topic element is recursive, and a level has been created on two topic elements (by right-clicking the node tag and selecting Template Serves as Level). One topic element (highlighted in the screenshot above) is nested within the other. As a result, the levels also are nested. Within each level, a hierarchical numbering placeholder (num-lvl) has been inserted (right-click within the level and select Insert Table of Contents | Hierarchical Numbering).
The result of the design shown in the screenshot above will look like this.
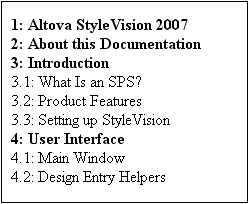
The first level is shown in bold, the second in normal.
To format hierarchical numbering, right-click the num-lvl placeholder and select the Edit Format command. This pops up the Format Hierarchical Auto-Number dialog (screenshot below).
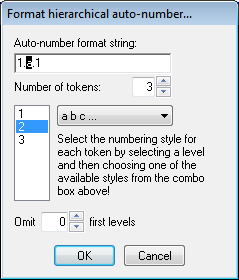
First select the number of tokens in the Token combo box. This number should be the same as the number of TOC levels in the document. Each token can then be separately formatted. In the lower of the two display boxes, select the token to be formatted. (In the screenshot above, the second token has been selected.) Next, in the Formatting combo box, select the formatting style you want. In the screenshot above, lowercase formatting has been selected for the second token, and this is reflected in the display box at the top of the dialog. Additionally, levels can be omitted by entering the required number of levels to be omitted in the Omit Levels box.
Note that formatting is defined on hierarchical numbering one level at a time. So the hierarchical numbering placeholder num-lvl at each level must be separately formatted.
Click OK when done.