Data Mapping
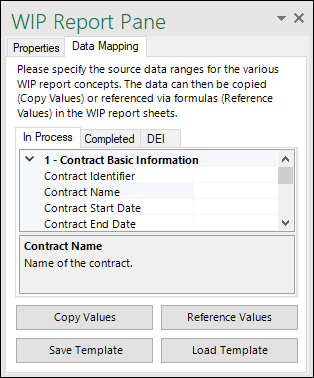
The Data Mapping tab (screenshot below) of the WIP Report Pane provides a flexible way to import data from an external workbook or from a different sheet of the same workbook into a WIP Report. Data mappings are saved references between certain WIP report fields and the corresponding cell range in a separate sheet. Data mappings are saved together with the WIP workbook they belong to. Data mappings are suitable for on-demand and recurring imports of data into the same workbook. If you plan to use the same data mapping in other workbooks, you can save the mapping as a template (see Templates below).
The Data Mapping tab contains three tabs: In Process, Completed, and DEI (screenshot below). If you want to import values into the WIP In Process sheet, use the In Process tab. To import values into the WIP Completed sheet, use the Completed tab. The DEI tab includes information about the current report and the reporting entity. The DEI tab allows you to import values into the Properties tab of the WIP Report Pane.
Data mapping setup
To set up a data mapping, follow the instructions below:
1.Open a workbook which contains an existing WIP Report or create a new WIP Report.
2.Open the Data Mapping tab in the WIP Report Pane.
3.Depending on where you would like to import values, select the relevant tab (In Process, Completed, or DEI). In our example, we have chosen the In Process tab.
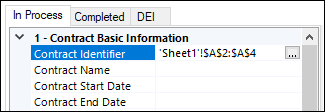
4.Enter a source cell range next to the field into which you want to import data. In the example below, the values of the A2:A4 cell range from an Excel sheet called Sheet1 will be mapped to the Contract Identifier column of the current WIP In Process report.
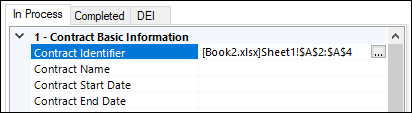
If you copy or reference values from a different Excel book, both books must be open so that the values are copied or referenced correctly. In the example below, the Contract Identifier field will receive data from the A2:A4 cell range that comes from a sheet named Sheet1 of a separate Excel book called Book2.
The source cell range must consist of a single row or a single column. Values can be copied or referenced from other workbooks or sheets as long as they represent a valid Excel cell range. The range can be vertical or horizontal in the source sheet. In the WIP In Process and WIP Completed sheets, the imported cell range will automatically conform to the required layout. To find out more about creating references to a cell range, see the Microsoft documentation.
Once you have finished setting up the data mapping, you can copy or reference the actual values from the source (see below).
Tip: To quickly enter a cell range, open the edit box of the relevant report concept (use the ![]() button) in your WIP report and select a cell range in the source sheet, from which you want to import values. The selected source cell range will appear automatically in the edit box. Then click OK.
button) in your WIP report and select a cell range in the source sheet, from which you want to import values. The selected source cell range will appear automatically in the edit box. Then click OK.
Copy/reference a cell range
There are two ways to import values from a source sheet: You can copy or reference values. Copying means that a specific value is taken from the source range and inserted into the target. If the source value changes, it is not automatically updated in the target WIP sheet. However, you can update the WIP report values at any time by clicking the Copy Values button in the Data Mapping tab of the WIP Report Pane. Referencing means that, instead of storing an actual value, the WIP sheet will contain a formula which refers to the source cell range. Updating and saving a value in the source will automatically update this value in the target sheet.
Note that copying/referencing values overwrites your original report data with the data imported from the source sheet. To copy or reference a cell range, take the steps below:
1.Click the Data Mapping tab in the WIP Report Pane.
2.Click Copy Values or Reference Values at the bottom of the WIP Report Pane. When you click the buttons Copy Values or Reference Values, values are copied or referenced, respectively, from all the Data Mapping tabs, not just the currently visible tab.
3.The add-in will inform you that the data in the WIP report will be overwritten. Click OK to confirm.
Rules for referencing a cell range
The rules below explain how to reference a cell range.
•A cell range must consist of a single row (e.g., A1:K1) or a single column (e.g., A1:A20).
•A cell range must come from the same worksheet of the same workbook.
•If you indicate a cell range for different report concepts that come from the same Data Mapping tab (e.g., In Process), the cell range for these concepts should begin and end in the same row (or column in the case of a vertical range). This will ensure that the values are pasted correctly. For example, if you want to supply the cell range for the Contract Identifier and Contract Name columns, you can type the following values: A1:A20 and B1:B20, respectively. Thus, the range for both columns starts in Row 1 and ends in Row 20.
Templates
If you plan to use your data mapping in other workbooks, you can save the mapping as a template. Templates are saved as independent files (not inside the workbook like data mappings). A significant difference between data mappings and templates is that the cell range referenced by a data mapping is fixed (predetermined), whereas the cell range referenced by a template can adjust if more or fewer rows or columns of data are available in the source. Unlike data mappings, the cell range of various report concepts in a template must come from the same workbook and worksheet.
Templates are meant to be reusable and not bound to specific workbooks like data mappings. Therefore, when you save a data mapping as a template, any references to a specific workbook are removed. For example, a cell range such as [CustomBook.xlsx]CustomSheet!$C$4:$C$8 would be saved as CustomSheet!$C$4:$C$8 in the template.
Create a template
To create a new template, follow the instructions below:
1.Open an Excel workbook which contains WIP data in non-XBRL format. This is the source workbook, from which values will be imported into your WIP report.
2.Open an existing WIP report or create a new report.
3.Open the Data Mapping tab of the WIP Report Pane in your WIP report.
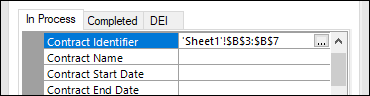
4.Depending on where you would like to import source values, open the corresponding tab in the Data Mapping tab (In Process, Completed, or DEI) and enter a source cell range next to each field that you would like to be part of the template. For example, the image below shows that the values from the B3:B7 cell range from Sheet1 will be mapped to the Contract Identifier field of the WIP In Process sheet. The cell range selection mechanism is the same as for Excel formulas. For more information, see the Microsoft documentation.
5.As soon as you have finished defining the data mapping, click Save Template at the bottom of the WIP Report Pane. At this stage, validation takes place. If no error messages appear, the following dialog box is displayed:
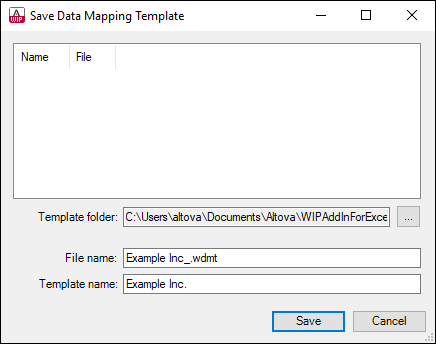
6.Optionally, select a destination template folder. By default, the template folder is C:\Users\...\Documents\Altova\WIPAddInForExcel.
7.Enter a file name in the File name box. The template will be saved to the selected template folder as a file with a .wdmt (WIP Data Mapping Template) extension.
8.Optionally, enter some descriptive text in the Template name box, which will help you identify this template later (e.g., Template 1).
9.Click Save.
If your WIP worksheet already contains a previously defined data mapping, you can save the mapping as a template (Steps 5-9 above). All data mappings must comply with the rules for referencing a cell range.
Edit an existing template
Templates saved previously can be modified as follows:
1.Open a workbook that contains an XBRL-bound WIP report sheet or create a new WIP report.
2.Click the Data Mapping tab in the WIP Report Pane.
3.Click Load Template at the bottom of the WIP Report Pane, select the relevant template from the list of available templates, and click Load. If the template is located in a folder different from the default template folder, click the  button to change the template folder.
4.Edit the relevant cell range in the Data Mapping tab.
5.Click Save Template.
Import a template
To import a template to your WIP workbook, follow the instructions below:
1.Open an Excel workbook, from which you want to import data into your WIP report.
2.Open an existing WIP report or create a new one.
3.If you open an existing WIP report, click the Import Template command in the ribbon. This will open the Import Data from other Excel Sheets dialog (screenshot below). If you want to apply a template to a new WIP report, click Insert in the add-in ribbon. This will open the Insert WIP Report dialog, similar to the one below.
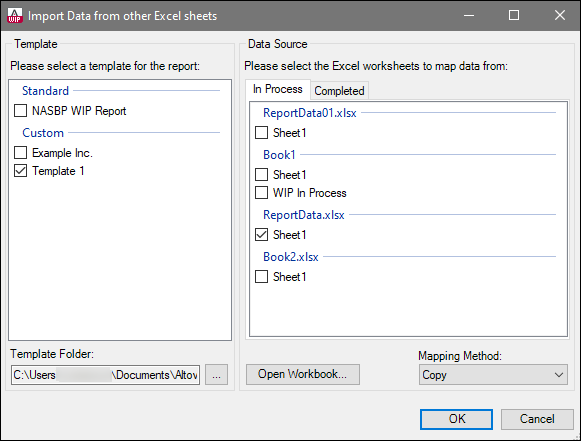
4.Select a template you wish to apply to your WIP report (Template 1 in our example). If the template is located in a folder different from the default template folder, click the button to change the template folder.
5.Click the In Process or Completed tab, depending on the kind of WIP report you wish to import your data into.
6.Select the worksheet from which you would like to import data. In our example, the data will be imported from Sheet1 of the ReportData.xlsx workbook.
7.Under Mapping Method, select Copy or Reference (see Copy/Reference a Cell Range above) and click OK.