New Report
This topic explains how to create an XBRL report based on the default XBRL taxonomy installed with the add-in. You can install additional taxonomies separately. For details, see XBRL Taxonomy Package Manager.
Besides creating a new report, you can also import data from existing XBRL reports into Excel. For more information, see Data Import.
To create a new report, take the steps described below.
Step 1: Insert new report and select taxonomy entry point
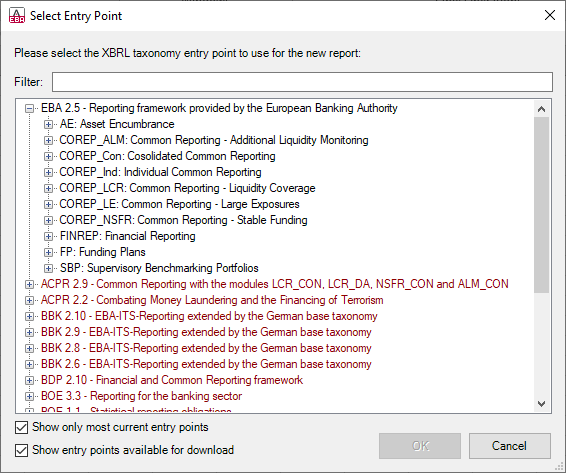
Click Insert New Report on the add-in ribbon. This opens the Select Entry Point dialog. Select the taxonomy entry point corresponding to the report you want to create (see screenshot below) and click OK.
You can filter entry points by keywords. By default, only the most current entry points for the current version of the add-in are shown. To show all the XBRL taxonomies available for download, select the check box Show entry points available for download. To show all versions, clear this check box. Entry points shown in red are not installed.
Because of memory requirements, some entry points cannot be loaded in the 32-bit version of the add-in. In this case, they appear as grayed out in the dialog box. To make the loading of such entry points possible, use Excel 64-bit and install the 64-bit version of the add-in.
Step 2: Fill in properties in the Select Entity Identifier
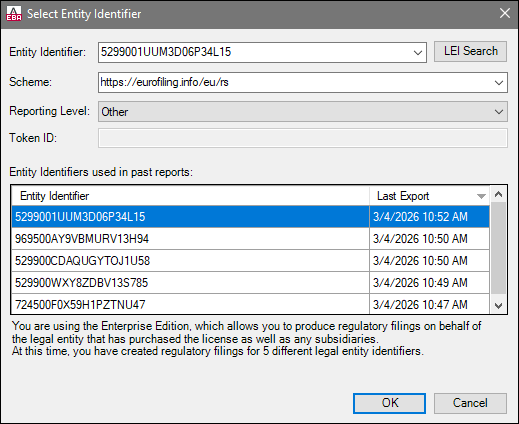
Fill in the following properties for this report in the Select Entity Identifier dialog (see screenshot below):
•Entity Identifier: The unique code used to identify the reporting institution (typically a 20-character LEI). You can enter a new identifier or select a previously used one from the list.
•Scheme: The unique URI (Uniform Resource Identifier) that identifies the type of identifier used. This allows the regulator to correctly verify and process the Entity Identifier.
•Reporting Level: Specifies the organizational scope of the report (e.g., Individual or Consolidated). The corresponding suffix will be added to the entity identifier in the exported XBRL report to indicate this scope.
•Token ID: Represents a unique security identifier required for EBA MICA reports. This ID is included in the Report Subject to authenticate the submission.
You can also fill in these details at a later stage.
In the Enterprise and Consultant editions, you can use the integrated LEI Search to find an entity’s Legal Entity Identifier, view its ownership hierarchy (direct and ultimate parents/children), and directly copy the LEI into your report settings.
Step 3: Select the appropriate tables
After the report tables have been loaded into Excel, navigate to the Tables section in the EBA Filing Pane (see below).
Select the tables you want to include in the report. Each included table appears on a new sheet in the Excel book. Selected tables will generate a true filing indicator. Unchecked tables will generate a false filing indicator. Each selected table will be added to the report and set as filed; all others will be excluded from the report.

Next steps
After creating an XBRL report or importing an existing one, you can proceed to enter data into tables, validate it, and export it to XBRL format. See the following topics for more information:
Update entrypoint (Enterprise and Consultant editions)
If you have already created a report and need to switch to a different version of the same taxonomy (newer or older), you can use the Update Entrypoint command on the ribbon. Clicking this command opens the Select Entry Point dialog (see above), in which you can select and install a different version of the taxonomy. The currently used taxonomy version is grayed-out in the Select Entry Point dialog.
When you install a different taxonomy version, it opens in a new workbook. The following rules apply:
•Facts in the original workbook that fully match concepts in the new entry point are copied automatically.
•Facts that cannot be matched (e.g., because data types differ between the old and new entry points) are not copied. You can copy these facts manually from the original workbook.
•Keeping the original workbook ensures that no data is lost.
Any facts that cannot be inserted into the new entrypoint are listed in the validation reports of the original and new workbooks. These reports include links to the affected facts. Clicking a link highlights the corresponding cell in the original report.