OCR Worklow
This topic describes the OCR workflow in the PDF Extractor. The OCR functionality is integrated as a pre-processing step. The workflow consists of the following procedures:
2.Create a PXT template and load your scanned PDF document.
3.At this stage, the PDF document is displayed in the PXT window. To start OCR, click Open OCR in the Properties Pane or Run OCR in the File menu. You will be prompted to save your document with an ocr.pdf extension. Once the document is saved, it opens in a new window.
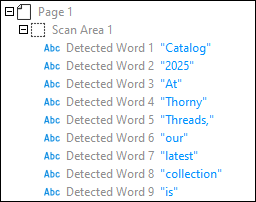
4.In the new window, the ocr.pdf document is processed automatically, and the results are displayed in the object tree (left-hand screenshot). If the  (Show Overlays) and
  (Show All Overlays) toolbar commands are enabled, the results can also be dispalyed in the document's scan area (right-hand screenshot). Revise the OCR results and adjust them if necessary.
5.Click Save.
6.Return to the PXT template and define extraction rules for your document.
7.Import the template into MapForce and create a mapping as required.
For more information about how to apply OCR to a scanned PDF document, see Tutorial.
Saving changes
The OCR editing state is stored directly in the PDF as hidden metadata. This enables you to:
•Save intermediate states without waiting for OCR to finish.
•Continue OCR later on partially processed documents.
•Maintain edits even if pages are added, removed, or replaced.
Tips
When working with the OCR feature, consider the following recommendations.
•Use UserWords to correct OCR errors or add missing text.
•For large documents, you can save your work at any point without waiting for full OCR processing.
•Define ScanAreas to cover only the regions you want OCR to process. You can create multiple ScanAreas per page if necessary.