Create a New Taxonomy
A new taxonomy would typically be created to extend one or more standard taxonomies. If a new taxonomy builds upon a standard taxonomy or some other already existing taxonomy, it must import that taxonomy. Alternatively, a new taxonomy can be built from scratch. In XMLSpy's XBRL View, you can easily import a standard taxonomy, such as US-GAAP, as a base taxonomy. The imported taxonomy can then be modified using the graphical interface of XBRL View.
The first step in creating a new taxonomy is to create its concept definitions file, which is an XML Schema (.xsd) file. Besides containing concept definitions, this file defines and declares the namespace of the new taxonomy, locates taxonomies to be imported, locates the relationships files of the taxonomy, and declares the namespace of imported taxonomies and other namespaces used.
Creating the concept definitions file
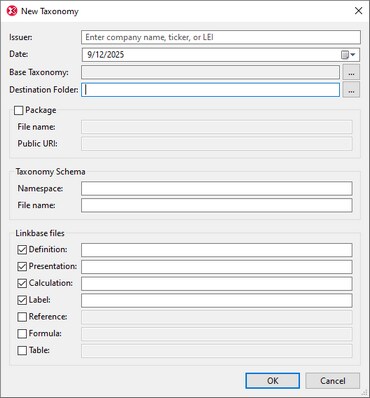
To create a new XBRL taxonomy, select the menu command XBRL | New Taxonomy. This pops up the New Taxonomy dialog (screenshot below), which is described broadly below and in more detail in the description of the menu command XBRL | New Taxonomy.
It is best to save the new taxonomy in its own dedicated folder since there will be multiple taxonomy files and it would be convenient to store them together in one folder. You might also want to consider storing the taxonomy as a taxonomy package (a zipped archive that contains a structured collection of a taxonomy's different files).
Overview of taxonomy-creation steps
The broad steps for building a taxonomy are as follows:.
1.In the New Taxonomy dialog (screenshot above), enter the details of the new taxonomy you are creating.
2.If you want to create a taxonomy that extends an existing taxonomy, then, in the New Taxonomy dialog, select the existing taxonomy as your base taxonomy. If you do not want to use a base taxonomy—that is, if you want to build your taxonomy from scratch—skip this step.
3.Make sure that you have given your taxonomy a target namespace. In the New Taxonomy dialog (screenshot above), this is entered in the Namespace field of the taxonomy schema. You can also do this via the XBRL | Set Target Namespace menu command.
4.The namespaces of the imported base taxonomy will be automatically declared in your taxonomy. You can conveniently add any other namespaces that you want, as described in the topic Setting Up the Taxonomy Files.
5.You can now extend the base taxonomy with your own elements and relationships.
Enter the new taxonomy details
In the New Taxonomy dialog (screenshot below), enter the taxonomy's essential properties (described below). For more details about the dialog's fields, see the description of the New Taxonomy command.
The most important fields of the dialog are described below. When you finish entering data in these fields, click OK. The new taxonomy will be created in the specified destination folder.
Issuer and Date
The issuer of the taxonomy and the date of creation. Since the new taxonomy you are creating will most likely be an extension taxonomy based on a standard taxonomy, you can, for example, enter the name of your organization as the issuer of the taxonomy. The values you enter in the Issuer and Date fields will be used to automatically generate the names of files and URIs in the other fields of the dialog. You can edit these auto-generated values in the dialog if you want.
Destination folder
The location where the taxonomy package or taxonomy files will be created.
Taxonomy Schema
This is the taxonomy's entry point schema. Enter its file name and target namespace.
Linkbase files
Select the check boxes of the linkbase files you want to create in the taxonomy and finalize their names. Note that you can always add linkbases after the taxonomy has been created. To do this, right-click in the taxonomy's Overview entry helper and select the Add New Linkbase command.
Example file: Step 1
Create a new taxonomy and save it with any name and the (.xsd file extension) to a suitable location. We will refer to the file we are creating as Nanonull.xsd. This is the same name as that of the supplied example in C:\Documents and Settings\<username>\My Documents\Altova\XMLSpy2026\Examples\XBRLExamples\Nanonull.
In the New Taxonomy dialog (screenshot at top of topic), for the base taxonomy, import the US-GAAP 2013 taxonomy. In the Overview entry helper, take a close look at all the imported taxonomies and referenced linkbases. Switch to Text View and look for the xs:import elements. In the Main Window of XBRL View, notice that imported concepts are indicated with a gray font color. Also notice that the Overview entry helper lists the linkbases and the imported schemas of the US-GAAP taxonomy.
In the next step, we will check the target namespace of the taxonomy and see how to edit the namespaces of the taxonomy.
