Install a Taxonomy
You can install a taxonomy by using the approaches listed below, as applicable.
Note the following:
•Installing or uninstalling a taxonomy from XBRL Taxonomy Manager takes effect for all user accounts on the same computer.
•Installing or uninstalling a taxonomy from XBRL Taxonomy Manager takes effect in all Altova XBRL-enabled applications installed on the same computer.
•If the current taxonomy has dependencies on other taxonomies, the dependent taxonomies are also installed (or uninstalled, as applicable).
Graphical user interface (Windows only)
To install a taxonomy:
1.Run XBRL Taxonomy Manager.
2.Select the check box next to the taxonomies or taxonomy versions you want to install, and click Apply.
Alternatively, if you have downloaded a file with the .altova_taxonomies extension from the Altova website, double-click the .altova_taxonomies file to run it. XBRL Taxonomy Manager opens when you run the .altova_taxonomies file.
Command line interface (Windows)
To install a taxonomy, run:
TaxonomyManager.exe install FILTER... |
Where FILTER means one of the following:
1.A taxonomy identifier in the format <name>-<version>, for example: eba-2.10, us-gaap-2020.0. To view all the available taxonomy identifiers and versions, run the list command.
2.An .altova_taxonomies file downloaded from the Altova website.
Command line interface (Linux, macOS)
To install a taxonomy, run:
sudo ./taxonomymanager install FILTER... |
Where FILTER means one of the following:
1.A taxonomy identifier in the format <name>-<version>, for example: eba-2.10, us-gaap-2020.0. To view all the available taxonomy identifiers and versions, run the list command.
2.An .altova_taxonomies file downloaded from the Altova website.
Installing taxonomies on demand
Whenever StyleVision Server detects that certain XBRL taxonomies must be installed on your computer, you may be prompted to install taxonomies on demand. For example, if you run a command that requires loading XBRL taxonomies, and if no XBRL taxonomies are currently installed, the command is cancelled and an error message similar to the following appears:
Unable to load a schema with target namespace [...] from [...].
Details:
I/O Error: File [...] is part of missing taxonomy [...]. Call 'taxonomymanager install [...]'.
To install the missing taxonomy, run the install command as suggested by the error message. You can always view all of the previously installed taxonomies by running the list command.
Applying patches
Occasionally, XBRL taxonomies may receive patches from their issuers. When the XBRL Taxonomy Manager detects that patches are available, the following happens:
•If you use XBRL Taxonomy Manager through the Windows graphical user interface, the respective XBRL taxonomies are shown with the ![]() icon.
icon.
•If you use the command line or a Linux/macOS system, any XBRL taxonomies that have patches are listed when you run the executable with the list -u command.
To apply a patch on Windows:
1.Click the Patch Selection button. The icon of each XBRL taxonomy that qualifies changes from ![]() to
to ![]() , and the dialog box informs you about the patches that are to be applied, for example:
, and the dialog box informs you about the patches that are to be applied, for example:
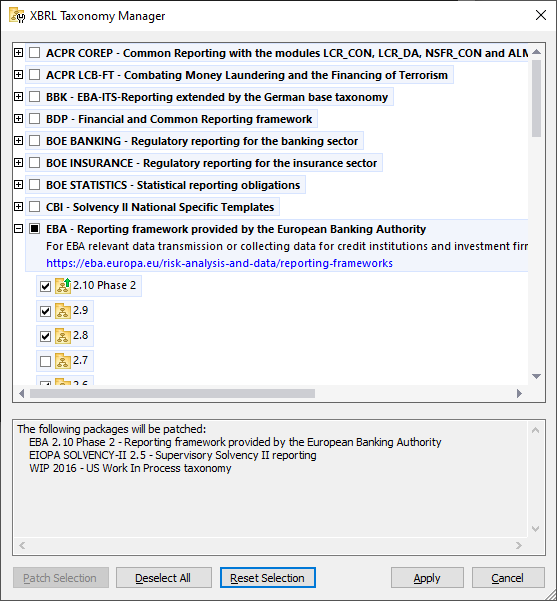
| Note: | The Patch Selection button is enabled only when there are patches available for any of the currently installed XBRL taxonomies. |
2.Click Apply.
To apply a patch at the command line interface:
1.Run the list -u command. This lists any taxonomies where patch upgrades are available.
2.Run the upgrade command to install the patches.
For more information, see the reference to the Command Line Interface.