Add Components
This topic explains how to add components to a mapping. To add a component, you need to create a new mapping design first and then do one of the following:
•In the Insert menu, choose a component type (e.g., XML Schema/File).
•Drag a file from Windows File Explorer into the mapping area.
•Click the relevant component button in the toolbar.
•Select a component from the Component Gallery (see below).
Each component type has a specific purpose and function. For an overview of components, see Components. To find out more about data structures that can be used as sources and targets, see Data Components. You can add a local file, a component from a URL or from the list of global resources (see subsections below). For information about MapForce components used to store data temporarily or to transform it, see Processing Components.
Add components via the Component Gallery
You can add components via the Component Gallery (screenshot below). It provides an overview of the available sources, targets, and data-processing components. Clicking a component will add it to the mapping.
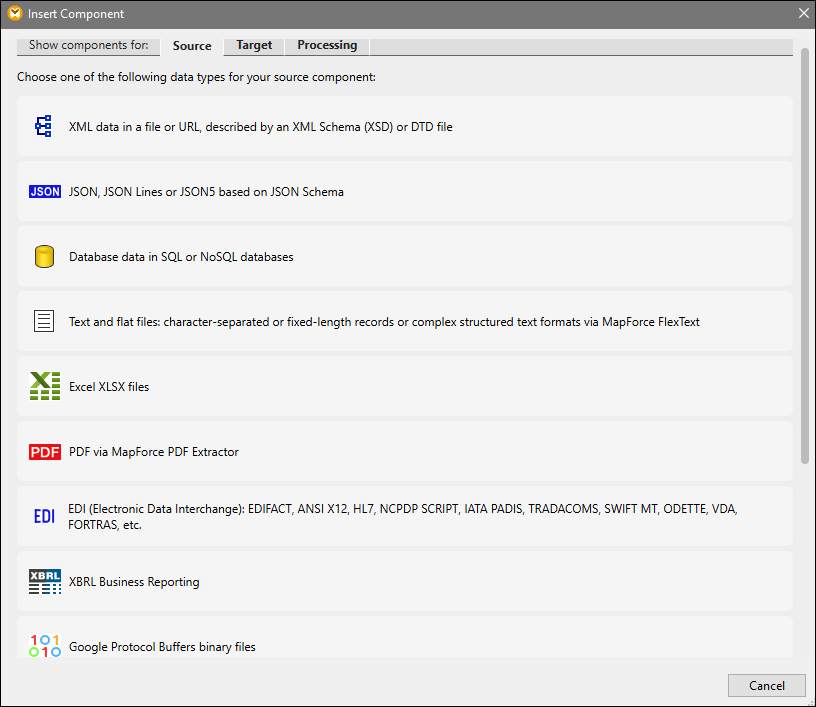
To access the Component Gallery, do one of the following:
•Click ![]() in the toolbar.
in the toolbar.
•Click Insert | Component from Gallery.
Add components from URL
Adding components from a URL is supported only for source components. The supported protocols are HTTP, HTTPS, and FTP. Depending on the type of data structure, the instructions on how to add a component from a URL may vary. For most data structures, the following instructions apply:
1.Select the component type you wish to add (e.g., XML Schema/File).
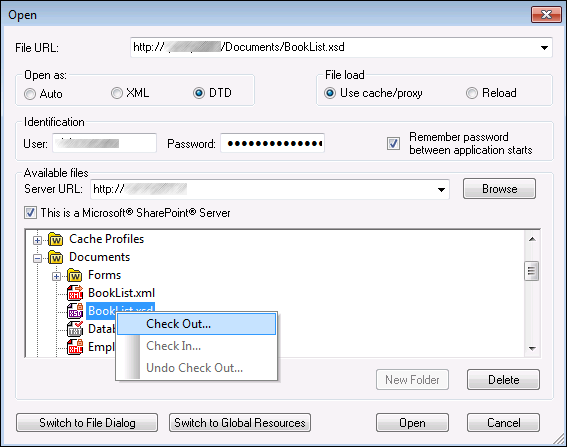
2.Click Switch to URL in the Open dialog box.
3.Enter the URL of the file in the File URL text box and click Open (see below).
The list below describes the available options in the Open dialog.
•Open as: This option defines grammar for the parser. The default and recommended option is Auto.
•File load: If the file you are loading is not likely to change, select the Use cache/proxy option to cache the data and speed up file loading. Select Reload if you want the file to be reloaded every time you open the mapping.
•Identification: If the server requires password authentication, you will need to enter your user name and password. If you want your user name and password to be remembered next time, select the check box Remember password between application starts.
•Server URL: For servers with Web Distributed Authoring and Versioning (WebDAV) support, you can browse files after entering the server URL in the Server URL text box and clicking Browse. Although the preview shows all file types, make sure to open the same file type as in Step 1 above. Otherwise, errors will occur.
•Check in/out: If you use a Microsoft SharePoint Server, select the check box This is a Microsoft SharePoint Server. This displays checked-in/checked-out files in the preview area. If you want to make sure that no one else can edit the file on the server while you are using it, right-click the file and select Check Out (see screenshot above). To check in any file that you previously checked out, right-click the file and select Check In.
•Switch to File Dialog: Clicking this button will redirect you to the dialog in which you can select a local file.
•Switch to Global Resources: Clicking this button will redirect you to the dialog that allows selecting a global resource.
Add global resources
If you have defined a database (Professional and Enterprise editions), a file, or a folder as a global resource, you can add it to your mapping. For more information about global resources, see Altova Global Resources. Depending on the type of data structure you are working with, the instructions on how to add a global resource may very. For most data structures, the following instructions apply:
1.Select the component type you wish to add (e.g., XML Schema/File).
2.Click Global Resources in the Open dialog box.
3.Select one of the resources from the list and click Open (see below).
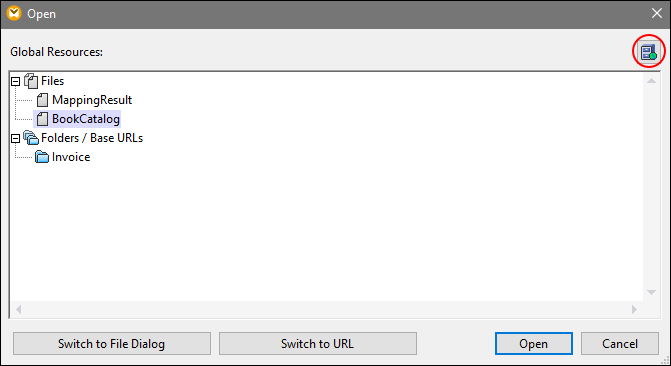
If you want to add, edit, or delete global resources, click the Manage Global Resources icon (circled red above). The Open dialog for global resources allows you to switch back to the dialog with local files (Switch to File Dialog) or open a file from a URL (Switch to URL).