Windows App
The Windows App format is for Windows touch devices (such as tablets running Windows RT) and PCs running Windows 8.1 or higher. The generated program code for Windows Apps is in C++. It is generated in the directory you specified in Screen 7 of the Generate Program Code Wizard. You can open the generated C++ project (some-app-name.vcxproj) in Visual Studio and build the project into a Windows App. The output of the build process includes a file with the .XAP extension. This is a zip file that contains all the files required by your app, and it is the file that you publish to the Windows App Store.
For additional information, see the Readme.docx file in the MobileTogether Designer program files folder: C:\Program Files (x86)\Altova\MobileTogetherDesigner9\MobileTogetherSPL\WindowsApp.
Requirements
In order to build, test and publish the Windows App from the generated program code, you will need the following:
•A Windows app developer account. You will need this to publish your app to the Windows Store. For details, see the Microsoft information about opening an account.
•Visual Studio 2015 Update 3, Visual Studio 2017, and Visual Studio 2019. For each of these versions, the respective additional components listed below are also required.
•Windows 8.1 or higher for testing the app.
Additional components for different Visual Studio versions:
Visual Studio 2015 Update 3
•Universal Windows App Development Tools (1.4.1) and Windows 10 SDK (10.0.14393)
•Windows 8.1 and Windows Phone 8.0/8.1 Tools: Tools and Windows SDKs
Visual Studio 2017
•C++ Universal Windows Platform Tools
•Windows 10 SDK (10.0.14393.0)
•Windows 8.1 SDK (can be found under "SDKs, libraries, and frameworks" in "Individual components")
Visual Studio 2019
Either one of the following:
•Visual Studio has the following components: (i) Windows 10 SDK (10.0.17134.0); (ii) MSVC v141 – VS 2017 C++ x64/x86 build tools; (iii) MSVC v141 – VS 2017 C++ ARM build tools;
•The generated project is re-targeted to use Toolset v142. Do this as follows: In Visual Studio's Solution Explorer: (i) select the project; (ii) run the Retarget Projects command in the context menu. If you expect your app to be used on Windows Phone, then select Windows SDK 10.0.17134.0 or older. Note that version 10.0.17763.0 or newer will generate a .msix installer package, which cannot be used on Windows Phone. Note also that the minimum version of the Windows SDK that the MobileTogether libraries support is 10.0.10586.0.
Building the app
The broad outline for building the app is as follows:
1.Open the generated program code in Visual Studio. The file to open will be a .vcxproj file in the target directory you specified in Screen 7 of the Generate Program Code Wizard.
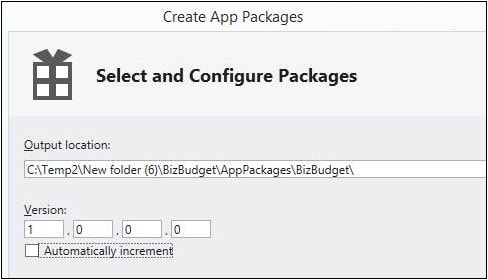
2.In Visual Studio, set the build configurations to Windows 32, Windows 64, or ARM. For the Version setting (see screenshot below), use the same version number as you entered in Screen 1 of the Generate Program Code Wizard. For example: If you entered 10 as the version number in the wizard, then make sure that the version number in Visual Studio is 10.0.0.0. Also, in Visual Studio, make sure that you uncheck the Automatically Increment option of the Version setting (see screenshot below). If this option is checked, the version number will automatically increment each time you build the app, and will lead to a mismatch with the number entered in the wizard.
3.In the combo box to the right of the Run button (in the toolbar), select Debug, and then click Run, or press F5, or select Debug | Start Debugging.
4.Some exceptions will be reported because Visual Studio cannot check the existence of some MobileTogether project or workflow files. Ignore these exceptions.
5.If you need to modify the program code, decide whether the SPL templates that generate the program code need to be edited or whether the modifications are limited to entries in the Generate Program Code Wizard. If the former, then edit the SPL template/s. Run the Generate Program Code Wizard to re-generate the program code, then re-test.
6.To build the release app, go to the combo box next to the Run button and select Release. Then choose Project | Store | Create App Packages. This opens a wizard.
7.In the screens of the wizard, select the options you want and provide the information requested.
8.After completing the wizard, press Create. Visual Studio will start building the app.
For each selected platform (Win-32, Win-64, and ARM), an APPXUPLOAD file is created. This is the file to upload to the Windows Store. Additionally, for each platform, a folder will be created (with WindowsStore in its name), which contains an installer package that enables you to install the compiled app on the respective platform. This enables the app to be tested on multiple machines before it is published to the Windows Store. How to install from this package is described in the next section.
Installing the app directly
You can install the Windows app directly on PCs or tablets running Windows 8.1 or higher. Installing in this way (as opposed to downloading the app from the Windows Store) is convenient, for example, if you wish to test the app on multiple workstations or distribute it directly.
1.On the PC or tablet, go to the Start page, and search for Windows PowerShell. Right-click it and choose Run as administrator.
2.In PowerShell, type: set-executionpolicy unrestricted
3.Press Enter, and confirm with Y and Enter. (You only have to do this once.)
4.Type: Show-WindowsDeveloperLicenseRegistration , and press Enter.
5.Complete the dialog in order to get a Windows Developer License. (You only have to do this once.)
6.Copy the files of the compiled App package to your PC or tablet.
7.In PowerShell, navigate (using the cd command) to where you copied the files.
8.Type: Add-AppDevPackage.ps1 to start the .ps1 script in that folder, and then press Enter. (Another way to start the .ps1 script is to use the context menu command Run in PowerShell (or something similar).)
9.Your app should then be installed on the Start page and be ready for testing.