Running a Database Schema Comparison
A database schema comparison in DiffDog involves the steps shown below.
Step 1: Connect to the databases that are to be compared
1.On the File menu, click Compare Database Schemas. (Alternatively, click the Schema Comparison  toolbar button.) At this stage, you may be prompted to add a new data source, if no connected data source already exists. In this case, click Yes and follow the wizard steps to create a new data source (see Connecting to a Database).
2.When prompted to select database objects for comparison, first choose a data source from the Data Source list, and then select the check boxes next to the objects you want to include for comparison. The Data Source list displays any active data sources that you've connected since starting DiffDog.
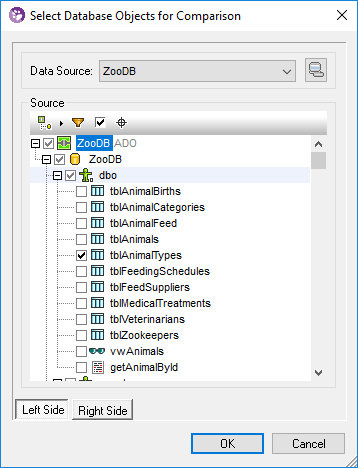
| Note: | From the dialog box above, you can optionally group, filter, or navigate database objects using the buttons above the database tree structure. For more information, see Navigating Database Objects. |
3.Click either Left Side or Right Side to add the data source to the left or right side of the comparison, respectively, and then click OK. Be patient while DiffDog adds the selected objects to the comparison. At this stage, only one of the comparison components (right or left, depending on what you selected) has an assigned data source.
4.Click the Browse  button of the empty component, and choose the second data source from the Data Source list, if one is available. Otherwise, click Quick Connect
  , and follow the wizard steps to connect to the second data source.
5.Select the check boxes next to the objects you want to compare, and then click Left Side (or Right Side, depending on the case).
If the databases to be compared are SQLite or Access, you can also perform this step from Windows Explorer, see Quick Comparison of SQLite and Access Databases.
Step 2: Map the objects to be compared (if applicable)
To perform a comparison, the objects on the left and right side of the comparison must be connected by a line (a "mapping"). The mapping instructs DiffDog to compare these two objects specifically. By default, DiffDog will attempt to match automatically the objects to be compared by their name, and thus create the corresponding mappings. The mapping options can be adjusted from Tools | DiffDog Options | Database Comparison. When necessary, you can create mappings manually, or adjust the existing ones. For example, you may need to create a mapping manually between two objects if the object names are different in the "left" as opposed to the "right" database. To create a mapping, click the triangle on the left component and, holding the left mouse button pressed, drag it to a target triangle on the right component.
To delete all mappings of a comparison, right-click the title bar of either component and choose Unmap items from the context menu. To delete a single mapping, right-click the appropriate object and choose Unmap selected from the context menu. Alternatively, click the connection line between two mapped objects and press Delete.
| Note: | Unmapping a table will also unmap all columns of that table. |
Step 3: Run the comparison
Once the mappings between objects are created, you can run the comparison:
•On the Diff and Merge menu, click Start Comparison. (Alternatively, click the Start Comparison  toolbar button, or press F5.)
The result of a comparison is indicated by the following icons:
 The compared objects are equal in both components
 Differences exist between the objects in the left and right components
Schema objects that are different are highlighted with green colour.
To simplify navigation through huge schemas which contain a lot of objects, you can collapse and expand individual objects when you are examining the differences. If you double-click an item in one component, both versions of the item are collapsed or expanded, respectively, simultaneously in both components. To collapse all items in both components, do one of the following:
•On the Diff and Merge menu, click Collapse items.
•Right-click the title bar of a component, and select Collapse items from the context menu.