Document Content
Editing XML content in Grid View is straightforward: Double-click inside the content field and edit the content as required. The node type can be quickly changed by clicking the node's Type icon and selecting another type from the menu that appears. Entities can be inserted via the Entities entry helper. Grid View additionally offers validation and find-and-replace functionality.
Selection and conversion of the node's type
The cells in Grid View contain nodes of the XML document. For ease of understanding, we have grouped the types as follows:
•Name–Value types: Element, attribute, processing instruction (PI). Nodes of this type have names and values.
•Value types: Text, CDATA, comment, entity/character references. Nodes of this type take values only.
•Definition types: XML declaration, DOCTYPE (internal or external DTD). These nodes define properties of the XML document.
•Special container types specific to XMLSpy: Formula.
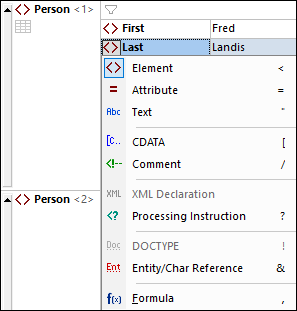
The type of a value is indicated by a symbol in front of the value (see screenshot below). To change a type, click its symbol and select the type you want from the menu that appears. Alternatively, right-click in a cell and, from the context menu that appears, select a type from the Type sub-menu. The symbols and shortcuts of types are shown in the screenshot below:
Note the following points:
•Nodes of type Element, Attribute, and PI take a name and a value, whereas nodes of type Text, CDATA, and Comment take only a value. For example, an element node will have a name and content, whereas a text node will have only a value.
•Type conversions try to preserve the original key and value. For example, if you convert an element to an attribute, the attribute will have (i) the same name as the element, and (ii) a value that is, as far as possible, the same as the content of the element.
•In the sequence of an element's child nodes, attributes are always listed first. As a result, type conversions could lead to a reordering of nodes.
•In the case of mixed content (character data interspersed with element children, such as a paragraph element that contains text as well as bold and italic elements), consecutive text nodes are not allowed and so might automatically be joined.
•You can set an option to determine whether, when multiple nodes are selected for conversion to a single type, this change should go ahead or not, or whether you should be warned.
•You can edit raw text in a cell or a row by selecting the parent cell or parent row to be edited in this way and then clicking the Edit as Raw Text icon in the toolbar. When you edit text as raw text, entities and markup in that cell or row will not be resolved, respectively, into glyphs and Grid View components (and can therefore be edited).
Auto-completion
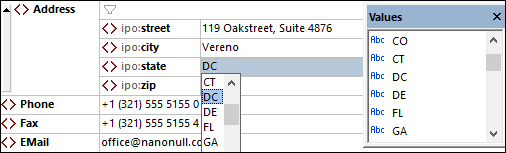
Auto-completion is enabled when the XML document being edited is associated with a schema.
Auto-completion provides you with entry options at the cursor location (see screenshot below). These options, which are based on the definitions in the schema, are provided (i) via pop-ups in the main window, and (ii) via the entry helpers. The pop-ups and entry helpers each display a list of entries that are valid at that cursor location. To move through the entries in the pop-up list, use the arrow keys. Select an entry from the pop-up window or double-click an entry in the entry helper to insert it.
Toolbar/in-cell command buttons
In XML Grid View, buttons in grid cells or in the Grid View toolbar provide functionality that is available in the context of the current selection (cell or column). Using these commands is a faster and easier way to carry out commonly used operations. The available commands are listed in the table below. Display-related commands are shown with a blue background. Commands for editing the document (structure and content) are shown with a beige background. For additional commands in a particular cell's context, use the cell's context menu. Note: The name of a command is displayed as a tool tip when you hover over the cell button or toolbar icon.
| Optimizes widths of grid columns according to cell content. |
 / /  | When colored, Table Display is on, otherwise off. Click to switch the display |
 / /  | A toggle command in top left cell of table. Switches rows to columns and vice versa |
 / /  | When colored, a filter for the table, object, or array is active, otherwise the filter s deactivated. Click to deactivate/activate. To edit the expression, double-click it |
| Toggle command to word-wrap cells. When selected, word-wrap is on. By default. only the contents of items are wrapped. If you want to additionally wrap the names of items, choose this option from the icon's dropdown list. |
| Zoom level of Grid View |
Enabled when a column header in Table View is selected. The buttons sort the rows of the table, respectively, in descending or ascending order of column content |


| Note: | For a description of other toolbar commands, see the section Context Menu in Grid View. |
Validate on modification
The Validate on Edit mode is toggled off by default. When toggled on, well-formed checks and validation checks are carried out as you edit a document in Grid View. For validation to be carried out (additional to well-formed checks), a DTD or XML Schema must be assigned to the document. Errors are shown by displaying erroneous text in red and flagging the location with a red exclamation mark. If a smart fix is available for an error, then a light bulb icon is shown on the line that generates the error. When you place the mouse over the icon, a popup appears that lists available smart fixes. Select a fix to apply it immediately. See Validating an XML Document for more information.
The Validate on Edit mode can be toggled on/off either (i) via the XML | Validate on Edit menu command, (ii) the Validate on Edit toolbar button, or (iii) via the On Edit option of the Validation settings of the Options dialog.
Find and Replace
You can use the Find (Ctrl+F) and Replace (Ctrl+H) commands of the Edit menu to find text in Grid View and replace it. Results are highlighted in orange, and containing cells also highlighted in orange.
Display as table
Repeating elements are shown in standard Grid View, one after the other, progressing vertically downward in document order (screenshot below left). However, displaying repeating elements as the rows of a table provides additional editing features. In the screenshots below, the Person element is the repeating element. The screenshot at left shows standard Grid View; the first Person element is shown expanded, while subsequent instances are shown collapsed. The screenshot at right shows the repeating Person elements as the rows of a table.
To switch to Table View, click the Table Mode icon (circled in green in the screenshot below left). When switched to table display, the icon is displayed in color (see screenshot below right).

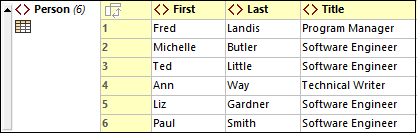
Table View offers unique editing benefits in that whole rows and columns can be manipulated relative to other columns and rows in the table. This enables such operations as sorting table rows on the values of one column. For example, in the screenshot above right, the six Person elements can be sorted on the basis of their Last child elements via a single command in the Grid View toolbar. This is simpler than running an XSLT transformation, which would be the usual way to sort an XML nodeset.
For more information, see the topic Table Display.