Including other UModel projects
When you want to generate code from a model, or import source code into a model, a profile project applicable to that specific language (for example, C#, Java, VB.NET) must be included in your UModel project.
To include a UModel project as a subproject of another UModel project, select the menu command Project | Include Subproject. As illustrated below, several .ump subprojects (language profiles required for code engineering) are available on the Basic tab. In addition, several .ump subprojects containing C#, Java, and VB.NET types, organized by version, are available in tabs with the same name.
In order for all types to be recognized correctly during code engineering, make sure to include both the language profile (for example, the C# profile) and the types project of the corresponding language version (for example, .NET 5 for C# 9.0). Otherwise, an "Unknown Externals" package will be created in the project which will include all unrecognized types. Note that, for C++, there are no "types" projects, only a C++ language profile exists. |
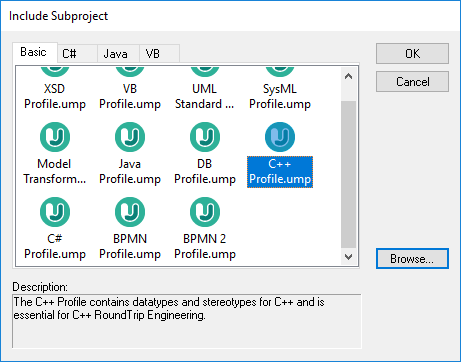
Include Subproject dialog box
The tabs and UModel projects (.ump files) available on the "Include Subproject" dialog box are configurable. Namely, UModel reads this information from the following path relative to the "Program Files" folder on your operating system: \Altova\UModel2024\UModelInclude. Note that the project files available on the Basic tab exist directly under the UModelInclude folder, while projects in each of the Java, VB, and C# tabs exist as subfolders of the UModelInclude folder.
To view all currently imported projects:
•Select the menu option Project | Open Subproject Individually. The context menu displays the currently included subprojects.

To create a custom tab on the "Include Subproject" dialog box:
•Navigate to the \Altova\UModel2024\UModelInclude folder (relative to your "Program Files"), and create your custom folder in it, for example \UModelInclude\myfolder. The name you give to the folder determines the name of the tab on the "Include Subproject" dialog box.
•Copy to your custom folder any .ump files that you want to make available on the corresponding tab.
To create descriptive text for each UModel project file:
•Create a text file using the same name as the *.ump file and place in the same folder. For example, the MyModel.ump file requires a descriptive file called MyModel.txt. Please make sure that the encoding of this text file is UTF-8.
To remove an included project:
1.Click the included package in the Model Tree view and press the Delete key.
2.When prompted, click OK to delete the included file from the project.
To delete or remove a project from the "Include Subproject" dialog box:
•Delete or remove the (MyModel).ump file from the respective folder.