Design View Symbols
An SPS design will typically contain several types of component. Each component is represented in the design by a specific symbol. These symbols are listed below and are organized into the following groups:
•XML document content
•Data-entry devices
•Predefined formats
•XPath objects
•URI objects
Each of these component types can:
•be moved using drag and drop;
•be cut, copied, pasted, and deleted using (i) the commands in the Edit menu, or (ii) the standard Windows shortcuts for these commands;
•have formatting applied to it;
•have a context menu pop up when right-clicked.
Element and attribute nodes in the XML document are represented in the SPS design document by tags. Each node has a start tag and end tag. Double-clicking either the start or end tag collapses that node. When a node is collapsed all its contents are hidden. Double-clicking a collapsed node expands it and displays its content.
The following types of node are represented:
•Document node
The document node (indicated with \$XML) represents the XML document as a whole. It is indicated with a green \$XML tag when the schema source is associated with an XML document, and with \$DB when the schema source is associated with a DB. The document node in the screenshot at left is expanded and contains the OrgChart element, which is collapsed. The document node in the screenshot at right is collapsed; its contents are hidden.
•Element node


An element node is inserted together with all its ancestor elements if the ancestors are not present at the insertion point. In the screenshot above, the Name element node is shown expanded (left) and collapsed (right).
•Attribute node
An attribute node is inserted together with all its ancestor elements if the ancestors are not present at the insertion point. Attribute names contain the prefix =. In the screenshot above, the href attribute node is shown expanded (left) and collapsed (right).
Nodes are included in the design as node templates. For information on the various kind of templates that can be included in the design, see the section, Templates and Design Fragments.
XML document content is represented by two placeholders:
•(contents)
•(rest-of-contents)
The contents placeholder represents the contents of a single node. All the text content of the node is output. If the node is an attribute node or a text-only element node, the value of the node is output. If the node is an element node that contains mixed content or element-only content, the text content of all descendants is output. In XSLT terms, the contents placeholder is equivalent to the xsl:apply-templates element with its select attribute set for that node..
| Note: | When applied to an element node, the contents placeholder does not output the values of attributes of that element. To output attribute nodes, you must explicitly include the attribute in the template (main or global). |
The rest-of-contents placeholder applies templates to the rest of the child elements of the current node. The template that is applied for each child element in this case will be either a global template (if one is defined for that element) or the default template for elements (which simply outputs text of text-only elements, and applies templates to child elements). For example, consider an element book, which contains the child elements: title, author, isbn, and pubdate. If the definition of book specifies that only the title child element be output, then none of the other child elements (author, isbn, and pubdate) will be output when this definition is processed. If, however, the definition of book includes the rest-of-contents placeholder after the definition for the title element, then for each of the other child elements (author, isbn, and pubdate), a global template (if one exists for that element), or the default template for elements, will be applied.
In order to aid the Authentic View user edit the XML document correctly and enter valid data, data-entry devices can be used in the design. You can assign any of the following data-entry devices to a node:
•Input fields (single line or multi-line)

•Combo boxes
•Check boxes
•Radio buttons
These tags can be collapsed and expanded by double-clicking an expanded and the collapsed tag, respectively. For a detailed description of how each of these data-entry devices is used, see Data-Entry Devices.
Predefined formats are shown in mauve tags, which can be expanded/collapsed by double-clicking.
The screenshot above shows tags for the predefined format p (para), expanded (at left) and collapsed (at right). To apply a predefined format, highlight the items around which the predefined format is to appear (by clicking a component and/or marking text), and insert the predefined format.
StyleVision features two mechanisms that use XPath expressions:
•Conditional templates
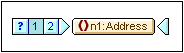
Condition tags are blue. The start tag contains cells. The leftmost cell contains a question mark. Other cells each contain either (i) a number, starting with one, for each when condition; and/or (ii) an asterisk for the optional otherwise condition. A condition branch can be selected by clicking it. The number of the selected condition branch is highlighted in the start tag, and the template for that branch is displayed (within the start and end tags of the condition). The XPath expression for the selected condition branch is also highlighted in the Design Tree. Note that tags for conditions cannot be expanded/collapsed.
•Auto-Calculations
Auto-Calculations are represented in Design View by the =(AutoCalc) object (see screenshot above). The XPath expression for the selected Auto-Calculation is highlighted in the Design Tree. The dialog to edit the Auto-Calculation is accessed via the Properties sidebar.
There are three URI-based objects that can be inserted in a design:
•Images
If an image is inserted in the SPS design and can be accessed by StyleVision, it becomes visible in Design View. If it cannot be accessed, its place in the SPS is marked by an image placeholder.
•Bookmarks (Anchors)
Bookmark tags are yellow and indicated with the character A (screenshots above). A bookmark is created with the command Insert | Insert Bookmark, and can be empty or contain content. Content must always be inserted after the anchor is created. Anchor tags can be expanded (screenshot above left) or collapsed (screenshot above right).
•Links
Link tags are yellow and indicated with the character A (screenshots above). A link is created with the command Insert | Hyperlink. The object around which the link is created can be inserted in the design before or after the link is created. If an item is to be created as a link, it should be selected and the link created around it. Link tags can be expanded (screenshot above left) or collapsed (screenshot above right).
