Example: Write Data to Protocol Buffers
This example shows you how to write data to binary files encoded in Protocol Buffers format. In this demo, the source data comes from a SQLite database (Nanonull.sqlite); however, you can use a similar approach to extract data from various other formats supported by MapForce, such as XML, EDI, JSON, and others.
The source demo database stores data about persons, their addresses, and products they ordered from a store. The business requirement is to extract order information from the database and to generate multiple binary files in Protocol Buffers format. One binary file with .dat extension must be generated for each order. The generated file name must contain the order's unique ID, for example, Order1.dat, Order2.dat, and so on. Also, each binary file must include the order ID, the person's name and email address, date, and shipping address information. More specifically, the .proto file that describes the structure of an order looks as follows:
syntax="proto3";
package mapforce.demo;
message Order { int32 id = 1; string name = 2; string email = 3; DateType entry_date = 4; // An order can have multiple addresses (shipping, billing) repeated AddressType address = 5; }
message DateType { // Must be from 1 to 9999 int32 year = 1; // Must be from 1 to 12 int32 month = 2; // Must be from 1 to 31, and valid for the year and month int32 day = 3; }
message AddressType { string city = 1; string street = 2; int32 number = 3; bool shipping = 5; bool billing = 4; } |
orders.proto
Both the Nanonull.sqlite database and the orders.proto file are available in the following directory: <Documents>\Altova\MapForce2024\MapForceExamples\Tutorial\. The mapping design file that performs the transformation is called GenerateOrders.mfd and is available in the same directory. You can open the mapping and run it directly, or follow the steps below to create it from scratch.
GenerateOrders.mfd
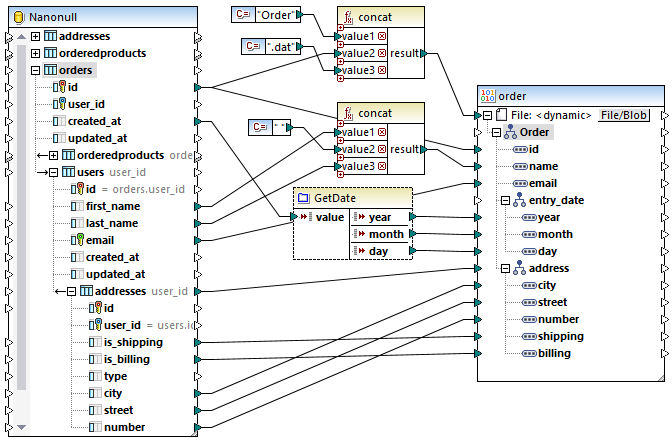
As illustrated above, the mapping consists of a source component (the SQLite database) and a target component (the binary component). In the source database, the main table relevant for this mapping is orders.
Notice that table users is nested under table orders, because MapForce detected automatically a foreign key relationship between these two tables. Likewise, table addresses is nested under users. All the connections drawn from such nested tables ensure that key relationships are preserved by the mapping. For more information, see Handling Database Relationships.
On the target side, the File<dynamic> item illustrates that the binary component is set to generate instance files dynamically, based on information received from the mapping. To have a target component generate files dynamically, click the ![]() button and select Use Dynamic File Names Supplied by the Mapping from the context menu. For more information about dynamic file names, see Processing Multiple Input or Output Files Dynamically.
button and select Use Dynamic File Names Supplied by the Mapping from the context menu. For more information about dynamic file names, see Processing Multiple Input or Output Files Dynamically.
In this mapping, for each id in the orders database table, a new file will be generated, as shown by the connection to the File: <dynamic> item. The name of each generated file is created with the help of the first concat function. This function joins the string "Order" with the unique ID of the order from the database, and with the extension ".dat". Therefore, the generated files will get names like Order1.dat, Order2.dat, and so on.
The concat function is also called a second time by the mapping. This time it returns the name of the person, by concatenating the first and last name, and inserting a space character in between.
Finally, the "GetDate" component in the middle is a user-defined function that populates the date fields in the binary file. This function takes as input a date expressed as string, parses it, and returns the year, month, and day separately as integer values. This conversion is required to accommodate the date format as it was defined in the .proto file. If you double-click the function's title bar on the mapping, you can view or change the definition of this function.
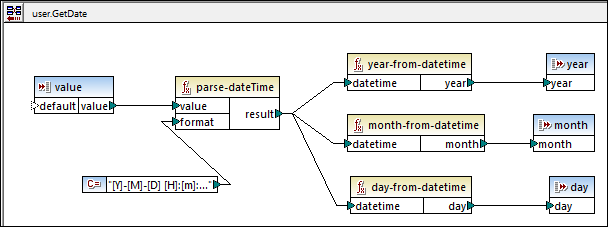
"GetDate" user-defined function
As illustrated above, the "GetDate" user-defined function parses the input value with the help of the parse-dateTime built-in function. The mask [Y]-[M]-[D] [H]:[m]:[s] matches the date format as it is stored in the database, for example, 2017-10-19 08:09:54. For more information about format masks, refer to the description of the parse-dateTime function. Next, various built-in functions are called to extract and return the significant date parts from the parsed date.
Creating the mapping
To create the mapping above (or a similar mapping) from scratch, take the following steps:
2.Insert the target .proto file, see Adding Binary Files to the Mapping.
3.Configure the target component to generate file names dynamically, when the mapping runs. To do this, click the  button and select Use Dynamic File Names Supplied by the Mapping from the context menu. Next, connect the File<dynamic> item to some input that provides the file name. In this example, the file name is produced with the help of the concat function, as mentioned above. For more information about dynamic file names, see Processing Multiple Input or Output Files Dynamically.
4.Optionally, add any MapForce built-in functions and connect their inputs. In this example, the concat function is used in two occurrences. For more information, see Add a Function to the Mapping. Note that, when you call built-in functions such as concat, it is likely that some of the input data will come from string constants. For information about how to add such constants, see Add a Constant to the Mapping.
5.Optionally, add any user-defined functions if required. These help you abstract away some of the mapping details and focus on the big picture. In this example, the "GetDate" user-defined function converts a string into date parts, as mentioned, and its implementation logic is hidden from the main mapping. For more information about creating custom functions, see User-Defined Functions.
If you are completely new to MapForce, see the Tutorials chapter for simple step-by-step examples.
Running the mapping
As outlined in the business requirement at the beginning of this example, the mapping is expected to produce multiple .dat files. To preview the generated files, click the Output pane.
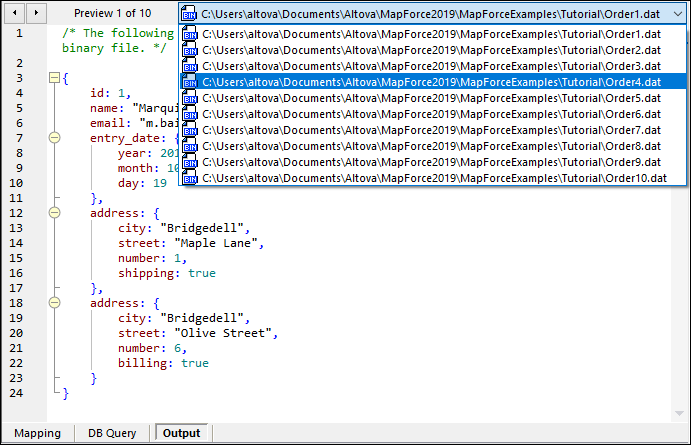
As illustrated above, the Output pane displays all the generated files, and you can navigate through them by clicking the directional buttons, or by picking an item from the list. To save the generated output, do one of the following:
•On the Output menu, click Save All Output Files (  ).
).
•Click the Save all generated outputs ( ) toolbar button.
When you preview output binary files generated with MapForce, their structure is displayed as JSON since this format is human-readable as opposed to binary format. Viewing the output as JSON is to help you test the mapping. When you save the output file, it will be saved as a binary file, however. |
Automation with MapForce Server
If you have licensed MapForce Server, you can also run the mapping at the command line, on a Linux, macOS, or Windows machine, as follows:
1.Compile the mapping to a MapForce Server execution file (.mfx) with the menu command File | Compile to MapForce Server Execution File, see also Compiling Mappings to MapForce Server Execution Files.
2.Copy the .mfx file to the server machine.
3.Since this mapping reads data from a SQLite database file, copy the Nanonull.sqlite database file to the same directory as the .mfx file on the server. For other database kinds, see Database mappings in various execution environments.
4.Run MapForce Server with the command below.
mapforceserver run GenerateOrders.mfx |
Notes:
•mapforceserver is the path to the MapForce Server executable as applicable for your operating system.
•Change the path to the .mfx file as applicable, or copy the .mfx to the same folder as the executable.
In server execution, you can also run mappings as an API call, or as FlowForce Server jobs, either on demand or on recurring basis. For more information, see Automation with MapForce Server.