Receive AS2 Messages
With FlowForce Server, you can create jobs to receive AS2 messages from you organization's partners, process this data, and store it locally. In general, such jobs share the same characteristics as other FlowForce jobs, and, in addition, provide the following extra functionality:
•You can create, directly from the job configuration page, an AS2 service that listens to requests.
•As further illustrated below, the job that receives AS2 data takes two predefined parameters, partner and message. These parameters provide information about the sending partner and the incoming message, respectively.
Exposing a job as AS2 service roughly works in the same way as exposing a job as a Web service, see also Exposing Jobs as Web Services. Namely, the AS2 service URL is in a format like http(s)://<flowforce-server>:<port>/service/<as2-service-name>, where:
•<http(s)> refers to the protocol that you can choose, HTTP or HTTPS (this is configured from the FlowForce Server setup page, see Defining the Network Settings)
•<flowforce-server> is the host name or IP address of the machine where FlowForce Server runs
•<port> is the port name (by default, 4646). Note that HTTP and HTTPS have different port numbers, as configured from the setup page, and, specifically, from the "FlowForce Server" section, see Defining the Network Settings
•service—this URL part is always the same and cannot be changed
•<as2-service-name> is the custom name you want to give to your AS2 service. You can define this URL part when you create the job.
Depending on your needs, you can configure FlowForce Server to accept requests from unauthenticated clients (thus making the service public) or request basic HTTP authentication from clients. To make the AS2 service accessible without authentication, create the AS2 service job in a FlowForce Server container where the user  anonymous has the following permission: "Service: Use". For more information about containers and permissions, see Permissions and Containers. For an example of such configuration, see Example: Full AS2 Message Exchange (Simple).
Prerequisites
Before you can receive AS2 data from partners, the following prerequisites must be met:
•The details of each partner from whom you will be receiving data must be added to FlowForce Server, see Configuring AS2 Partners.
•The "FlowForce Server" service must accept connections from remote clients on the designated URL, as mentioned above.
By default, FlowForce Server accepts connections from localhost on port 4646. To make the AS2 service accessible to machines other than localhost, open the setup page, and change the Bind address of FlowForce Server to All interfaces (0.0.0.0) or to a specific interface, see Defining the Network Settings. In addition, make sure that FlowForce Server is allowed to communicate through the operating system's firewall. |
| Note: | The "FlowForce Server" service should not be confused with the "FlowForce Web Server" service. The latter is used to access the Web administration interface, accepts connections on port 8082 and has separate configuration, see also How It Works. |
Creating the AS2 service
This example illustrates how to create a job that exposes an AS2 service. First, log on to FlowForce Web administration interface (see Logging on to FlowForce Server). You could create the AS2 service in the default public container; however, it is a good idea to create a separate container for it (because this service might need separate permissions). Click Configuration, and then click Create | Create Container.
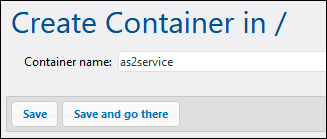
Enter a container name (for example, "as2service"), and then click Save and go there. Next, click Create | Create job. The job configuration page opens:
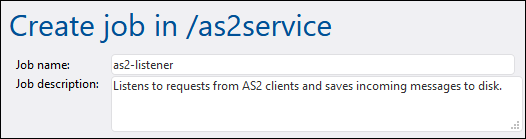
To turn this job into an AS2 service, select the check box Make this job available at... and enter the name of the service (for example, "as2-receiver"). In addition, make sure to select AS2 service from the drop-down list.

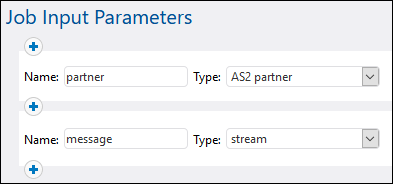
Note that two new parameters have now been added automatically to the job:
Parameter | Purpose |
|---|---|
partner | This parameter provides information about the AS2 partner that sent the message. The parameter data type is "AS2 partner". You can process this object in a subsequent step and get the partner's local or remote name as string, with the help of FlowForce expression functions as2-partner-local-name or as2-partner-remote-name. |
message | This parameter provides access to the incoming message. The data type of the message is "stream". As illustrated below, you can convert the stream to a file using FlowForce expression functions. |
| Note: | The predefined parameters partner and message must not be deleted. If you do not use the predefined parameters in subsequent steps, you can ignore them—this does not make the job invalid. However, you will typically want to process at least the incoming message in some way (for example, save it to a file). As illustrated below, this can be done by using FlowForce expression functions, and, in particular, MIME Expression Functions. In some cases, you might want to add extra parameters to the job (for example, to define some constant value reusable across multiple steps)—if you do this, ensure that the parameter has a default value; otherwise, the job will not be started when an AS2 message arrives, and an error message will be logged. |
So far, the job is configured to accept AS2 data, but it does not do anything with that data yet. In order to read the message content from the stream and save it to a file, let's add a new execution step to the job. Click New Execution Step, and browse for the /system/filesystem/copy function. Then fill the Source and Target parameters as illustrated below:
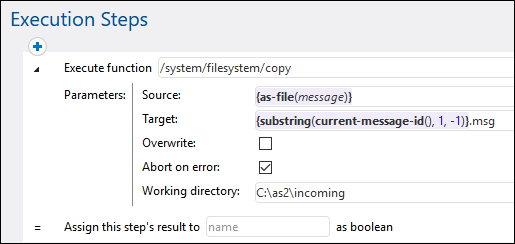
The execution step above calls the /system/filesystem/copy function to copy data from Source to Target. Source is a FlowForce expression. In this example, the expression
{as-file(message)} |
reads the message parameter mentioned earlier and converts it to a filename, with the help of the as-file expression function.
The expression
{substring(current-message-id(), 1, -1)} |
does the following:
1.It gets the value of the Message-ID header field as a string, with the help of the current-message-id expression function. For example, a typical Message-ID could look like <20180309125433018954-56c8aeb2fb4b478eb02f6f57662607da@somehostname>.
2.It strips the first and last characters of the resulting string, with the help of the substring expression function. This makes the Message-ID look like 20180309125433018954-56c8aeb2fb4b478eb02f6f57662607da@somehostname (notice the angle brackets "<" and ">" have now been stripped).
Finally, the string ".msg" is appended to the expression and this creates the path where FlowForce should save the incoming AS2 message. Note that the path is relative to the working directory C:\temp. Essentially, whenever someone will send an AS2 message to http://<flowforce-server>:<port>/service/as2-receiver, this job will read the message content and save it to a path like C:\temp\20180309125433018954-56c8aeb2fb4b478eb02f6f57662607da@somehostname.msg.
Remarks:
•The Overwrite check is not selected, meaning that the job will return an error in the event that a job with the same message ID arrives twice.
•The Abort on error setting is enabled, meaning that the job will fail if the copy function fails. A failed job will cause FlowForce to send a negative MDN to the partner. In this case, this option is intentionally enabled, meaning that, if FlowForce fails to save the message, it will send a negative MDN to the partner.
You have now finished creating a basic AS2 service which listens to AS2 requests and stores incoming AS2 messages locally. For an example of how this AS2 service can be consumed by clients, see Example: Full AS2 Message Exchange.
In a real-life scenario, for more advanced processing, it is likely that you will need to add more execution steps to the job, and make use of other expression functions available in FlowForce. For reference to all FlowForce functions that you can call in execution steps, see Built-in Functions. For a basic introduction to FlowForce expressions, refer to the FlowForce Expressions chapter.
It is possible to configure FlowForce to return a result before all the job steps are executed. This is particularly useful if the job invoked as a service takes a long time. The early result could be treated by the caller as a confirmation that the task has been accepted by FlowForce Server for processing. For details, see Postponed Steps.