 On the heels of our RaptorXML announcement earlier this month, we are very excited to tell you about the availability of three more new products that round out the Altova server software product family.
These high-performance server products are optimized for multi-CPU servers and are highly complementary when used together for defining and managing information pipelines. Cross-platform support is immediately available for Windows and Linux, with MacOS support expected just around the corner in May. Supported languages include English, German, Spanish, and Japanese.
Let’s take a look at each of these new products in detail.
FlowForce Server
After receiving valuable customer feedback during the beta period, we have announced general availability of FlowForce Server, a powerful new tool for managing multi-step, enterprise-level data aggregation, processing, and reporting tasks. The straight-forward FlowForce Web browser interface makes it easy to configure and monitor jobs, whether they require a single step, or multiple cascading steps starting with data aggregation and conversion, and completing with multi-channel report generation.

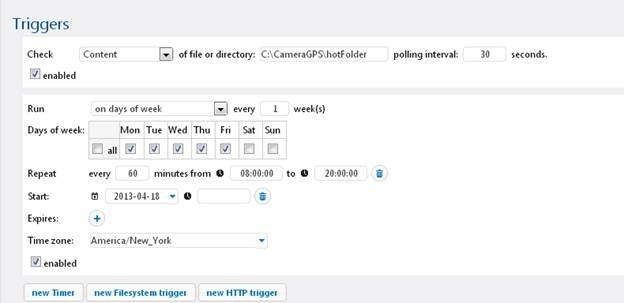
A flexible and highly customizable system of job triggers lets you schedule FlowForce Server job execution based on each job’s unique requirements. Jobs can be triggered by date and time, by the arrival of files in hot folders, or by http command – and you can define multiple triggers per job. To take full advantage of server resources and meet the demands of busy data transformation workflows, multiple jobs – even multiple instances of the same job – can run simultaneously on FlowForce Server.
FlowForce Server provides strong security measures through user, role, job credential, and permission definitions that enable multiple simultaneous jobs while preventing unauthorized access to restricted data repositories or system resources.
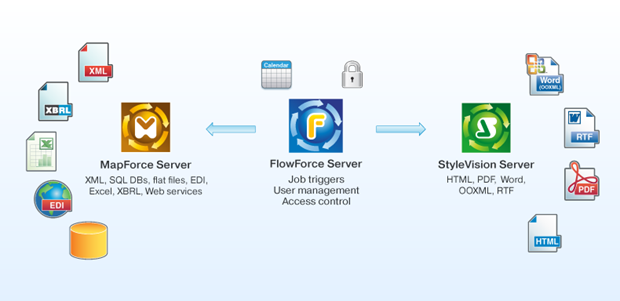
So, what kind of jobs can you set up on FlowForce Server? Most customers will want to use it in conjunction with MapForce Server and/or StyleVision Server for high-performance automation of data integration and multichannel publishing projects that doesn’t require writing or compiling any source code.
MapForce Server
You may already be familiar with MapForce, Altova’s desktop developer software for aggregating, mapping, and converting data. We describe it as an any-to-any data mapping tool because it lets you move between any combination of XML, SQL database, flat file, EDI, Excel, XBRL, and Web services data. With the introduction of MapForce Server, it’s now easy to fully automate those transformations that have been defined in MapForce.
MapForce Server performs data transformations based on preprocessed and optimized data mappings stored in MapForce Server Execution files prepared by MapForce and uploaded over a network. Preprocessing enables faster performance and reduced memory footprint for most data mappings.
When operating under the management of FlowForce Server, MapForce Server is a powerful transformation engine suitable for the high-volume, quick turn-around demands of today’s leading edge data centers. The standalone version is suitable in a department level or other small environment that does not require the extensive multi-tasking, job scheduling, and security features of FlowForce Server.
StyleVision Server
StyleVision Server provides high-performance automation of report and document generation tasks based on templates designed in Altova StyleVision. A graphical XSLT stylesheet and report design tool, StyleVision helps you create one design to render XML and XBRL data in Web and print formats including HTML, Word, RTF, and PDF, simultaneously. Using StyleVision Server, you can generate reports from XML and XBRL data on a recurring basis faster than ever before.
Like MapForce Server, StyleVision Server is an important option for document production by FlowForce Server, and the standalone version can be run from the command line and is suitable in smaller deployments that may not require all the features of FlowForce Server.
This new line of Altova server products represents a huge leap forward in effective automation of essential business processes, whether they require a single step, or multiple cascading steps starting with data aggregation and conversion via MapForce Server and completing with multi-channel report generation via StyleVision Server. These high performance workflow servers help customers design information pipelines quickly and easily, and then deploy them in a flexible way, utilizing the power and speed afforded by multi CPU servers. We’re excited to offer this new family of server products to our customers developing data integration and reporting projects using Altova MissionKit developer tools, as well as welcoming new customers who need a multi-platform, lightning fast orchestration engine.

As with all Altova tools, we invite you to try these new server products before making a purchasing decision. Download a free, 30-day trial now!
Use XPath Expressions to Refine Data Selection
In this era of big data we often need to simplify analysis and communication by creating customized views into sections of a larger file. XPath, short for XML Path Language, is designed to allow users to address parts of large XML documents. XMLSpy supports XPath with an XPath Analyzer window and in its interface for charting XML data, MapForce supports XPath functions for XML data mapping, and StyleVision supports XPath in conditional templates, extension templates, and template filtering.
Read more…
Filesystem Commands and More Wizardry with FlowForce Server Built-in Functions
In our earlier posts on FlowForce Server, we described jobs that execute MapForce Server for data transformations, StyleVision Server for report and document rendering, and RaptorXML Server for XML processing. In each scenario we also used built-in system functions to copy move, or delete files, as is often required in real-world workflows.
In this post we’ll take a look at more of the built-in functions automatically installed in the FlowForce Server system container. You can use these commands as execution steps to automate the file housekeeping so often required in enterprise production.
Read more…
Constant Quest for Efficiency
In last week’s blog post titled FlowForce Server Supports RaptorXML, we created a FlowForce Server job that defined a RaptorXML execution step to validate XML files, and we called that job as a step at the end of our job that processes camera GPS data, as a final check on the output. That was a quick way to demonstrate integration of FlowForce Server and RaptorXML Server, but for real-world production we would want to perform the same task more efficiently.
If we insert the RaptorXML validation function at the top of the job, right in front of the On error definition as shown above, we can apply the same error handling steps for failures of either the data mapping or the validation step. In other words, an error in any one of a series of steps before the On error definition forces the job to take the error path.
Read more…
FlowForce Server Supports RaptorXML
Altova FlowForce Server supports RaptorXML Server and RaptorXML+XBRL Server.
Altova RaptorXML is the third-generation, hyper-fast XML and XBRL processor from the makers of XMLSpy. RaptorXML is built from the ground up to be optimized for the latest standards and parallel computing environments. Now FlowForce Server jobs can include steps to validate XML, transform XML with XSLT, execute XPath and XQuery, and even perform complex XBRL operations for financial reporting including validating XBRL taxonomies, and validating XBRL instances against XBRL taxonomies with support for XBRL Dimensions and XBRL Formula, which define new, compatible functionality to extend XBRL 2.1.
For example, we can return to the FlowForce Server job described in Taming Bad Input Data with FlowForce Server and add a RaptorXML operation to validate the XML files created from raw GPS data captured by a digital camera.
Read more…
XBRL Validation and Processing Tools
When we were designing RaptorXML Server, we knew from the get-go that the engine should support XML and XBRL standards. The former standard is ubiquitous and the latter will be, as well, given increasing mandates from governments worldwide as well as adoption by enterprises for analyzing financial data in a standards-based, cost-effective manner. However, we knew that at this time a sub-set of customers would be interested in the XBRL capabilities of the engine, so we created two versions: RaptorXML Server and RaptorXML+XBRL Server.
Let’s take a look at some of the powerful XBRL-oriented features in RaptorXML+XBRL Server.
Read more…
Download Example Files for FlowForce Server, MapForce, and StyleVision
In response to an interested reader’s suggestion, the Altova MapForce mapping files and StyleVision stylesheet we deployed to FlowForce Server for the job described in the blog post Taming Bad Input Data with FlowForce Server are now available for download on the Altova Web site at www.altova.com/documents/AltovaBlogExampleFiles.zip
Simply unzip the archive into a new folder and you’ll have all the data mappings, the stylesheet, and other supporting data files all in one place. A ReadMe file explains the contents. You can download fully functional free trials of Altova MissionKit and FlowForce Server at https://www.altova.com/download.html and implement and test FlowForce Server yourself.
Or, execute the data mappings in MapForce and the stylesheet in StyleVision to see how easy it is to extract meaningful information from the GPS data recorded by your own digital camera or GPS device. The example files in the download were also used in Web Service as a Look-Up Table to Refine GPS Data, XPath Enhances XML Reports, and others in our series on working with XML and Global Positioning Systems.
If you’re already an Altova MissionKit user, you can download these files with examples of Web services and user functions for MapForce, and XPath calculations and chart features for StyleVision, and add them to the extensive libraries of MapForce and StyleVision samples installed with Altova MissionKit tools.
Taming Bad Input Data with FlowForce Server
Whenever you accept data from an outside source you risk encountering errors. We have blogged about this phenomenon in the past in Expect the Unexpected – Altova MissionKit Solves a Number Format Mystery and in the series of posts on Processing the Groupon API.
Bad data in an input file can cause the data transformation step of a FlowForce Server job to fail. When a FlowForce Server Job fails, further execution steps will not be performed. FlowForce Server is designed this way to prevent an error in one job step from cascading into a series of additional invalid results. Happily, FlowForce Server also includes features to help you recover from errors and keep production flowing.
In this post we will further extend the data mapping and report rendering job described in Customizing a FlowForce Server Job to gracefully handle bad data in an input file.
Read more…
RaptorXML is here!
Named for the dinosaur famous for its incredible speed and agility, RaptorXML provides blazing-fast validation and processing of XML, XSLT, XQuery, and XBRL data. Because it’s optimized for parallel computing on multi-core, multi-CPU machines, RaptorXML can scale quickly based on the amount of data you need to process.
Interface Options
In addition to numerous hyper-performance features and strict standards conformance, RaptorXML offers flexible implementation options for developers. These include command line operations, Java and COM APIs, a Python interface, and a built-in HTTP server. The built-in HTTP server allows RaptorXML to be integrated into SOA infrastructures and accept validation jobs, XSLT transformation jobs, etc., submitted via HTTP by other services or client applications.
Workflow Integration
RaptorXML may also be run as a component of Altova FlowForce Server, which provides a user-friendly Web interface for managing workflows based on customizable time or event triggers. This way you can automate validation or XSLT processing jobs based on a variety of triggers, or even pipeline RaptorXML jobs into multi-step processes utilizing MapForce Server and StyleVision Server that start with data aggregation, validation, and conversion and end with multi-channel report generation. The possibilities are many.
Product Options
There are two versions of RaptorXML available:
A note to current customers of AltovaXML Reporting Edition: As Altova’s third generation XML processing engine, RaptorXML Server replaces AltovaXML, which is being discontinued. To help existing AltovaXML Reporting Edition customers transition to the new engine and get the full value from their Support and Maintenance Package (SMP), Altova is offering all AltovaXML Reporting Edition customers with current SMP an additional license for RaptorXML Server for the remaining duration of their SMP at no cost. In fact, the value of this new RaptorXML license is significantly higher than the list price of AltovaXML. The RaptorXML Server license is for four cores and can be used in addition to the AltovaXML Reporting Edition license you currently have. To upgrade visit this page.
Free Trial
Come see us at TechEd in New Orleans!
Customizing a FlowForce Server Job
In our earlier post titled Automate Data Mapping and Transformation with FlowForce Server, we created a job called SimpleMapAndTransform to automate data mapping with MapForce Server and creation of html reports by StyleVision Server. After the FlowForce Server job ran several times, we have accumulated many output files in the same folder we use to process input files, as well as temporary intermediate files in the workFiles folder, as seen in the image below.
In this post we will enhance the job to create more orderly results and remove unneeded temporary files.
Read more…
Automate Data Mapping and Transformation with FlowForce Server
Altova FlowForce Server, launched on April 29, 2013, includes numerous enhancements over earlier beta releases and one of the most exciting new features is the implementation of StyleVision Server. Now a FlowForce Server job can automate a complete data transformation workflow by executing MapForce Server for data mapping and pipelining results to StyleVision Server to render a variety of output formats.This post describes a straightforward FlowForce Server mapping and transformation job as illustrated in these messages from the FlowForce Server Log, with the most recent step at the top of the list:
We’ll start with the GPS log files created by a digital camera. We wrote about these files last January in the post titled Process Multiple Input Files in a Single Data Mapping. We’ll use the mapping output with a StyleVision SPS stylesheet adapted from the XPath Enhances XML Reports post to produce a time and elevation report for each file.A FlowForce Server For-each job step repeats based on the result of an expression. We can use For-each to build a list of files in a folder, then repeat one or more steps for each file. Here is how it looks in the job configuration page:
The line labeled Execute function defines the mapping to be used by MapForce Server, and the input parameter {file} refers to each file in the list C:CameraGPSexample*.LOG.We can add an execution step to instruct StyleVision Server to perform the transformation:
The data mapping creates output files by adding .gpx to the name of the input file, and now we can define the transformation input using the {file} variable with the new file suffix. We chose to create .html output, but we could just as easily create other formats for a multi-channel publishing implementation.The transformation working directory is the location where StyleVision Server unpacks the contents of the .pxf file containing the stylesheet, XML Schema, and other needed components. Using a dedicated working folder will keep the workflow more organized.We want to allow network users to drop new .LOG files into the C:CameraGPSexample folder and we want run the FlowForce Server job on a regular schedule, but we don’t want to process the same files over and over. We can define one more job step to move the processed file to a different location:
The complete FlowForce Server job is a series of three steps that loops for each .LOG file found in the folder. We can set up a repeating trigger for the workweek or any other appropriate schedule:
Here is a portion of a .LOG file created by the camera that is an example of one input file:
We can drop this file into the C:CameraGPSexample folder, where it will be processed based on the FlowForce Server job trigger:
When the timer triggers execution of the FlowForce Server job, the Web interface Job Log page displays this series of messages for the complete job:
The contents of the C:CameraGPSexample folder now look like this:
We can examine the 121130.LOG.gpx file in XMLSpy:
And we can open the .html file in any Web browser:
In future blog posts we will enhance this FlowForce Server example to illustrate jobs with error handling and more complete cleanup of working files.FlowForce Server is available for Windows, Linux, and soon for Mac OS platforms. To get started yourself, click here to download a free trial!
New Server Products for Data Transformation
These high-performance server products are optimized for multi-CPU servers and are highly complementary when used together for defining and managing information pipelines. Cross-platform support is immediately available for Windows and Linux, with MacOS support expected just around the corner in May. Supported languages include English, German, Spanish, and Japanese.
Let’s take a look at each of these new products in detail.
FlowForce Server
After receiving valuable customer feedback during the beta period, we have announced general availability of FlowForce Server, a powerful new tool for managing multi-step, enterprise-level data aggregation, processing, and reporting tasks. The straight-forward FlowForce Web browser interface makes it easy to configure and monitor jobs, whether they require a single step, or multiple cascading steps starting with data aggregation and conversion, and completing with multi-channel report generation.
A flexible and highly customizable system of job triggers lets you schedule FlowForce Server job execution based on each job’s unique requirements. Jobs can be triggered by date and time, by the arrival of files in hot folders, or by http command – and you can define multiple triggers per job. To take full advantage of server resources and meet the demands of busy data transformation workflows, multiple jobs – even multiple instances of the same job – can run simultaneously on FlowForce Server.
FlowForce Server provides strong security measures through user, role, job credential, and permission definitions that enable multiple simultaneous jobs while preventing unauthorized access to restricted data repositories or system resources.
So, what kind of jobs can you set up on FlowForce Server? Most customers will want to use it in conjunction with MapForce Server and/or StyleVision Server for high-performance automation of data integration and multichannel publishing projects that doesn’t require writing or compiling any source code.
MapForce Server
You may already be familiar with MapForce, Altova’s desktop developer software for aggregating, mapping, and converting data. We describe it as an any-to-any data mapping tool because it lets you move between any combination of XML, SQL database, flat file, EDI, Excel, XBRL, and Web services data. With the introduction of MapForce Server, it’s now easy to fully automate those transformations that have been defined in MapForce.
MapForce Server performs data transformations based on preprocessed and optimized data mappings stored in MapForce Server Execution files prepared by MapForce and uploaded over a network. Preprocessing enables faster performance and reduced memory footprint for most data mappings.
When operating under the management of FlowForce Server, MapForce Server is a powerful transformation engine suitable for the high-volume, quick turn-around demands of today’s leading edge data centers. The standalone version is suitable in a department level or other small environment that does not require the extensive multi-tasking, job scheduling, and security features of FlowForce Server.
StyleVision Server
StyleVision Server provides high-performance automation of report and document generation tasks based on templates designed in Altova StyleVision. A graphical XSLT stylesheet and report design tool, StyleVision helps you create one design to render XML and XBRL data in Web and print formats including HTML, Word, RTF, and PDF, simultaneously. Using StyleVision Server, you can generate reports from XML and XBRL data on a recurring basis faster than ever before.
Like MapForce Server, StyleVision Server is an important option for document production by FlowForce Server, and the standalone version can be run from the command line and is suitable in smaller deployments that may not require all the features of FlowForce Server.
This new line of Altova server products represents a huge leap forward in effective automation of essential business processes, whether they require a single step, or multiple cascading steps starting with data aggregation and conversion via MapForce Server and completing with multi-channel report generation via StyleVision Server. These high performance workflow servers help customers design information pipelines quickly and easily, and then deploy them in a flexible way, utilizing the power and speed afforded by multi CPU servers. We’re excited to offer this new family of server products to our customers developing data integration and reporting projects using Altova MissionKit developer tools, as well as welcoming new customers who need a multi-platform, lightning fast orchestration engine.
As with all Altova tools, we invite you to try these new server products before making a purchasing decision. Download a free, 30-day trial now!
Announcing RaptorXML, the Hyper-fast XML and XBRL Server
RaptorXML+XBRL Server supports all the features of RaptorXML Server, with the addition of processing and validating the XBRL family of standards:
Developers creating solutions using Altova MissionKit XML development and XBRL development tools will be able to power their server applications with RaptorXML for hyper-performance, increased throughput, and efficient memory utilization, giving them the opportunity to validate and process large amounts of XML or XBRL data cost-effectively. Check out the complete list of supported XML and XBRL standards and more details on this groundbreaking new server product. RaptorXML will be available to download and purchase in May.
Editing, Converting, and Generating JSON
As the use of JSON as a data transport protocol increases, I thought it would be useful to take a look at JSON support in XMLSpy. There’s been much debate about advantages of JSON vs. XML, but when you boil it down, there are simply some cases for which JSON is the best choice, and others where XML makes more sense. This article on the XML Aficionado blog unpacks this topic quite well.
While you might need to choose between JSON and XML depending on the development task at hand, you don’t have to choose between code editors – XMLSpy supports both technologies and will even convert between the two. Let’s take a look at how that works.
Editing JSON
To make JSON editing as easy as possible, Altova extended its intelligent XML editing features to the JSON editor. If you choose to edit JSON in text view, XMLSpy helps you along with syntax coloring, bracket matching, source folding, entry helper windows and menus, and so on.
Here’s that same JSON file in grid view, which offers a graphical representation of the JSON structure with drag and drop editing. Both views provide JSON syntax checking and advanced error checking features.
Another common requirement is converting XML to/from JSON, which is a one-click option on the XMLSpy convert menu. The JSON data above has been converted to valid XML:
Having JSON editing and conversion functionality directly inside the XML editor is quite useful, especially if you’re using the free Eclipse or Visual Studio integration package.
Check it out and let us know what you think.
Web Interface Simplifies Automation of Data Transformations
FlowForce Server is a new product designed to provide automation of data transformations performed by dedicated high-speed servers. FlowForce Server can start jobs based on a variety of triggers, runs multiple jobs simultaneously, and can even run multiple instances of the same job, depending on workflow.Monitoring all these complex activities is critical to success in a busy production environment. The FlowForce Server Web interface includes customizable views into operations, simplifying management from anywhere on the network.
The screen shot above shows the Home page of the FlowForce Server Web browser interface, displaying all currently running jobs and active triggers. Six instances of the gpxElevationUSGS job are running, each identified by a unique job ID. Four job triggers are also active, three watching hot folders, and one based on a timer. Each FlowForce Server job automates a MapForce data transformation.The orange arrows below each grid are clickable update buttons, and the job names link to the definition pages for each job.The blue headings at the top are also clickable buttons. The Log link displays the Log View, a detailed history of all system activity, shown in a truncated version below.
Each message line describes one step in one instance of a FlowForce Server job, and may have links to more information, as we described in our earlier blog post titled Automate Data Transformation with FlowForce Server. If the status is anything other than 0, the more link opens a detailed error message.
In a busy environment, all this can be just too much information. In that case, the Log View offers several alternatives to help you find critical information quickly. The options bar above the list lets you filter items displayed by a particular job or Message severity.
If you only want to know if anything unexpected occurred, select Warning as shown above to hide all normal Info messages.You can also sort the list by any of the column headings Date, Severity, Module, User, or Instance ID in ascending or descending order. When the FlowForce Server is running multiple simultaneous jobs and instances, it’s very likely individual steps from different jobs will be shuffled. Sorting by Instance ID can let you more easily review the job history.Click here to learn more about FlowForce Server Beta 3 at the Altova Web site, or visit the FlowForce Server Beta 3 download page to get started automating data transformations in your data center!
Compare Folders Fast and Efficiently with DiffDog
Three user preferences in DiffDog work together to accelerate directory differencing tasks into hyperdrive, especially when you compare folders with thousands of files.DiffDog can perform specialized comparisons. For instance, XML comparison mode commands DiffDog to determine whether two files contain equivalent XML content, even if they would be different in a text comparison because of spacing, line-ending, or attribute order variations. For the fastest directory comparisons, choose Quick Comparison mode, which only looks at file sizes and modification dates.
When you compare large directories, most often you want to quickly locate differences. Choose the Hide Equal setting to avoid listing all identical files.
Show/Hide empty directories should be set to Hide, otherwise subdirectories that contain identical files will be listed, but since their contents are equal, none of the files are shown.
After you choose settings and click the Compare button, DiffDog flies through the directory comparison.
When the comparison is finished DiffDog displays a concise listing showing only the differences, with a summary message at the bottom of the window. The toolbar in the screenshot below illustrates the settings for Quick Comparison on, Show Equal files off, and Show Empty directories off.
DiffDog saves your preferences to apply to the next folder comparison, and DiffDog even includes a quick synchronization tool to merge folders in either direction.
Find out for yourself how fast DiffDog can run your folder comparisons – download a fully-functional, free 30-day trial!
Automate Data Transformation with FlowForce Server
Altova designed FlowForce Server to provide comprehensive automation, management, and control over data transformations performed by dedicated high-speed servers. FlowForce Server Beta 3 is currently available to users of MapForce Enterprise and Professional Editions at no charge during the beta test period.FlowForce Server can provide hot folder automation of data mappings and maintains a detailed activity log users can monitor remotely in a Web browser window. The screenshot below shows the log for FlowForce Server running the MapForce data mapping CameraLogToGPX we wrote about in the blog post titled Process Multiple Input Files in a Single Data Mapping. This mapping used wildcards to specify multiple input files for processing.

It only takes a few minutes to set up, run, and review the results of jobs like this on FlowForce Server. Wildcards or Hot Folders?Wildcards and hot folders increase the complexity of a data transformation workflow, and using them successfully requires careful planning. Let’s take a minute to look a little deeper at the scenario we want to implement.Assume we are the IT department in a company that publishes nature and hiking guides. We employ photographers who go out trekking and record their routes as they go, using the GPS tracking feature of their digital cameras. We want to convert the camera GPS log files to XML-based .gpx format for mapping and other processing.We will publish a folder on our network where photographers can drop off their GPS log files. This will be the hot folder FlowForce Server watches for new files to supply as input to the CameraLogToGPX mapping. We only need to process each input file once. So, after the data transformation is complete, we can remove the input file from the hot folder. We also want to place the output file in a separate folder. This suggests the following FlowForce Server job steps:
The diagram below shows a folder structure we can use for the workflow, with files ready to drop into the hot folder for processing:
The hot folder is C:CameraGPShotFolder and the generated .gpx files will be placed in C:CameraGPSoutputFiles. When the data mapping is done, input files will be moved to C:CameraGPScompletedInput. Deploy the Mapping on a ServerMapForce Beta is a component of FlowForce Server that works just like MapForce, and adds a feature to deploy mapping files to a FlowForce Server. Existing data mappings need little or no special preparation for deployment.The only thing we need to think about are the filenames of the input and output files. We will instruct FlowForce Server to provide the input filename as a job parameter as new files arrive in the hot folder for processing. The original mapping assigned a wildcard filename for the input component, which is no longer needed. We will also want FlowForce to specify the location of the output file.We can open the mapping in MapForce Beta, remove the filename from the input component, and add a remove-folder filepath function to the output file so FlowForce Server can set the destination. The screenshot below shows the new filename definitions in the mapping.
In the MapForce Beta dialog to deploy the mapping, we can choose to immediately open the mapping in a FlowForce Server job definition window in a Web browser to finish defining the job operations.
Defining the Job in FlowForce ServerThe screenshot below shows the complete job steps defined in a FlowForce Server job properties window:
The job trigger is defined at the bottom of the window. Every 30 seconds, FlowForce Server will check the hot folder. If the contents have changed, FlowForce Server will execute the job steps. Each Execution step could be a deployed MapForce mapping, a system step, or even another FlowForce Server job.The name of each new file entering the hot folder becomes the parameter called {triggerfile} that we use in the mapping step as the input filename, and in the move step as the name of the file to be moved.The Working-directory parameter in the mapping step defines where the output files will be placed.FlowForce Server also includes features to set automatic run and stop times for jobs, user permissions and roles, and Queue settings to define minimum time between job runs and maximum parallel instances of a job.In our scenario, we are likely to receive multiple input files in groups as they are copied from photographers’ memory cards. Multiple parallel runs can greatly improve throughput. As a rule of thumb, you might want to match the number of cores or CPUs in the machine running FlowForce Server.
Exploring the Job Log
Each time FlowForce Server runs our job, six lines are added to the Log View shown in the illustration at the top of this post. The first and last lines record the start and completion of the job, and each Execution step generated its own start and completion messages. The phrase “completed with status: 0” means the step was successful with no errors.
We can click the more links for a detailed report on each Execution step. The screenshot below shows the message for the MapForce mapping Execution step:
Each file dropped into the hot folder generates an individual FlowForce Server job instance, even if multiple files are added as a group. This makes it easy to track any individual input file that generates an error.When we dropped four files into the hot folder, FlowForce Server ran four jobs, and the contents of the output folder looked like this:
Click here to read more about FlowForce Server Beta 3 at the Altova Web site, or visit the FlowForce Server Beta 3 download page to get started automating data transformations in your data center!
Process Multiple Input Files in a Single Data Mapping
Typical data conversion tasks require processing numerous input files that arrive in batches. Altova MapForce includes features that let you handle groups of files with minimal intervention.For instance, we recently copied a set of files from the memory card of a digital camera with GPS support. Each .LOG file is a CSV containing GPS coordinates for a single route.
We quickly designed a mapping to convert the CSV data to XML-based .gpx format and processed all three files to generate three output files in a single execution:
Read more…
Expect the Unexpected – Altova MissionKit Solves a Number Format Mystery
Every time you receive data from an outside source, there is a chance it won’t arrive in the form you expect. This can require special accommodations for the rare and unlikely to make a real-world data mapping and transformation solution robust and reliable.
We processed literally dozens of .gpx files, containing hundreds of coordinates each, through the MapForce mapping we wrote about in the blog post Web Service as a Look-Up Table to Refine GPS Data. Then one day we ran a new file and encountered the error below, which caused the mapping to fail:
Reaching into the Altova MissionKit to combine features of MapForce and XMLSpy, we quickly diagnosed the issue and developed a solution we can also reuse in future mapping projects.
Read more…
Brand New Altova Web Site
We are so excited to announce the launch of our new, improved, completely redesigned Web site! The new Altova.com is cleaner, simpler, and more beautiful than ever.
Our goal was to make our site easier to navigate so that you can find exactly what you’re looking for quickly, whether that’s Product information, Support resources, or technical reference materials. Of course, it’s as simple as ever to download a free trial or update your software to the latest version.
At the same time, we hope the new site will help you discover a little something you didn’t know about Altova. For instance, did you know that we have a comprehensive line of Database Tools in addition to the XML Tools and Developer Tools that we’re known for? Did you know that we offer free, online product and technology training? And have you tried our new, cloud-based project collaboration and team management tool?
Despite all the planning, proposals, testing, and reworking that go in to a new Web site, the true test of success is how the site works for you, our customers. Please share any feedback or suggestions you may have for the new site, either by leaving a comment here on the blog or contacting our Marketing team by email. We look forward to and greatly appreciate your input!
Version 2013 Service Pack 1 Delivers Windows 8 Support and More
Version 2013 Service Pack 1 is a free update for all customers of Version 2013 products, as well as any customer with valid Support and Maintenance. Download and install SP1 now.
The Altova MissionKit 2013 Introduces Seamless Integration of XMLSpy, MapForce, and StyleVision in Java Applications
The Altova MissionKit 2013, empowers developers to integrate XMLSpy, MapForce, or StyleVision functionality seamlessly in custom Java applications for Windows. This frequently-requested capability adds to existing support for integrating these MissionKit tools in Visual Basic or C# applications, giving developers flexibility to add some or all XMLSpy, MapForce, or StyleVision views and functionality to their own custom apps.
Version 2013 of XMLSpy, MapForce, and StyleVision include a new API that allows each to run inside a window within a Java application developed using the Java Abstract Window Toolkit (AWT) or Java Swing. This functionality allows MapForce 2013, for instance, to be embedded in larger applications where data mapping and transformation is only one requirement.
Altova provides sample applications with XMLSpy, MapForce, and StyleVision illustrating use of the Java API. You can access the sample applications from the command line or from within Eclipse.
Read more…
Trick or Treat with Altova at DevConnections!
Altova MissionKit 2013 provides specialized functionality for Microsoft developers and IT pros, including seamless integration with Visual Studio®, C# and C++ code gen eration, powerful functionality for SQL Server® database management and reporting, integration with SharePoint® Server, functionality for working with Open XML (OOXML), diff/merge for Word documents, and much more.
While you are at our booth, don’t forget to enter our drawing for a chance to win a free Altova MapForce Basic Edition license. If you also mention that you saw this blog post – we might have a special treat for you too!
Do You Believe in (XML) Magic?
One of the most exciting features in our recent Version 2013 release is Smart Fix XML validation in XMLSpy. Smart Fix is so magical it can revolutionize XML validation as we know it. While the XMLSpy validator has always been powerful, with new features added often, Smart Fix really delivers the “wow” factor: automatic error correction.
Read more…
Using Table Row and Column Conditions in StyleVision 2013
The ability to conditionally hide table rows or columns has been a popular feature request from StyleVision users. StyleVision 2013 adds the capability in the form of conditional expressions on table rows and columns. Conditional processing can be set on individual columns and rows of static and dynamic tables, as well as on column and row headers, to display or hide the column, row, or header depending on the truth of the condition. The conditions are specified using StyleVision’s XPath Expression editor. If a condition evaluates to true, the column, row, or header is displayed; otherwise it is not (i.e., is hidden).
Let’s take a look at some scenarios for which this new feature is exceptionally useful.
Read more…
Watermarks in StyleVision 2013
Watermark support has been added in StyleVision 2013, in response to customer requests. A watermark is text or an image that is displayed on the background of each page of a document section. Watermarks are often used in draft and confidential documents in order to emphasize a document’s status or security constraints.
In StyleVision 2013, watermarks may be used for print-oriented output formats, including PDF, RTF, and Word (Open XML). In keeping with StyleVision’s overall design model, with a single layout design used for multiple output types, you only need to define watermarks once, and they are applied to all print-output views.
Here’s an example of a StyleVision design containing a watermark:
Let’s take a look at the steps involved in using watermarks in StyleVision 2013 by modifying the QuickStart example (quickstart.sps) included in the Tutorials folder (installed with StyleVision), in order to produce the design shown in the image above.
In the Design view, if you select “Edit Properties” in the Initial Document Section, you’ll see a new “Watermark…” button. Clicking the button presents the Edit Watermark dialog:
StyleVision supports both image and text watermarks. For both types of watermarks, the general idea is to specify:
· A condition used to determine when the watermark should be included (which can simply be “true()” in order to include the watermark on all pages)
· The watermark content (image or text, with related attribute setting preferences)
· Watermark size and position settings
For our example scenario, let’s assume we want to place a red “CONFIDENTIAL” text watermark across printed pages. To do so, we click the Text tab in the Edit Watermark dialog and:
· Enter “true()” for the condition
· Enter “CONFIDENTIAL” for the watermark text
· Select red for the watermark color
StyleVision’s support for watermarks is powerful and flexible. You can include both text and image watermarks, for example, with different XPath conditional expressions used to specify what should appear when. You can also specify different watermarks (or pairs of image and text watermarks) for each document section in a StyleVision design.
Check out watermark options and the other new features in StyleVision 2013 by downloading a free 30-day trial version today!
Visit us at Oracle OpenWorld next week!
Fall is here, which must mean we are off to San Francisco, CA for the 2012 Oracle OpenWorld show. If you are planning on attending come by and see Altova at the Moscone center from Sept. 30th – October 4th in booth #3408 for a demo of Altova’s tools for Oracle Users and see the amazing new features in the newly released Altova MissionKit 2013!
While you are visiting our booth tell us about your latest projects and challenges, collaborate on best practices or let us show you some of the latest and greatest features available in MissionKit 2013, like Smart Fix XML Validation in XMLSpy, mapping SQL stored procedures in MapForce, watermark support in StyleVision, or our seamless integration options in Java applications. Don’t forget to enter our drawing for a chance to win a free Altova MapForce Basic Edition license!
Stored Procedures in Database Mappings
In response to user requests, the new release of MapForce 2013 includes robust support for stored procedures in database mappings as:
The screenshot below shows the mapping of a stored procedure in SQL Server to create an XML file.
Read more…
Altova MissionKit 2013 with Smart Fix
Altova Software Version 2013 was released today, and, as always, numerous features in this year’s autumn launch have been developed in response to customer requests. You asked for the ability to use SQL stored procedures in MapForce data mapping projects, to embed XSDs in WSDL documents in XMLSpy, to add watermarks in StyleVision, and to integrate MissionKit functionality flexibly in Java applications. All those features and more are there in Version 2013. We’ve also added some features that can only be described as magical. Let’s take a look at the highlights…
Read more…
Have you ever wanted a schema for Apache Ant?
Recently I was having some issues with the Ant files for a software project I was working on. I was editing one of them in XMLSpy but wasn’t getting entry help or code completion because I didn’t have a schema assigned to my script.
That seemed like a simple problem, so off I went looking for the schema.
I quickly found a Stack Overflow question looking for the same thing. The answer turns out to be, there is no Ant schema or DTD. The reasoning is straightforward. Above the challenge of making a flexible and comprehensive model of the Ant core, it would be able to include all the external tasks.
I immediately remembered that I’d been here before a couple years back, but this time I figured I’d use XMLSpy’s schema generation feature to try to do something about it…
Read more…
FlowForce Server Beta 3 is Now Available
MapForce 2012 users who need to automate data transformations in a centralized environment are enthusiastic about FlowForce Server, the new server product from Altova that automates execution of MapForce data transformations. Now we are pleased to announce the release of FlowForce Server Beta 3, offered as a free public beta test to all licensed users of Altova MapForce 2012 Enterprise Edition and MapForce 2012 Professional Edition.
The beta test period for FlowForce Server Beta 3 is extended until March 31, 2013.
FlowForce Server Beta 3 adds support for remote job requests via an HTTP client and job parameters that can be passed to any step in a job. When used together with the request interface, job parameters empower the HTTP client to specify input values in the job request.
FlowForce Server Beta 3 also permits any job to be called as a step within another job, implements individual job queues that make it possible to control server resources used by jobs, and adds many more refinements and enhancements.
FlowForce Server Beta 3 is available in a 32-bit version and a 64-bit version. The 64-bit version allows the MapForce Beta 3 module to process extremely large data files and provides compatibility with 64-bit database drivers.
Click here to read more about FlowForce Server Beta 3 at the Altova Web site, or visit the FlowForce Server Beta 3 download page to get started automating data transformations in your data center!
XML Summer Fun
Aloha! Summer is the time to hang loose, get some sun, and recharge your XML knowledge. Altova offers free, self-paced, Online Training in XMLSpy, MapForce, and StyleVision. We also have technology specific training in XBRL, XSLT, and HL7.
Don’t be a poser when your bro’s talk up XSLT transformation. Our classes will let you brag about some cherry surfing through gnarly XPath code.
XML getting you bummed? Brush up on XMLSpy techniques to ride a fat wave to a juicy completed project. Let MapForce put your data in the best form for your project and make your output major with StyleVision.
Don’t get cranked by the tax code. Use our XBRL training to become the Big Kahuna and shoot the pipe to the Surf Shack of Standards Compliance.

Grab your board, and surf over to Altova Online Training to catch some sweet knowledge.
You’ll say “Mahalo, Altova!”
Web Service as a Look-Up Table to Refine GPS Data
Elevation data recorded by GPS devices is notoriously inaccurate, especially in hilly terrain like the Russian River Valley example from our earlier post.
The final elevation track plotted from the Russian River Valley GPX file is suspicious for several reasons. First, the graph shows we descended almost 50 feet below sea level. That’s hard to believe, since we were travelling along the bank of the river, only about 10 miles from the Pacific Ocean.
We can evaluate the recorded GPS elevation data by comparing it to information available from the United States Geological Survey (USGS). The USGS operates a Web service that accepts latitude and longitude coordinates, and returns elevation data measured by NASA and assessed for accuracy based on over 13,000 control points in the continental United States.
Using the elevation Web service in an Altova MapForce mapping will let us extract each point from the GPX file, send the coordinates to the USGS Web service, and build a new GPX file with corrected elevation data.
Read more…
We will be at TechEd! Will you?
If you are attending TechEd, stop by our booth to see the latest features in the Altova MissionKit 2012r2, which include EPUB editing and validation in XMLSpy, sorting of data mapping results in MapForce, generation of code from UML sequence diagrams in UModel, RichEdit functionality in StyleVision and Authentic and much more! We hope to see you next week.
New Case Study: Automating XBRL Data Collection and Processing
Case studies are a great way to see how other organizations use Altova® technologies to develop unique projects that meet their business goals. We’re often asked, however, what comes next. Did the project take off? Has it grown since the case study was published?
We’re happy to bring you a follow up to a case study we published last year about the not-for-profit Maryland Association of Certified Public Accountants (MACPA).
In the original case study, MACPA converted General Ledger and other financial data from siloed systems into XBRL – in house and on a budget – with the Altova MissionKit®. At that point, they were mapping the XBRL file to multiple external targets, including an Excel spreadsheet used to feed their Key Performance Indicators (KPI) system. (You can read the original XBRL case study here.)
Since that time, they’ve built on the foundation they created and developed a business intelligence dashboard driven by the XBRL files they generate in MapForce®. They used Altova FlowForce®, an application designed to automate the execution of MapForce data transformations and other tasks on servers, virtual machines, and workstations, to automate the XBRL data collection and processing. Now the most recent data is available across the entire organization for custom reporting.
You can read the follow-up to the original XBRL case study here.
Read more about how they did it. Read more…
Versiones en español de XMLSpy, MapForce y StyleVision
Nos complace anunciar que, a partir de la versión 2012 Release 2 SP1, las aplicaciones XMLSpy, MapForce, StyleVision y el conjunto de aplicaciones MissionKit for XML Developers están disponibles en español. También en español está ya el sitio web de Altova.
Estas versiones en español amplían nuestra oferta de versiones traducidas, que ya incluye productos en inglés, alemán, japonés y chino.
Para descargar la versión en español de XMLSpy, MapForce y StyleVision o el conjunto de aplicaciones MissionKit for XML Developers, sólo tiene que seleccionar la opción “Spanish/Español” del menú desplegable de selección de idiomas. Con su actual código clave de licencia puede desbloquear cualquier versión traducida del producto que adquirió. Si lo prefiere, también puede descargar una versión de prueba gratis de 30 días de duración.
Spanish Language Versions of XMLSpy, MapForce, and StyleVision
We’re excited to announce that, starting with Version 2012 Release 2 SP1, Altova XMLSpy, MapForce, StyleVision, and the MissionKit for XML Developers are now available in fully localized Spanish language versions! Much of the Altova Web site is now available in Spanish, as well.
Spanish is latest addition to our growing list of localized options including English, German, Japanese, and Chinese.
To download the Spanish version of XMLSpy, MapForce, StyleVision, or the MissionKit for XML Developers, simply select Spanish from the language selector. Your existing license key code will unlock any language version of your purchased product(s). You can also download a free 30-day trial at any time.
Resist Data Integration Redundancy
The Internet makes massive amounts of data available for lots of interesting applications. But whenever you design a unique analysis and presentation of information you don’t privately control, you risk that the owner will offer the same view at some point in the future, instantly making your application redundant.
That’s exactly what happened to the Groupon API data-mining project we originally wrote about in August, 2011. Fortunately, the core of our project is a MapForce graphical data mapping. We can quickly and easily tweak the mapping and repurpose it to present an entirely different data set that provides new value.
Read more…
XPath Enhances XML Reports
In our previous post on Creating Elegant Reports for GPS XML Data we used an XPath expression to select nodes from an XML document for an elevation line chart. You can also use XPath to compute values. Altova StyleVision includes strong support for XPath, and we can write XPath expressions to add interesting information to our GPS XML reports. For instance, we can process the elevation data stored by the GPS device in meters to plot a chart showing the elevation in feet above sea level instead.
Read more…
Creating Elegant Reports for GPS XML Data
In our earlier post on XML for Global Positioning Systems, we mentioned that adventurers and athletes might want to use XML data from their devices to keep a record of their trips, or even training sessions leading up a marathon or other special event. Several colleagues responded by offering example files!
Looking through all this data, we realized that plotting elevation changes over time would show interesting results for many activities. We used XMLSpy to create this customized line graph directly from the XML data to show elevation vs. time for an afternoon of bicycling through California wine country. We even applied the vineyard photo as a background image right from the XMLSpy chart settings dialog.
Whenever you want to elegantly present data from multiple XML data files based on the same XML Schema, Altova StyleVision is the tool that lets you design a richly featured stylesheet for repeatable output in HTML, RTF, PDF, or Microsoft Word formats. Here’s how we did It for our GPS XML data:
Read more…
Transforming a Plain Layout in StyleVision
Altova Online Training’s newest course, XSLT Technology, leads the student though several transformations of XML data into new formats. Even with all the transformations performed in the class, there are some transformations that did not make it into the final edit.
In Chapter 4 of the XSLT Technology training, I walk students through the process of creating a flyer for the play “Hamlet” using StyleVision. The source content is in XML, and StyleVision autogenerates the XSL stylesheets required to render it into HTML, PDF, and Word, based on our design.
I asked the Altova Art Department to spruce up my design, and, while I did not end up using the nicer design in the training, I wanted to show how to turn my plain flyer into the Art Department’s vision.
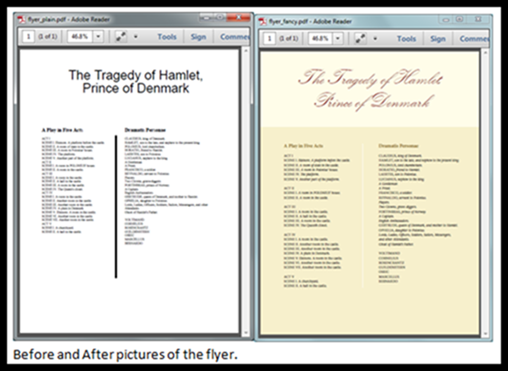
Let’s explore the transformation.
Read more…
FlowForce Server Beta 2 is Now Available
The beta test period for FlowForce Server Beta 2 is extended until September 1, 2012.
FlowForce Server Beta 2 adds robust access control to segregate jobs and related data files, so departments can work independently without seeing or overwriting each other’s data. Access control functionality includes defined Users and Roles, Privileges, and Credentials, all managed by FlowForce Server Administrators.
FlowForce Server Beta 2 also includes Web interface enhancements to provide more status information about job schedules, active triggers, and more.
FlowForce Server Beta 2 is available in a 32-bit version and a 64-bit version. The new 64-bit version allows the MapForce Beta 2 module to process very large data files and provides compatibility with 64-bit database drivers.
Click here to read more about FlowForce Server Beta 2 at the Altova Web site, or visit the FlowForce Server Beta 2 download page to get a copy of the installers for yourself!
Come Visit Altova this Spring at FOSE!
If you are attending FOSE, stop by our booth to see the latest features in the Altova MissionKit 2012r2, which include EPUB editing and validation in XMLSpy, sorting of data mapping results in MapForce, generation of code from UML sequence diagrams in UModel, RichEdit functionality in StyleVision and Authentic and much more.
Visit Altova at DevConnections!
We would love to see you there, where we will be showcasing the entire suite of tools found in the Altova MissionKit. Altova MissionKit 2012r2 products provide specialized functionality for Microsoft developers and IT pros, including seamless integration with Visual Studio®, C# and C++ code generation, powerful functionality for SQL Server® database management and reporting, integration with SharePoint® Server, functionality for working with Open XML (OOXML), diff/merge for Word documents, and much more.
Building Web Pages – HTML Design with StyleVision
The rapid pace of today’s business environment means that information – along with the format in which it is required – changes often. Although some Web pages contain content that doesn’t often change (e.g., About Us and directions pages), the majority of today’s corporate Websites are continually updated with new data.
For this reason, many organizations choose to store Web content in XML. This allows organizations to develop content in a highly efficient manner because information in the XML file can be used for multiple purposes and in multiple output formats – the XML Schema associated with the XML file describes the content model.
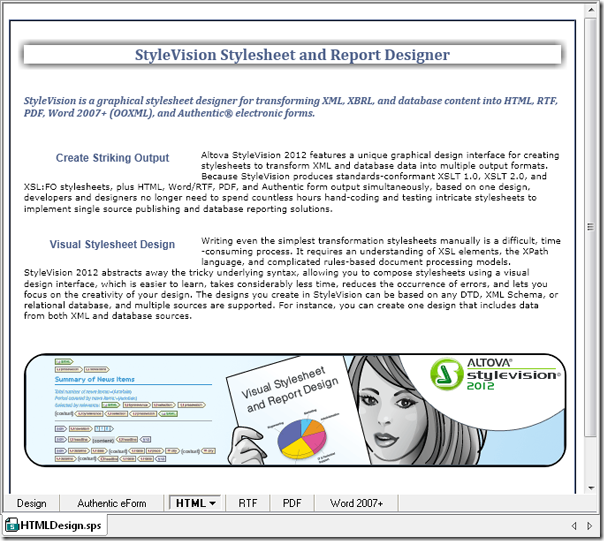
StyleVision is a powerful stylesheet and report designer that can help you leverage XML. StyleVision will allow you to build Web pages with sophisticated formatting in a template-based, drag and drop design window. StyleVision auto-generates XSLT stylesheets so that you can integrate your design into a new or existing site – you can even generate ASPX Web applications right from the File menu.
In this post we’ll design a Web page that will show off some of StyleVision’s HTML formatting capabilities. Although StyleVision’s built in formatting capabilities allow you to create sophisticated designs via simple drag-and-drop, for this example we’ll use CSS3, images, and other standard design elements to create a Web page that doesn’t need to be reformatted when content changes.
Read more…
The Global Positioning of XML
XML is everywhere. If you don’t believe it, get a USB cable and connect a GPS device to a computer, then browse for any file with the extension .gpx. We quickly found a 2 MB file named Current.gpx on a Garmin GPS. Opening it in XMLSpy reveals XML data and an XML Schema assignment at the top.
Scrolling through the body of the file displays numerous <trkpt> tags that record latitude and longitude along with <ele> and <time> tags reporting the elevation, date and time at that location.
Any place you may go in the world, XML is there to tell you where you are.
Read more…
New! XSLT Technology Training
We’re excited to introduce our new XSLT Technology training as the latest Altova Online Training offering. As with all our trainings, XSLT Technology is released as a free, self-paced course, available online, so students can fit it into their busy schedules.
XSLT transforms XML data into other formats, and this course will transform a beginner XML student into an advanced user. Intermediate and advanced students will gain valuable techniques to add to their XML toolkits.
Read more…
Release 2 of the Altova MissionKit 2012
It’s an exciting week here at Altova! We have several new offerings to tell you about, including Release 2 of the Version 2012 Altova MissionKit and entire product line, a new Altova Online Training course on XSLT Technology, and a new service called Altova Product Consulting. Let’s start with what’s included in the latest product release. Version 2012 Release 2 delivers a host of the new features that have been most frequently requested by our customers, including support for EPUB 2.x, sorting of data mapping results, RichEdit functionality for Authentic eForms, code generation from UML sequence diagrams, and much more.
Version 2012 Release 2 Highlights
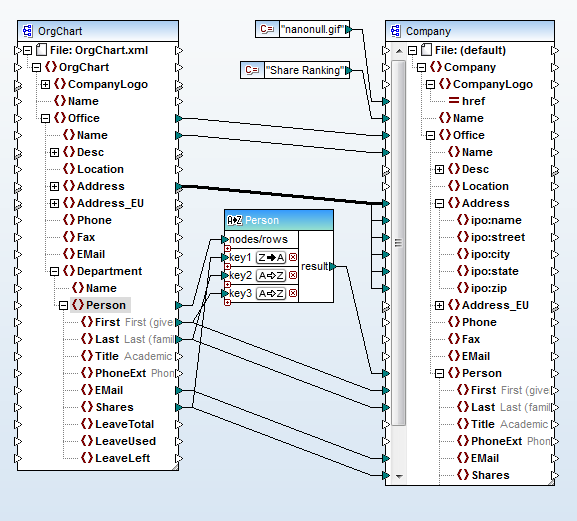
EPUB As the demand for e-books and other digital publications has exploded, so have the number of requests we’ve received from developers who need an easy way to create and edit these documents in XMLSpy 2012. In Release 2 we’ve added support for EPUB® (electronic publication), the open standard for e-books from the International Digital Publishing Forum (IDPF). It’s easy to view and work with the various files that make up an EPUB document in XMLSpy’s Archive View, which supports creating, editing, validating, and previewing EPUB digital publications.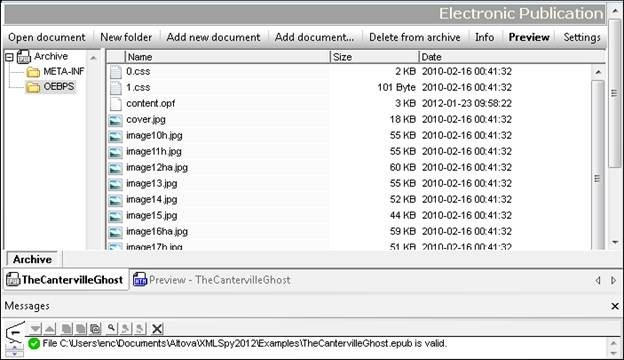 XMLSpy already provides validation and support for editing XML, XHTML, CSS, and other standards-based files that comprise EPUB documents, making it a natural choice for creating and working with EPUB content. Check out all the new features in XMLSpy. Sorting for Data Mapping Projects Another frequently requested feature is the ability to sort data in mapping projects where the final output format needs to be ordered differently than it was in the input. MapForce 2012r2 includes two powerful new sorting features that you can apply in a variety of ways. The screenshot below shows a new function that performs a multi-level sort on the source data before writing the output file:
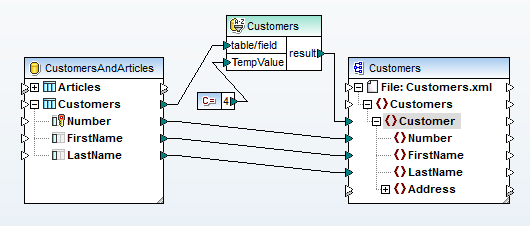
  Another option is available for sorting relational input. MapForce users have long been able to sort database data through ORDER BY statements in SQL queries. However, SQL queries that operate inside the database are not always sufficient for complex data mapping tasks. MapForce 2012r2 adds additional database sorting functionality to the existing MapForce SQL-WHERE component to become SQL-WHERE/ORDER, which is especially useful when database input requires additional processing that cannot be accomplished in a SQL query, or other data or conditions can impact the sorted order of data rows.
  Read more about new MapForce features. Other important features added in R2 include RichEdit functionality for Authentic eForms created in StyleVision, code generation from UML sequence diagrams in UModel, support for logical files in IBM® iSeries® databases across the product line, and much more.
Upgrade Info
Check out the rest of the features added in Release 2. This new version is free to download and install for customers with Support and Maintenance. If you’re not already an Altova customer, you can download a free, fully functional 30-day trial.
XSLT Technology Training
We are thrilled to announce the latest Altova Online Training course, XSLT Technology. This free, online, self-paced class introduces students to the concepts of XSL, XSLT, XPath, XSL-FO, and more, through guided tutorials and videos. You can practice working with these technologies using the tools of the Altova MissionKit to transform XML to XML, to HTML, and to PDF.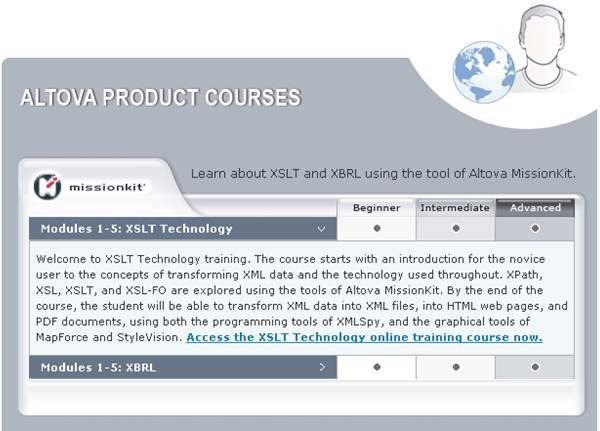
Altova Product Consulting
Have you ever wished you could purchase a few hours of a product expert’s time – whether you need to determine if a particular tool could solve your problem, or need help creating a schema or mapping project, or simply require in-depth product support? We’ve heard from a lot of customers with this very requirement – and in response we have created Altova Product Consulting. Altova’s Product Consulting engineers are experts on Altova software and related technologies. Services include determining if an Altova product meet the needs of a particular project, creating a MapForce mapping file (.mfd), designing a StyleVision design (.sps), and so on. Unlike typical complicated consulting engagements, Altova Product Consulting services are sold per hour, the allotment of which is agreed upon in advance, so there are no surprises. Get more information on specific services provided, pricing, and how to get started.
Model Driven Architecture with Altova UModel
For Version 2012, UModel introduces Model Driven Architecture (MDA), with platform-independent models and a Model Transformation feature that transforms all code relevant modeling elements to and from UML, C#, Visual Basic, Java, databases, and XML Schema. Model Transformation A Model Driven Architecture approach to software engineering with platform independent models provides two primary advantages:
Users can even apply model transformation to projects that were reverse engineered from existing source code. For instance, an existing Java application can be reverse-engineered by UModel then transformed to generate Visual Basic classes, and many other possibilities are available. Platform Independent Models Model Driven Architecture is a set of standards and methods for applying the UML (Unified Modeling Language) administered by the Object Management Group. In Model Driven Architecture, the UML model of a software project is a platform independent model (PIM) that can be fully described without concern for the details of any specific programming language. This development strategy allows software architects and other developers to focus exclusively on logic required by the subject domain, rather than characteristics of any programming language. Data Type Mapping During model transformation, UModel maps data types from the source to the target to accommodate differences between languages. The Type Mapping dialog lets you review or even edit type mapping pairs.
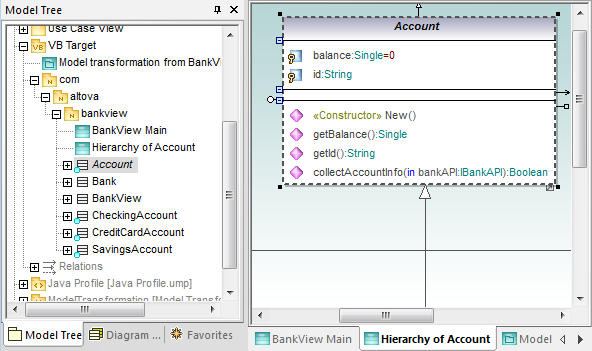
 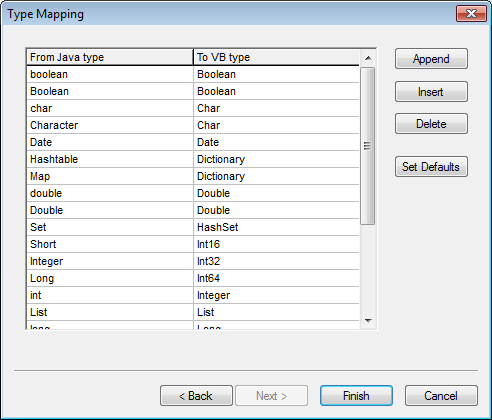 UModel also automatically adds the target language profile to the transformed project. UML Class Diagrams As part of the model transformation, UModel creates new UML classes and class diagrams for the target, reflecting classes and class diagrams in the original project. The screen shot below shows the Hierarchy of Account diagram for Visual Basic after model transformation from Java. The new Account class in the new folder named VB Target in the model tree contains Visual Basic syntax for all properties and operations. For instance, the new balance property is defined as the Visual Basic Single data type, whereas in Java the data type was float. After transformation, the original Account class for Java is preserved in the model in its original location in the model tree. The original UML design for Java will now generate code in multiple source code languages – Java and Visual Basic.
  Persistent Transformation Parameters The transformation paradigm extends to updating existing transformations and merging the updates into the specified target models. Transformation parameters are stored in a Model Transformation Profile in the model. The Transformation Profile can be set to run transformations automatically before forward engineering code generation, and/or after reverse engineering, to update elements for one target language based on changes to model elements for another.
  These Transformation Profile settings can also be changed at any time.
  This functionality lets UModel automate much of the maintenance of multiple source code languages as your cross-platform model evolves. If you’d like to try out Model Driven Architecture and model transformation with UModel 2012, you can download a free 30-day trial.
Data Exchange for the Mobile Workforce
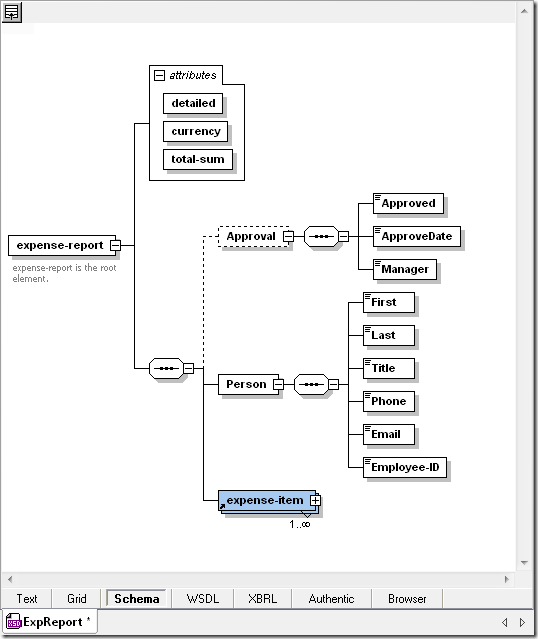
Data Exchange for the Mobile WorkforceOrganizations have been forced to adapt many of their internal business processes to accommodate an increasingly mobile workforce. Although there are technological solutions that address many of today’s communication needs, the plethora of different document formats in use – even within the same organization – means that some tasks remain vexing. For example, how does an organization remain flexible enough to facilitate the exchange of data among mobile workers yet retain the ability to bring that data into internal IT systems? Altova offers an inexpensive solution with StyleVision®, a graphical stylesheet and report designer with electronic forms capability, and Authentic®, a WYSIWYG XML and database editor in which end users can view and edit electronic forms created in StyleVision. The Authentic Community Edition is available from the Altova Web site as a free download so that anyone can be brought into your workflow, whether they are internal or external to your organization.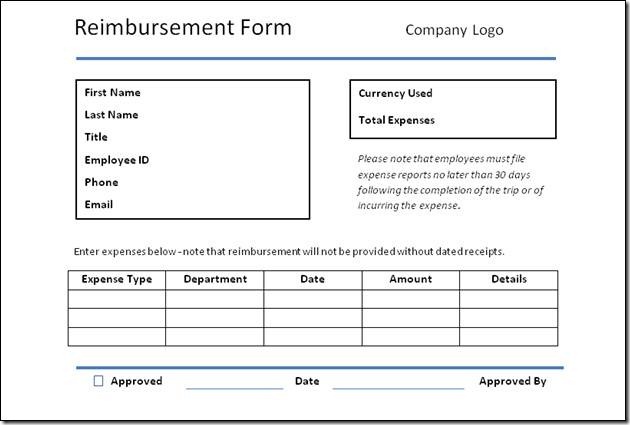 In this post we’ll present a sample case showing you how to create an electronic form that mirrors an existing paper form (in our example it is a reimbursement form) and then we’ll follow it as it makes its way around a fictional organization. Please note that the example we use here is simplistic and was designed only to illustrate the process of developing and deploying an electronic form. Although you can add additional data sources and perform validation and other complex functions in StyleVision, we have not illustrated these here.It is extremely easy to design electronic forms in StyleVision. To start, we simply select New – New from XML Schema/DTD/XML … from the File menu, browse to an XML Schema file, and select the type of design we’d like to create. For this example we created an XML Schema and instance file in XMLSpy, Altova’s XML editor and development environment, based on the fields on the paper reimbursement form. You can also base a StyleVision design on a database or XBRL taxonomy.Below is a copy of the reimbursement form we will be using along with the XML Schema we created.
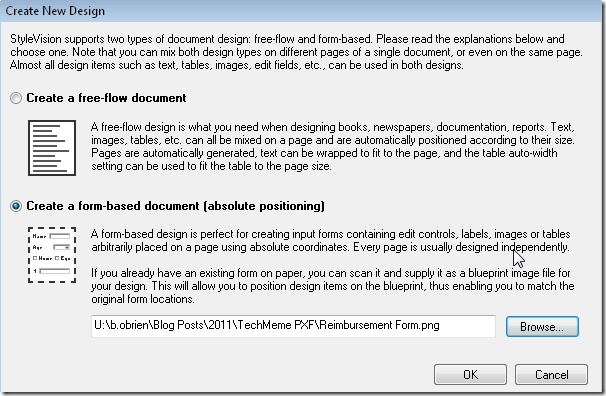
 Once we select the XML file in StyleVision, we are prompted to select either a free-flow or form-based document. In a form-based document all design elements (e.g., text boxes for user input, images, buttons) are fixed in position – ideal for data entry forms.When we create a form-based document, we can upload a “blueprint image” so that we can recreate a paper-based form exactly as it was originally designed. This is the option we’ve selected below. The image will appear in the background of the design window and we will simply place design elements on top of corresponding elements on the form. Of course, the blueprint image overlay does not appear in the final output.
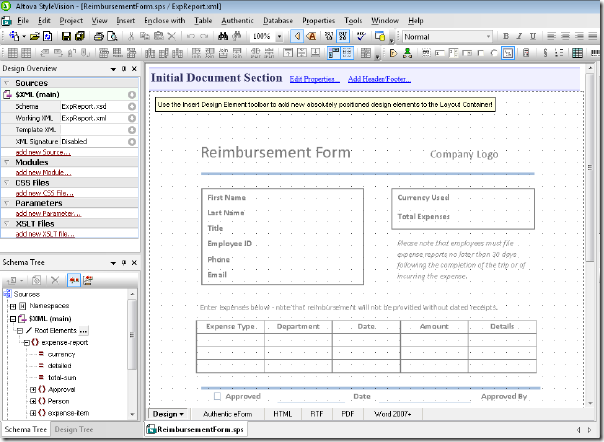
 The screenshot below shows the blueprint image as it appears in the design window in StyleVision – how cool is that?
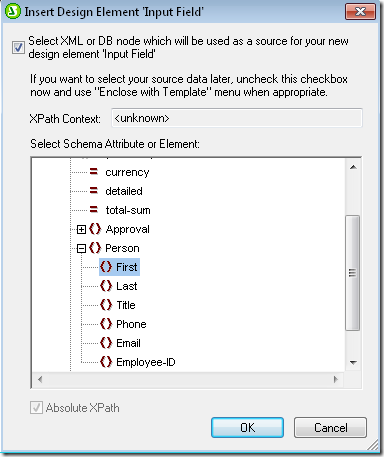
  Now, using the Insert menu at the top, we can simply insert design elements onto the blueprint image in the design window.Available design elements include form controls (e.g., input boxes, combo boxes, radio buttons), images, tables, charts, and “layout containers” for exact positioning.We’ll start by adding input fields to capture employee information (i.e., First [Name], Last [Name], Title, etc. from the top part of the form). Once we click Insert – Insert Form Controls and select Input Field, the Insert Design Element dialog box appears.We have highlighted the First [Name] element in the dialog box below – the input field will now be associated with the First element. This way, when the end user types data into the input field and saves the form, this information will populate the First [Name] element in the XML file.
 We now add design elements throughout the rest of the form, associating input fields with their respective elements from the XML file.When we are finished adding input fields, a logo, lines, a table for the expense items, and labels, the design looks like this – we’ve set the opacity attribute for the blueprint image to 0 to make it easier to view the design elements. Please note also that we’ve done some additional design work such as adding calendars in date fields, drop down boxes, and a currency sign that changes according to user input. For more information about fine tuning your form please see the StyleVision User and Reference Manual in the StyleVision application.
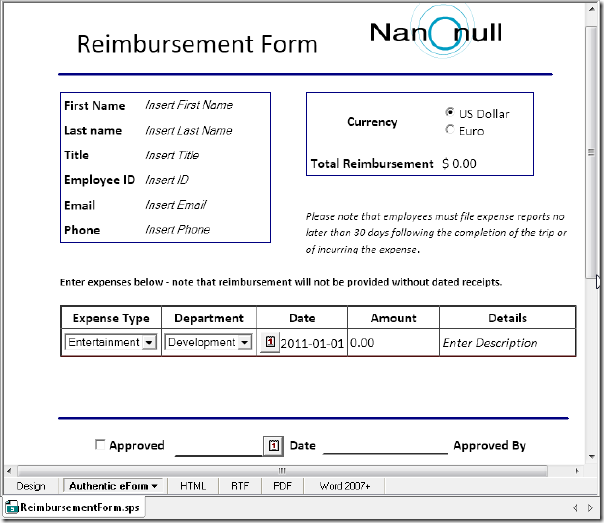
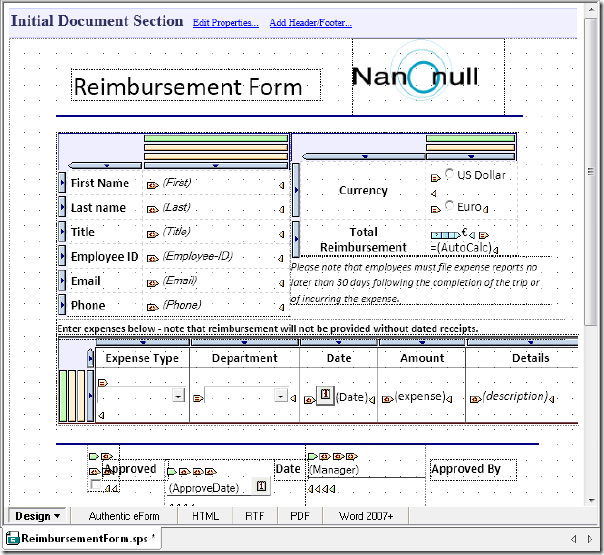 We can preview how the end user will see the form we designed in StyleVision by clicking on the Authentic eForm tab at the bottom of the design window (below). Note that the end user is prompted to enter data directly into each data input field. We accomplished this by placing the prompts (e.g., Insert First Name) in between the relevant tags in the XML file associated with our design. The end user simply highlights the prompt and replaces it with text.
 Once we are finished designing the reimbursement form we can save the entire design – including the XML Schema and instance files, images, and any other associated files – in a single PXF® (Portable XML Form®). Saving the design as a PXF will enable us to email the form along with data updated in the underlying XML form among people both inside and outside the company’s LAN.
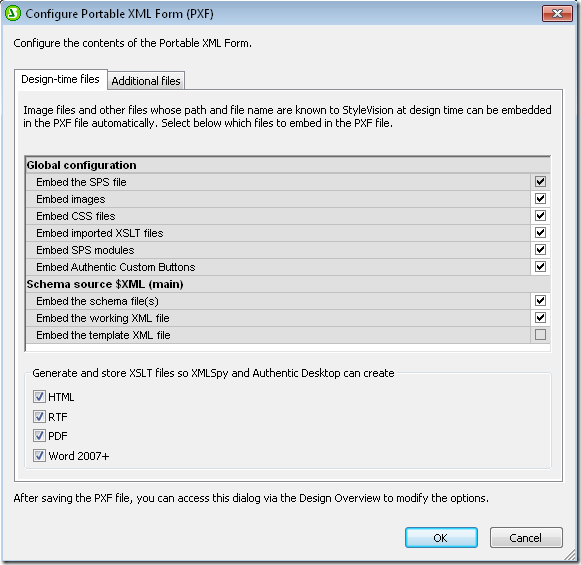
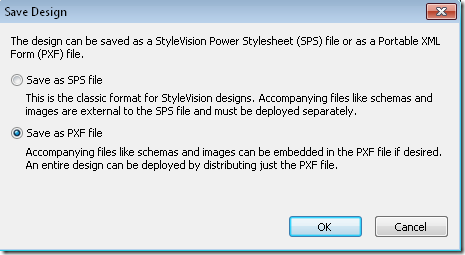 Once we hit OK we are prompted to select the files to include in the PXF. Notice that we’ve selected HTML, RTF, PDF, and Word 2007+ under the Generate and store XSLT files … heading. This will allow an end user to generate the form – with data – in these formats directly from Authentic.
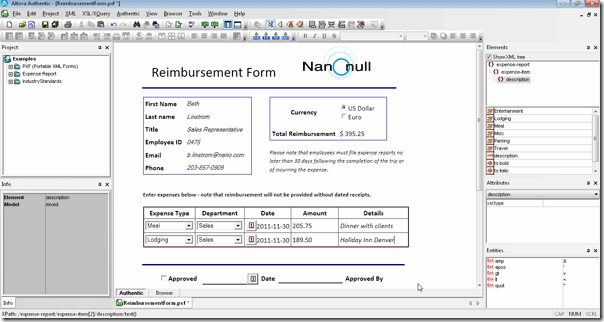
 Now that we’ve saved it in a PXF, the electronic form we designed in StyleVision is ready to be deployed in a business environment.In our example, we have a team of salespeople working across the globe who need to request reimbursement for business and travel expenses incurred. The salespeople complete expense reports, forward them to their managers for approval, and then send approved reports to the corporate office so that the information can be added into the accounting system.The PXF makes this easy.Once a salesperson is ready to complete a reimbursement request, she simply opens the PXF in Authentic and can immediately begin entering information onto the form. Below is a screenshot of a reimbursement form that has been completed in Authentic – notice that the form still needs a manager’s signature.
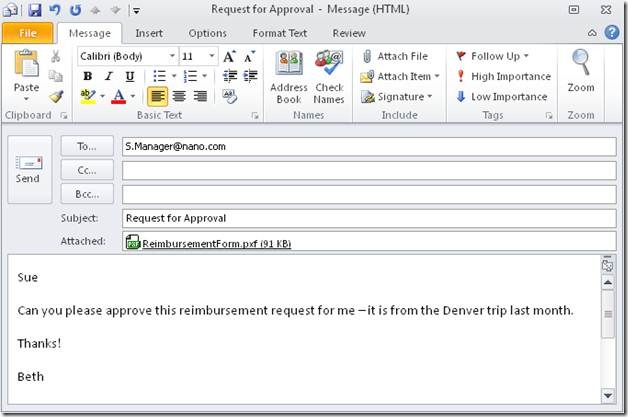
 Now the salesperson must send it to her manager for approval. It’s easy to initiate an email with the form attached directly from Authentic.
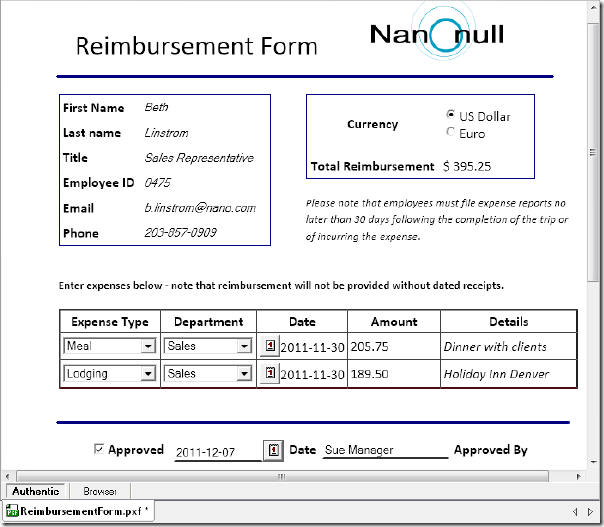
  Once the manager receives the email, she can simply double click the attachment and it will open in Authentic. Here the manager has clicked the Approved check box and added her name and the date.
 The manager can then email the updated PXF back to the salesperson, who in turn emails it to the corporate office so it can be imported into the accounting system for processing. Our fictitious corporate office of course receives hundreds of reimbursement requests each day and has established a process for importing them into the relevant Oracle databases in the accounting system.We’ll use Altova MapForce, a graphical any-to-any data mapping, conversion, and transformation tool, to populate the corporate database with the data from the quotations. After setting up the mapping, we’ll automatically generate code from MapForce so that we can automate the transformation either through batch processing or a real-time conversion.First we’ll set up the mapping.We’ve inserted the XML file ExpRpt which we’ve extracted from the PXF into the left side of the MapForce design window and then inserted the Oracle database on the right side of the design window.Now we can drag and drop fields from the XML file with the reimbursement data into the Oracle database. We can also transform data, as we’ve done with the Approved element. Here we’ve used the built-in boolean function to convert the string value stored in the XML file (“true” or “false”) into the numeric equivalents (1 or 0). We can also create our own functions.The mapping we’ve created appears below.
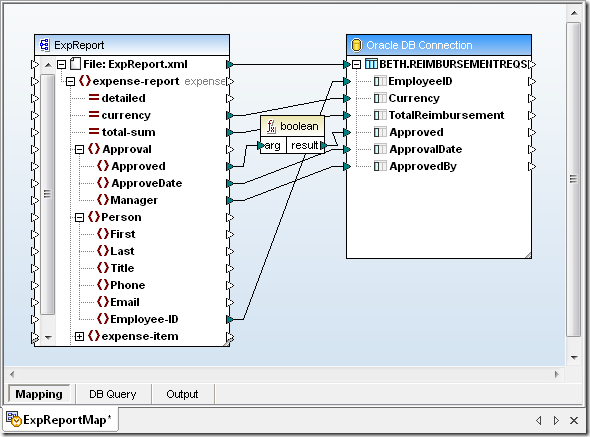 Please note that this post offers a very broad overview of how to use both StyleVision and MapForce. Please visit the online training section of the Altova website for more in-depth instructions on how to use these and other Altova products.And there you have it. With the PXF, the fictitious Nanonull Corporation allows a group of far flung sales reps and their managers to easily exchange and edit information via electronic form. The PXF also provides a way for Nanonull to populate the accounting database without offering these employees direct access to company IT systems. All without busting the IT budget.
What could your organization do with a flexible, portable interactive document? Please share your ideas with other users by commenting on this blog post. Have you used StyleVision or other Altova products in an interesting project and think it would make a great case study? Email us at marketing@altova.com. We’d love to hear from you!
Intuitive User Interface Features
Here at Altova we like to share user interface features across products to give the MissionKit a consistent look and feel, and to help users leverage experience gained using one tool to get up to speed more quickly with the others. In version 2012 we introduced new visual alignment guides in both UModel and MapForce to make it easy to work very rapidly, yet still produce a neat, organized result that communicates effectively with other team members. As users drag elements in the diagram window, alignment snap lines appear automatically to allow any component to align with any other component. In the UModel class diagram shown above, the developer has collapsed the properties and operations compartments to concentrate on class associations. As the CheckingAccount subclass is dragged upwards on the screen, a visual alignment guide appears and offers instant snap-to alignment with the other subclasses of the Account class. Complex data mappings in Altova MapForce might include dozens of components, functions and constants, and visual alignment guides can help organize the mapping view. In the screenshot below, the developer used alignment guides to collect split-name functions together, while concat functions are aligned in a separate group.
  Constructing the mapping diagram this way can greatly clarify the developer’s intent when multiple complex string manipulations are needed! Of course, aligned components also improve the value of printed diagrams that become part of the permanent documentation for UModel and MapForce projects. We also understand that not everyone likes to work the same way. If you prefer not to see guide lines and to turn off automatic alignment, this feature can be deselected in the Tools / Options menu selection in both UModel and MapForce. If you’d like to see for yourself how intuitively tools in the Altova MissionKit 2012 work together, click here to download a free trial!