AI-based support request sentiment analysis using MapForce and GPT-4
Automated sentiment analysis of text, such as user reviews, has historically been a challenge. Because of the myriad intricacies of natural language, systems faced difficulties in analyzing context and nuances. This required an inordinate amount of manual work to overcome.
One of the many useful capabilities of modern AI systems that are based on large language models (LLMs) such as OpenAI’s GPT-4 is that they are very good at sentiment analysis of natural text inputs. We can use that capability to build a very efficient database solution in MapForce that, for example, goes through all the new incoming records in a support database and automatically determines whether a particular support request or other customer feedback is positive, negative, constitutes a bug report, or should be considered as a feature request.

Initial tests with GPT-4 in the OpenAI Playground
If you want to follow along with this blog post, or ultimately want to implement this approach in your own database system, you will need to set up an account with OpenAI and obtain an API key that you can use in your implementation. This will also give you access to the “Playground” on the OpenAI portal, where you can run some initial tests and also get example JSON input that you’ll need to construct the right JSON requests in MapForce.
As always, one of the most important steps when working with a LLM AI system is the development of a proper prompt. You want to be as precise as possible, so that you get the desired outcome. For our purposes, we’re going to work with the prompt:
“Classify the sentiment in the following statement using these possible results: Negative, Positive, Feature Request, Bug Report.”
And this will be followed by the customer feedback that we want to analyze. To test this in the OpenAI Playground, we select Mode=Chat, Model=gpt-4, Temperature=1, Maximum length=512, Top P=1, and we’ll leave both Frequency and Presence penalties at 0. Then we can enter the prompt, enter our first customer feedback comment, and hit the Submit button:
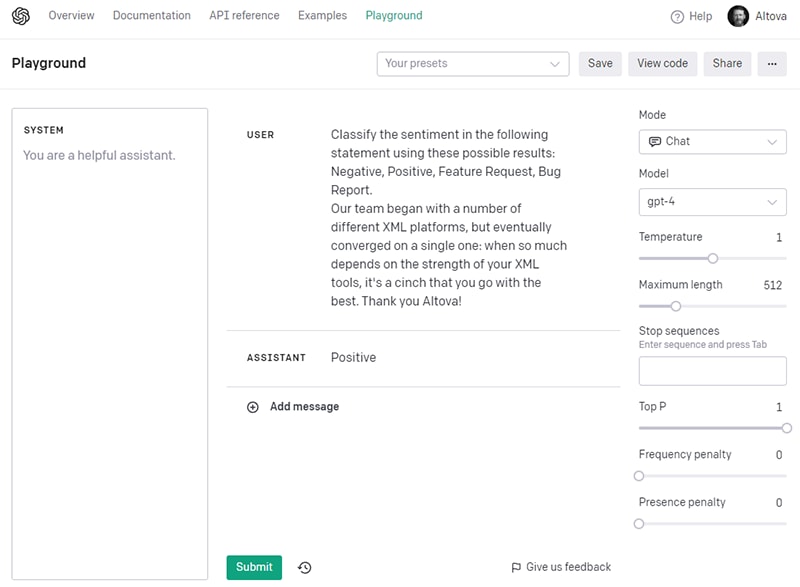
The GPT-4 AI immediately returns “Positive”, which is the correct answer. We can run a few more examples here to validate that our prompt works well in all other cases, too, and that we are getting the expected sentiment results.
Then it is time to look at the JSON request by clicking on the View Code button and switching the language popup from Python (the default) to JSON, then copying the code and pasting it into XMLSpy, so we can review better it in JSON grid view:
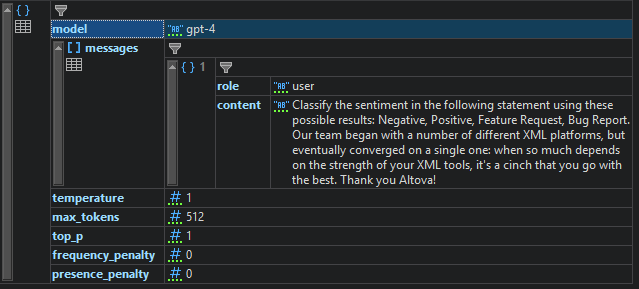
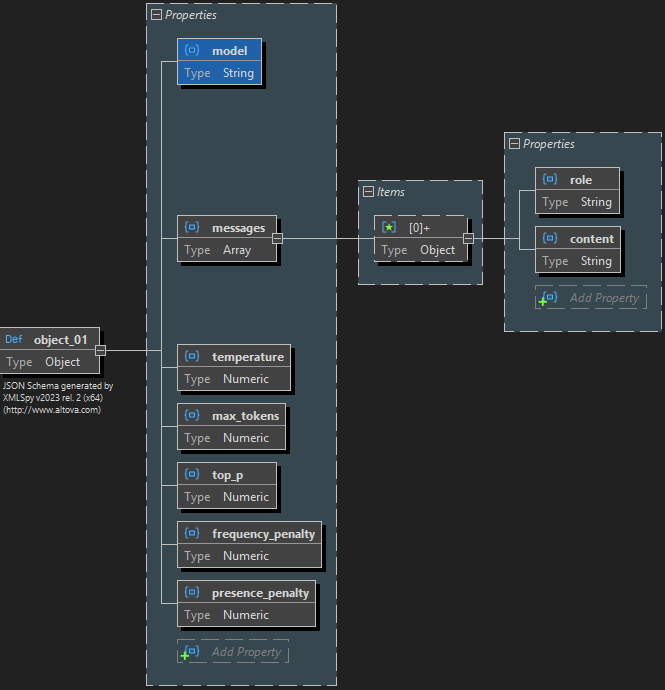
The JSON structure seems pretty straight-forward. This also allows us to immediately auto-generate a JSON Schema from this code, which we will use later to set up the web service request in XMLSpy and MapForce:
OpenAI API Test from XMLSpy
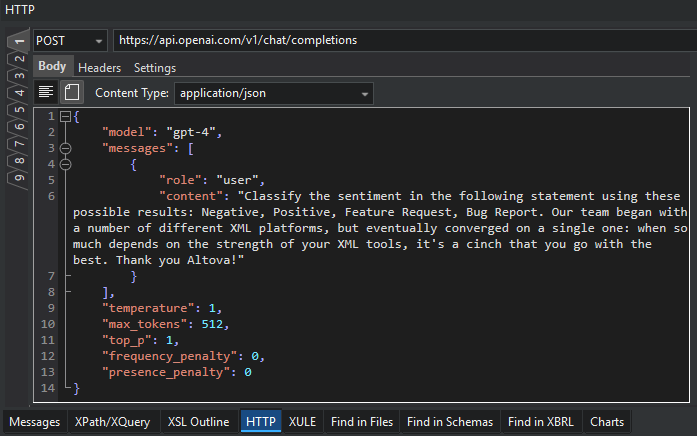
As a next step, we want to make sure we understand the OpenAI chat API correctly and take a look at the resulting JSON output. We’re going to do a manual test run using the handy HTTP test window in XMLSpy, which you can find right below your main working window as a separate tab next to the Messages window.
In the HTTP tab, switch the HTTP Request Method to POST, enter the URL for the OpenAI Chat API endpoint, which is https://api.openai.com/v1/chat/completions, and set the Content Type to application/json. Then paste the example JSON request that we got from the Playground above into the Body section:
Now we need to provide our secret API key in the Headers in order to authenticate our request, so click on the Headers tab and add one row with the header “Authorization” and a value that starts with “Bearer“, followed by a space, followed by the secret API key. If you have multiple accounts with OpenAI and need to ensure correct billing, you can also optionally add a second row with the header “OpenAI-Organization” and the value set to your assigned organization value from OpenAI:
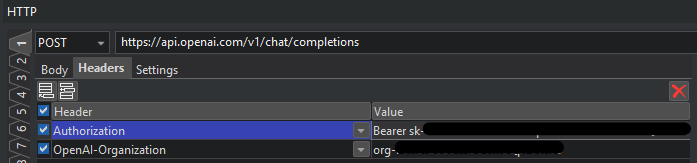
Obviously, we’ve had to obfuscate the exact values of our secret key and organization id in the above screenshot.
Now we’re ready to hit the Send button to send the above HTTP request to the OpenAI API endpoint to see what kind of response we’ll get back:
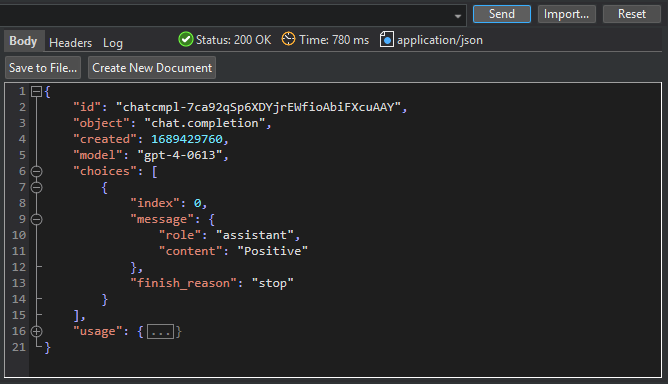
The first good news is we got a 200 OK result back within 780ms and some content of the type application/json, which is our response payload in JSON format, and it contains a message with the answer that the AI “assistant” has provided in the form of the content “Positive”. So we’ve been able to replicate our prior test in the OpenAI Playground nicely from within XMLSpy by sending an actual HTTP request to the API and getting the correct response.
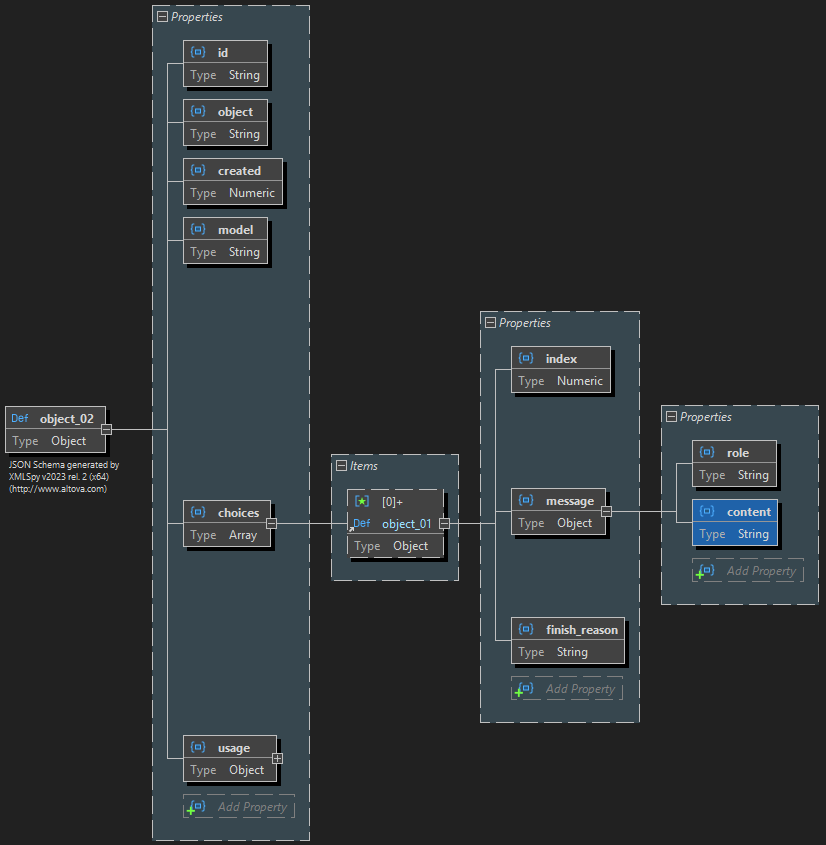
To continue, we’ll save this response into a file using the Save to File button in the HTTP tester window. Then we can open that file and use XMLSpy to automatically create a JSON Schema from the example JSON response message. This time, the schema describes the structure of the expected JSON output from the web service that we will then want to process in MapForce.
Example support database
Most tech support management systems are based on a SQL or other database back-end, so this approach can be easily applied to all of them, but for this blog post example we’ll just use a simplified form of a customer feedback database in SQLite:
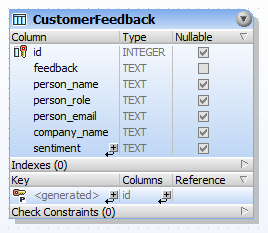
And we have some example data in it that will allow us to run our integration tests in MapForce and determine the sentiment of all these pieces of customer feedback:
![[FeedbackDatabaseData.png]]
Creating the database mapping in MapForce
Now we have all the ingredients ready to create our MapForce transformation or ETL project that will read all the records from the database, call the OpenAI API to get the sentiment analysis, and write the results back into the database.
The first step to design our ETL mapping is to insert our CustomerFeedback database object twice into the mapping – once as input (the extract part of ETL) and then also as the final output, and to connect the main table object as well as the id. MapForce will be so nice to connect all the other columns, too, but we don’t actually need those connections, so you can get rid of them again until you have this design:
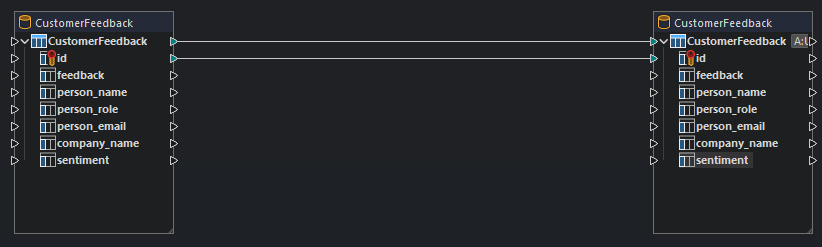
We are leaving a lot of space between input and output, because that’s where we are going to insert our web service call shortly. But before we do that, let’s define exactly our database output database operations (the load part of ETL) by double-clicking the right database object:
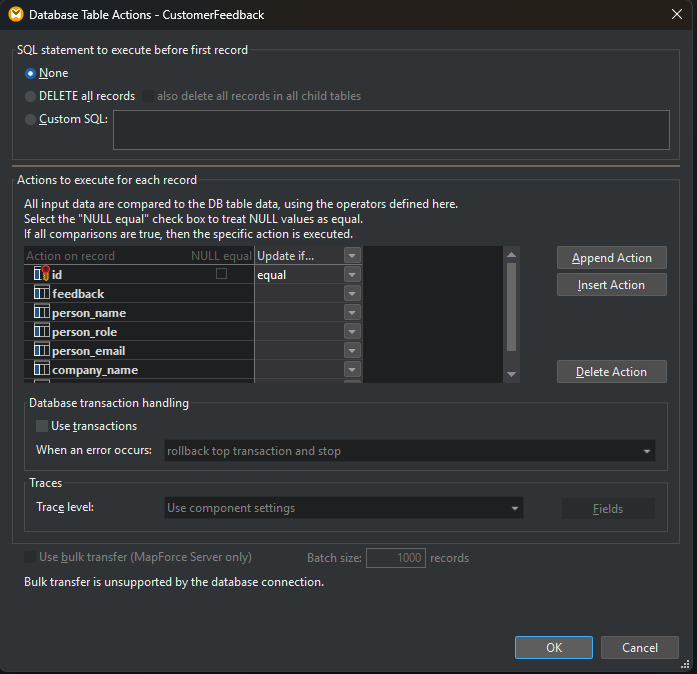
Make sure that the first radio button is set to None, because we don’t want to do anything special before the first record, and then change the column header of the second column to “Update if…” and the combo box in the id row to “equal”. This tells MapForce to update the data in the database for any record where the id provided via the mapping is equal to an id that already exists in the database. That’s all we need to do here, so you can click OK again.
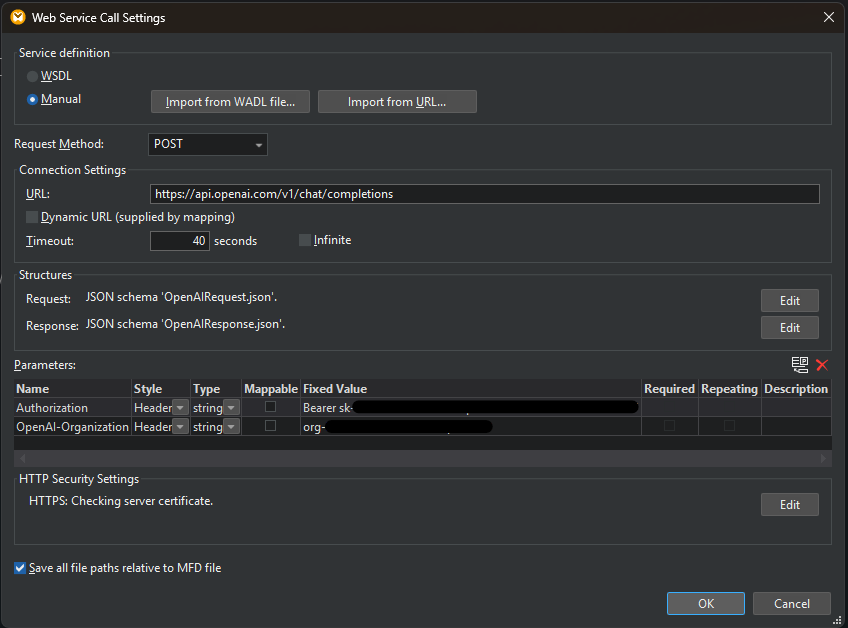
Now it’s time to insert the web service component to call the OpenAI API. Click on the Insert Web Service Function button on the toolbar. Then configure the necessary call settings for the API based on the work we’ve previously done when we were testing the API from XMLSpy.
Just like before, we will need to configure the HTTP request method to be POST and the headers to include our secret API key plus, optionally, our organization id. We will need to tell MapForce what the structure of the request and response payloads is going to be, utilizing the two JSON Schemas we created before:
Once that has been defined, the web service object will appear in the MapForce design pane, and we can start connecting the lines accordingly to wire up the functionality. First, we will want to call the web service once for each record in the CustomerFeedback table, so we connect that to the Request input:
![[InsertWebServiceIntoMapping.png]]
And our output will be provided in the content attribute inside the message returned from the AI, so we connect that to the sentiment column in our output database object.
All that is now left to do is to connect all the other inputs for the web service request to the API, and we can use our example JSON file from above to know exactly what inputs are required. Many of those are going to be constants, such as “gpt-4” for the model and various values for the other parameters.
The most important input is the prompt plus the feedback from the database, so we are concatenating those before feeding them into the content input on the web service:
![[FinalMapping.png]]
Normally, this is where we would be done with designing our ETL mapping and could now execute our transformation. However, because GPT-4 is the most advanced model and a lot of people are using it, OpenAI has implemented rate-limits for the number of web service requests you can send per minute, and we would easily exceed those if we ran this transformation right now.
Therefore, we need to add a little sleep(1) function between our calls to the OpenAI web service interface to separate our calls by about 1 second. We can easily do that via the new built-in sleep() function available in MapForce v2024:
![[MF-Sentiment-Analysis-With-Sleep.png]]
The Output preview tab in MapForce is where you can now see the result of this transformation. Once you click the tab, MapForce will execute the ETL mapping project and produce the necessary SQL statements that would update your database accordingly with the results from the sentiment analysis performed by the AI:
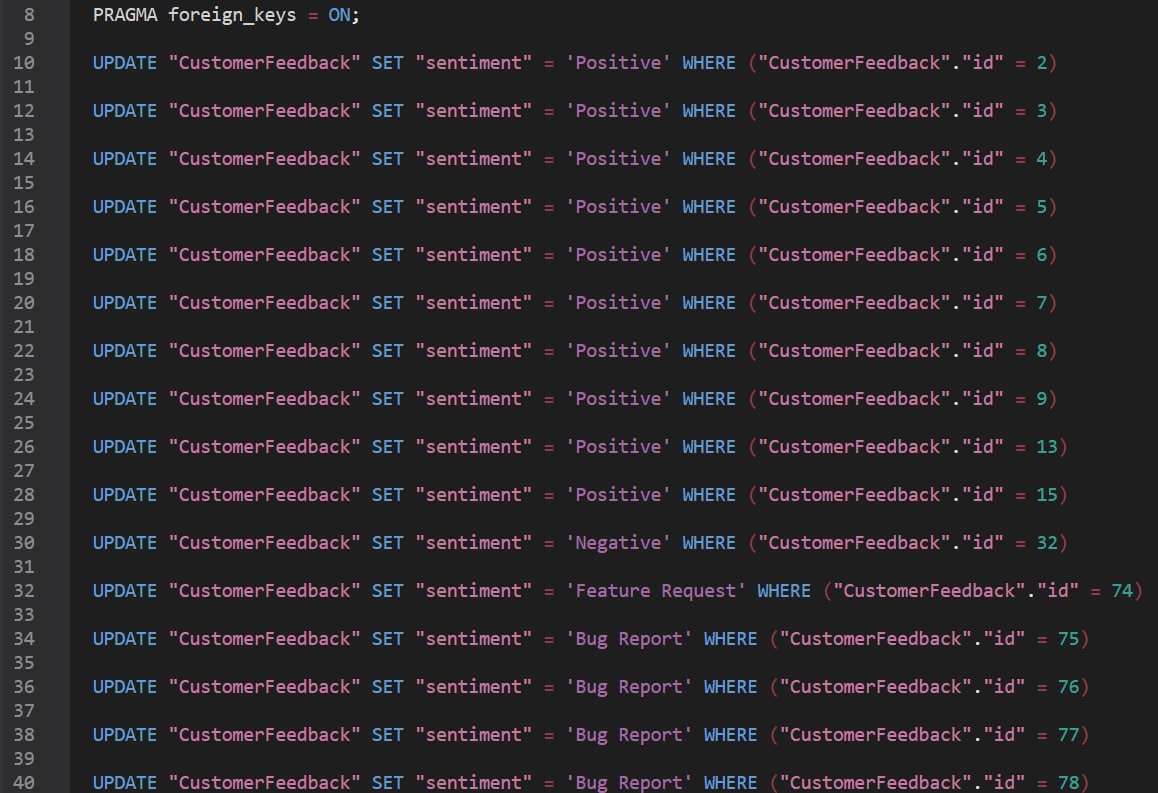
And you can now execute this SQL code directly from MapForce to actually update the data in your database.
Of course, in a real-world implementation, you would want to automate this process further so that new incoming support requests are automatically analyzed. You can do that easily by deploying this ETL mapping project to a MapForce Server instance in either your in-house IT infrastructure or in your private or public cloud. Then you can automate the workflow requirements, i.e., when to run this analysis based on certain triggers or events, using FlowForce Server.
By the way, all the screenshots from XMLSpy and MapForce in this blog post were taken while using the new Dark Theme, because that’s my personal preference, but you can, of course, use our products in the new Light Theme as well as in the Classic Theme, based on your personal taste.
To try an AI-based data transformation in MapForce or to experiment with any AI web service APIs in XMLSpy, you can download a free 30-day trial of both products and several other useful developer tools by downloading the latest Altova MissionKit from our website. We recommend using the 64-bit version of the Enterprise Edition for all AI-related work.